This King X barn door farmhouse bed is sponsored by The Home Depot. I have been compensated for my time and provided with product (tools). All ideas and opinions are my own. This post contains some affiliate links for your convenience. Click here to read my full disclosure policy.
After having my youngest child, and being a bit older ;-), my back started to really hurt. Usually it would just hurt in the morning until I got going, so I figured it had something to do with my mattress being a bit older too. Putting it off for a few years, I finally bit the bullet and bought a new mattress. We also upgraded to a King size mattress, which I’ve wanted to do for years! New mattress size = new bed frame to build, wahoo!
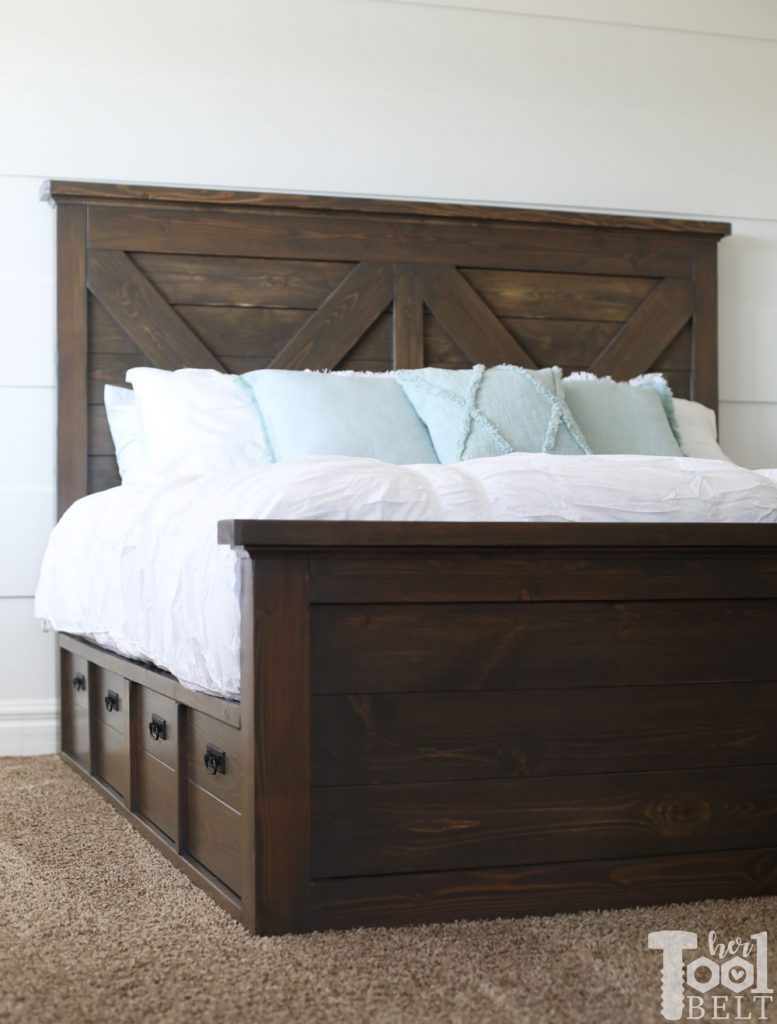
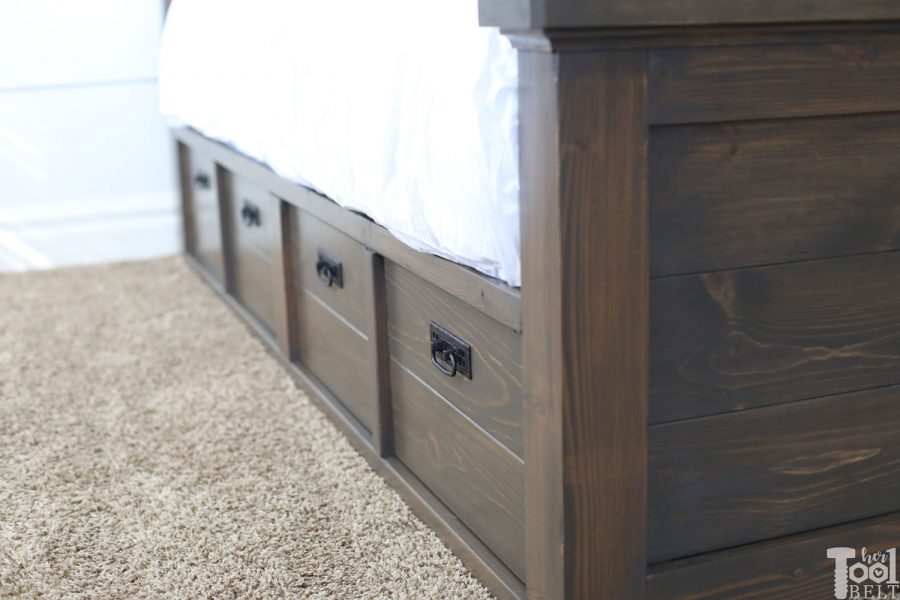
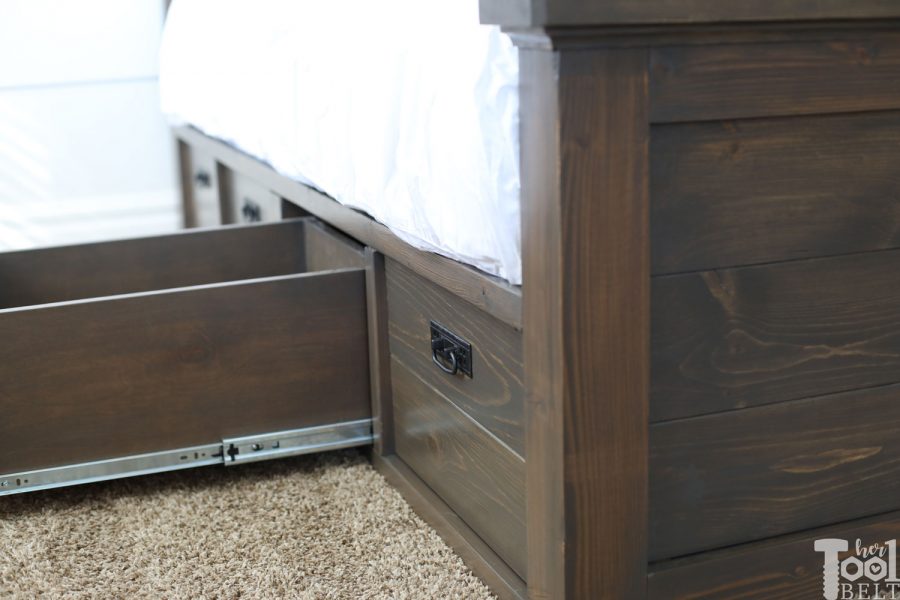
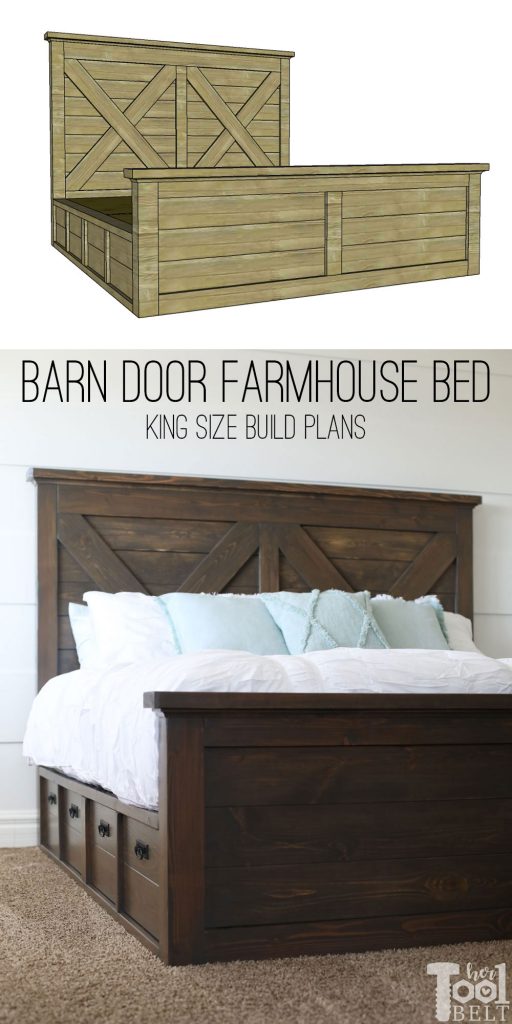
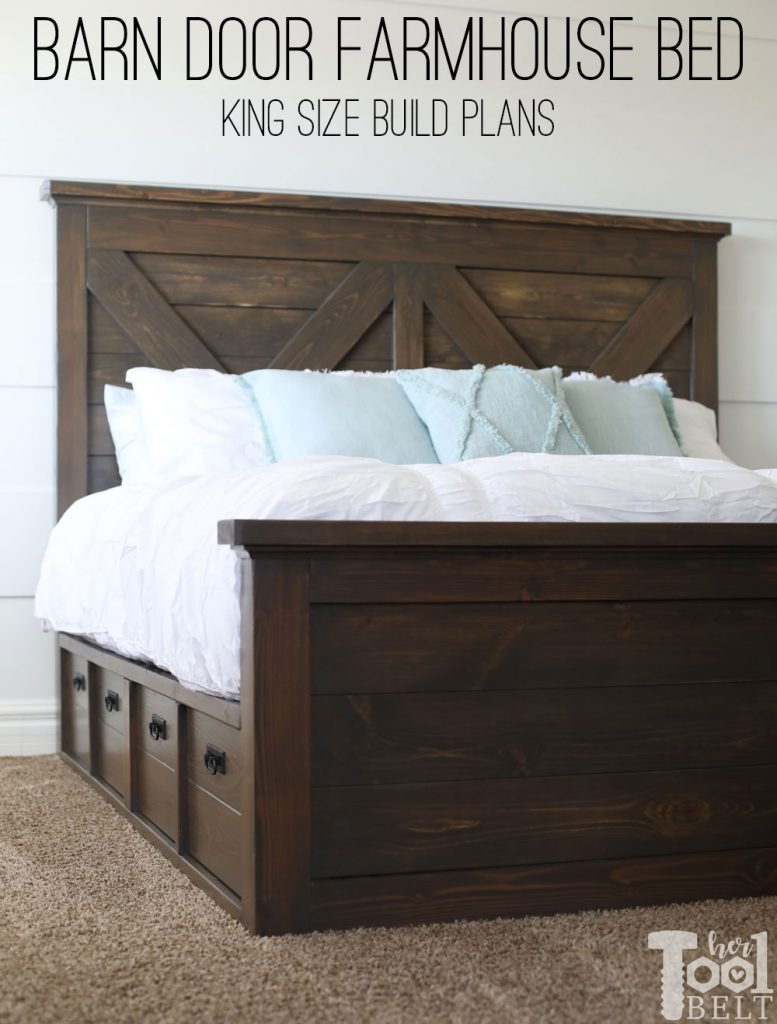
I really like the plank look of farmhouse beds especially with the barn door X accent like this one and this one, Ourfauxfarmhouse has a cute rendition too. We always find ourselves low on storage and space at our house, so I wanted to make the base of the bed have pull out drawers. A little secret on the ‘drawer’ at the head of the bed, it’s fake, since we’ll have nightstands at the side of the bed. (Plans for the coordinating –> Farmhouse X nightstand). Each side of the bed has 3 drawers that are 22″ deep, yay for storage!
Other Plans:
How to Build a King X Barn Door Farmhouse Bed
Materials
- 1 – 4 x 4 x 10′ post (actual 3 1/2″ x 3 1/2″)
- 1 – 4 x 4 x 8′ post (actual 3 1/2″ x 3 1/2″)
- 4 – 2 x 6 x 8′ boards (actual 1 1/2″ x 5 1/2″)
- 13 – 2 x 4 x 8′ boards (actual 1 1/2″ x 3 1/2″)
- 12 – 1 x 6 x 6′ boards (actual 3/4″ x 5 1/2″)
- 4 – 1 x 6 x 8′ boards (actual 3/4″ x 5 1/2″)
- 1 – 1 x 4 x 8′ boards (actual 3/4″ x 3 1/2″)
- 2 – 8′ pieces of cove molding
- 2 – 3/4″ x 4 x 8 sheets of plywood (drawers)
- 6 sets of 22″ drawer slides
- 8 drawer pulls
- 13 – 1 x 4 x 8′ for bed slats or 1 sheets of 3/4″ plywood + left over from drawer sheet
- 2 1/2″ pocket hole screws
- 1 1/4″ pocket hole screws
- 1 1/4″ brad nails or pin nails
- sandpaper
- wood glue
- wood putty
- stain – Varathane Briarsmoke
- top coat – Varathane polyurethane
Tools Used
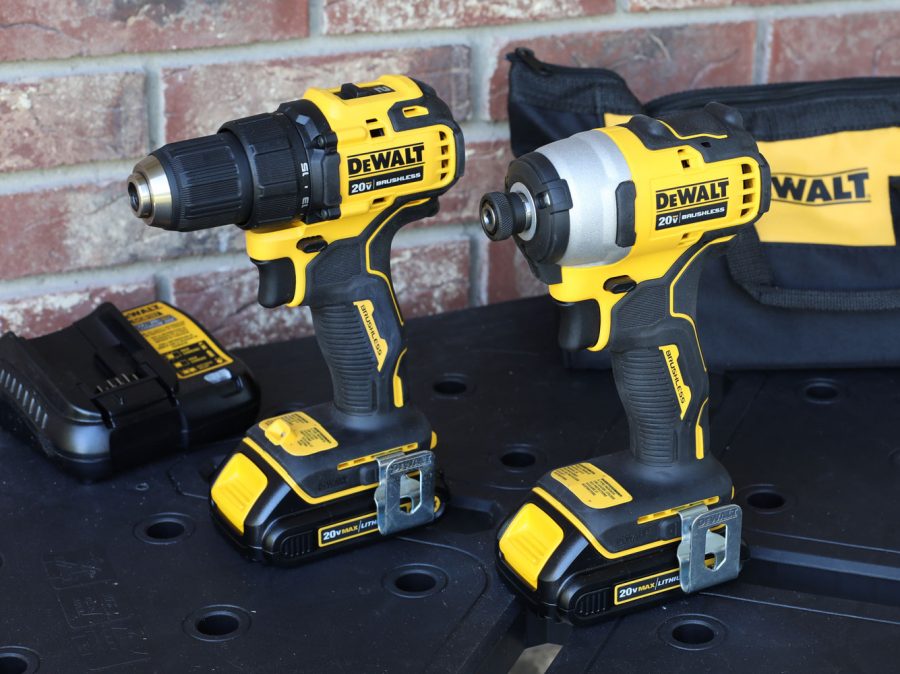
- DeWALT Atomic Drill/Driver kit
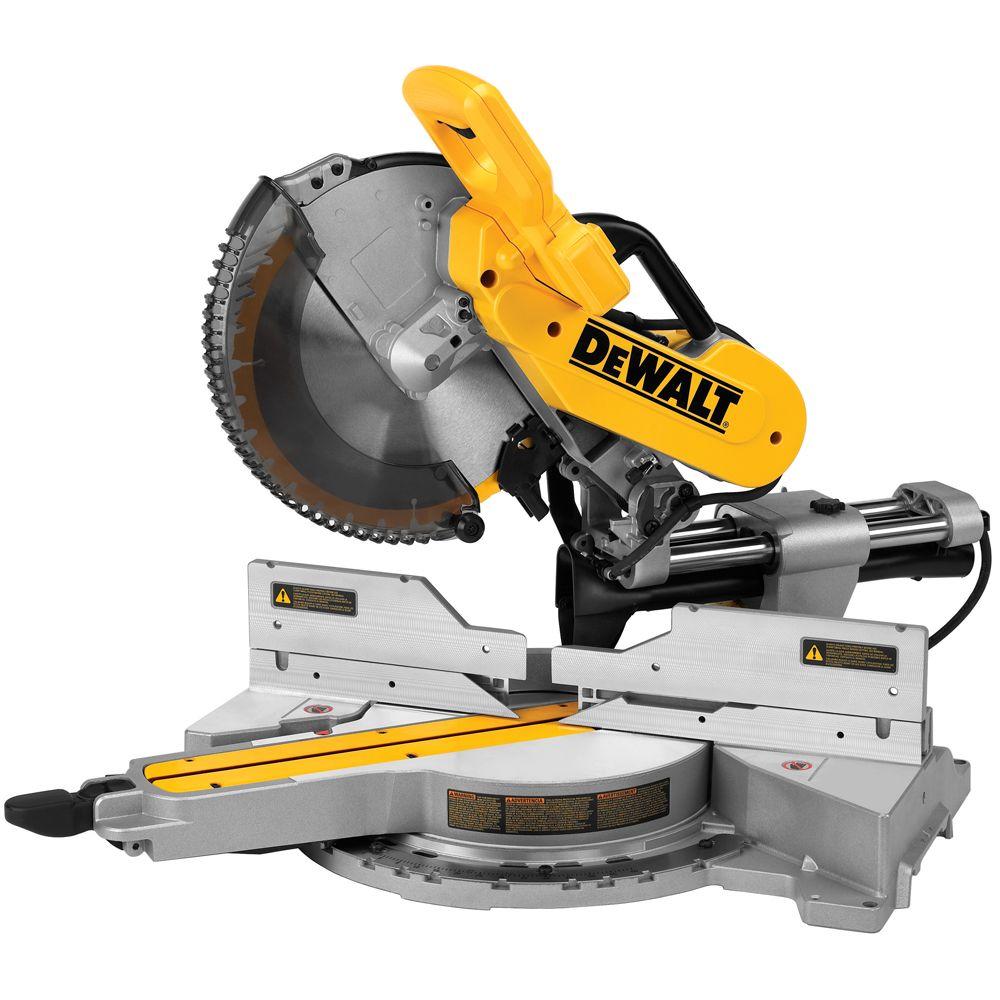
- DeWALT Miter Saw
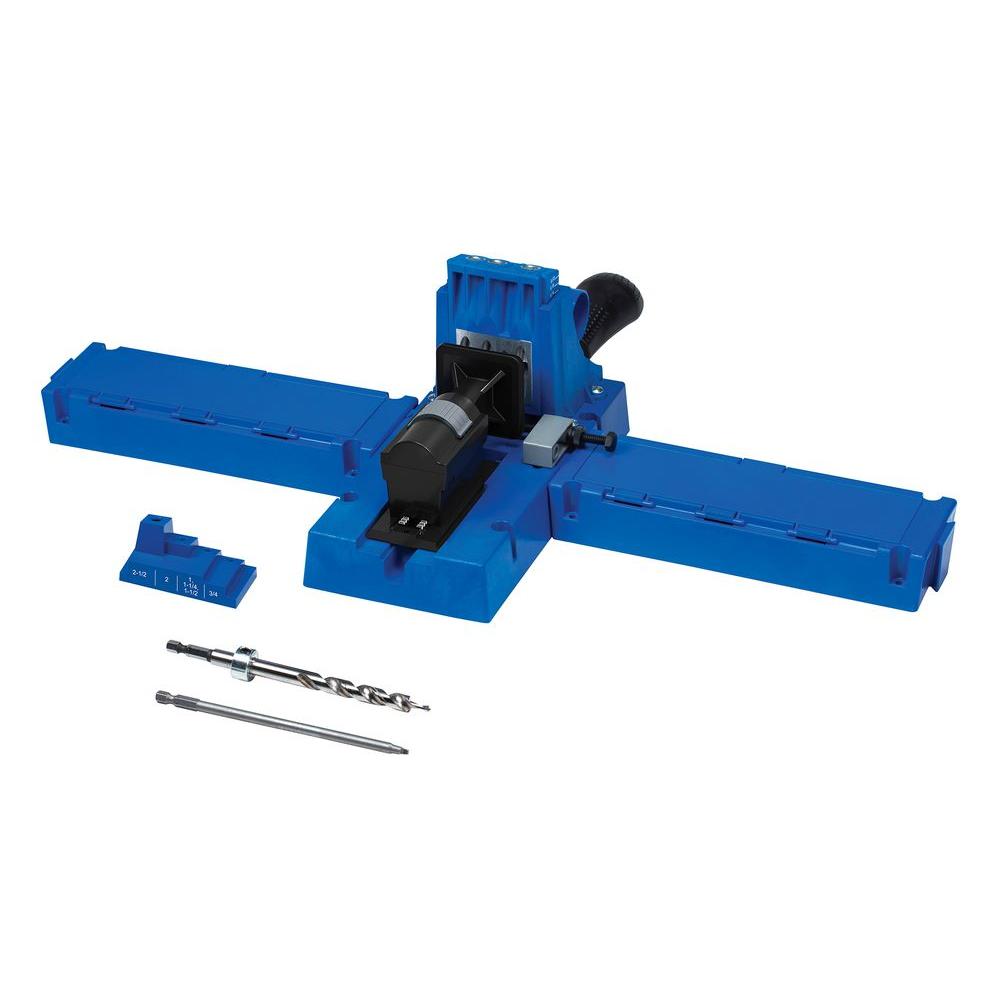
- Kreg Pocket hole jig
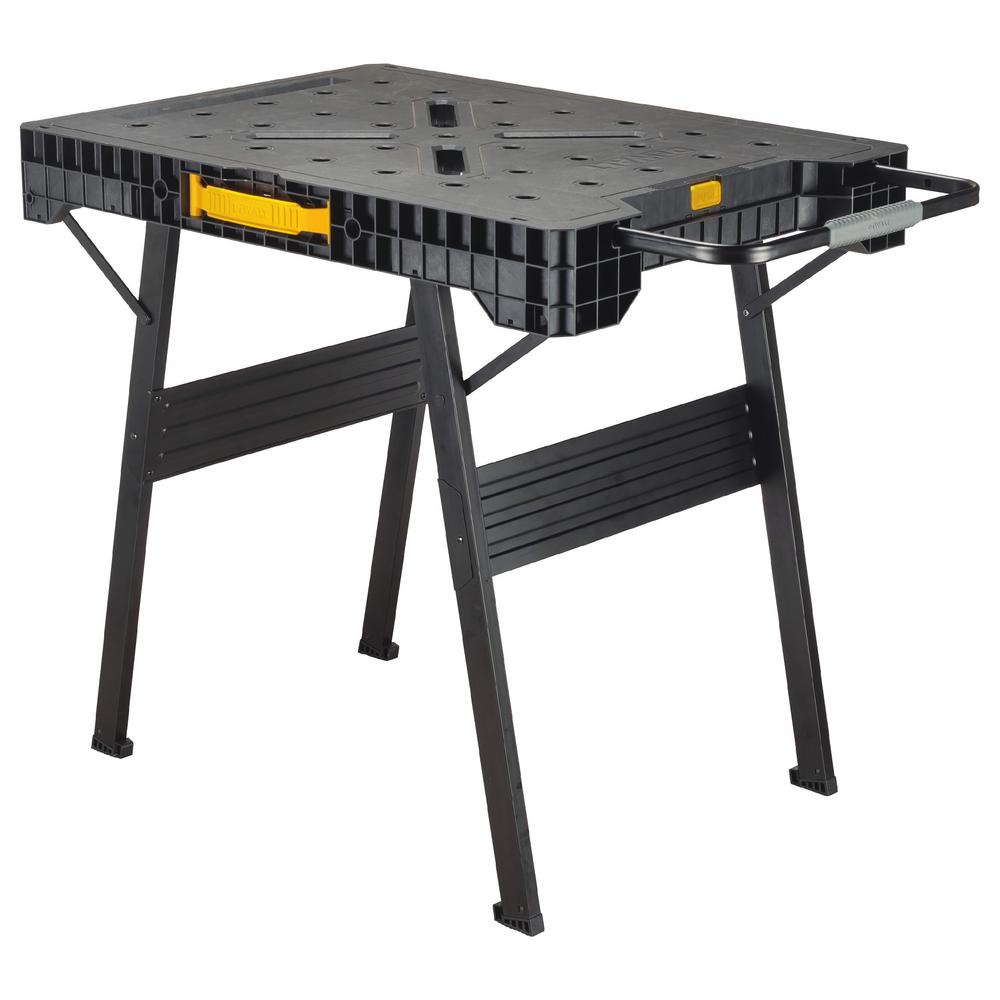
- DeWALT Portable Workbench
- DeWALT Sander
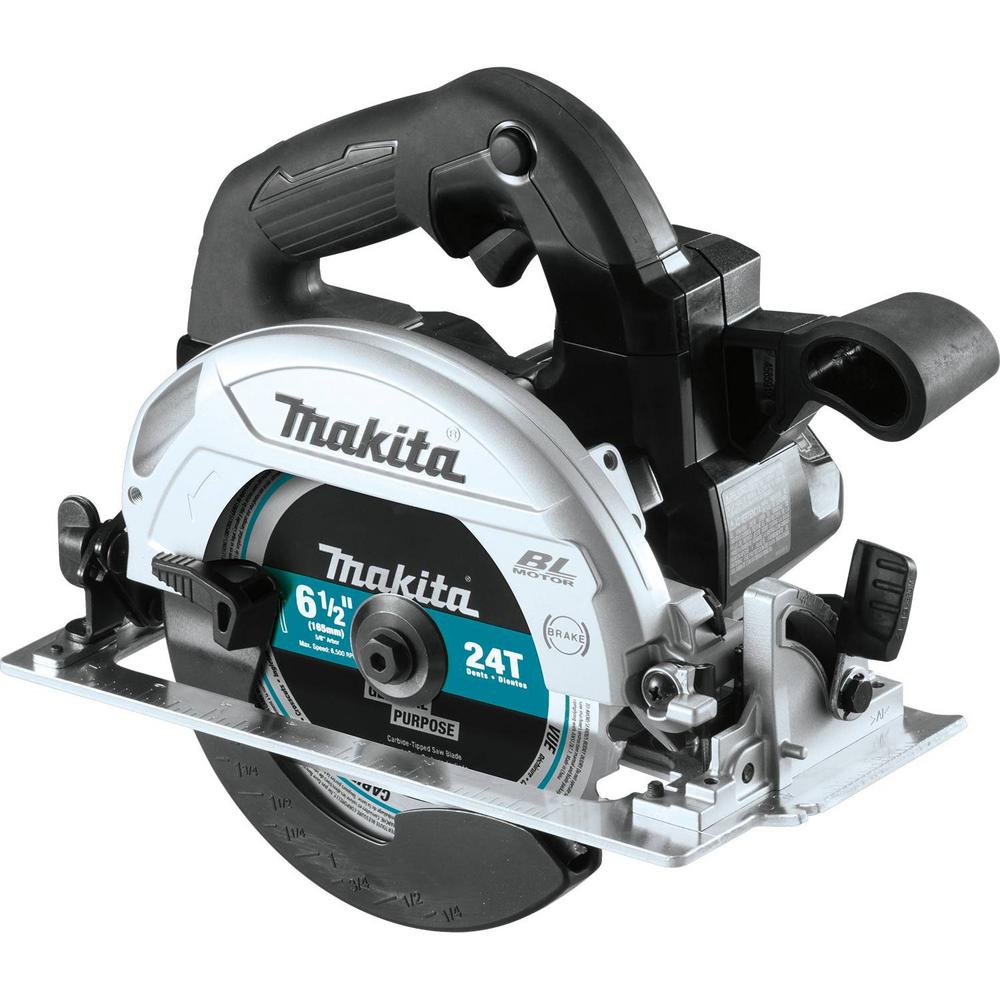
- Circular Saw or Table Saw
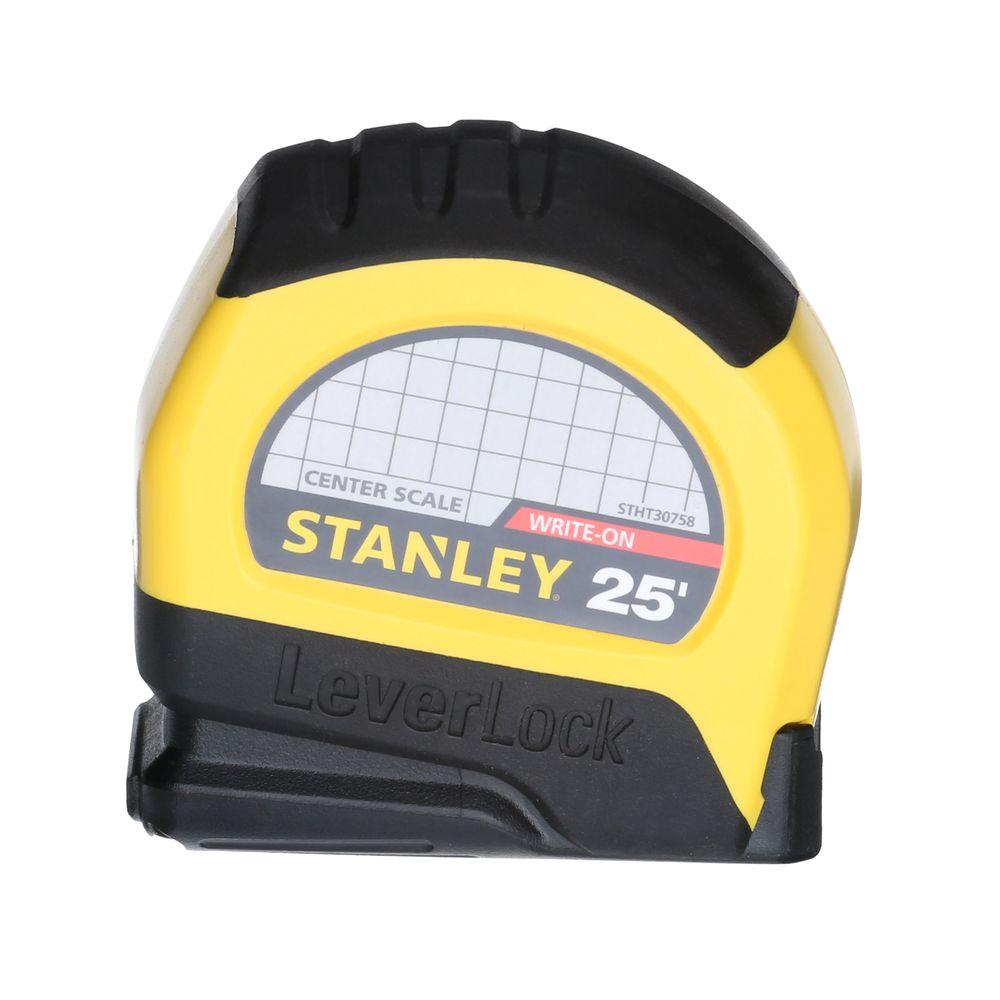
- Tape Measure
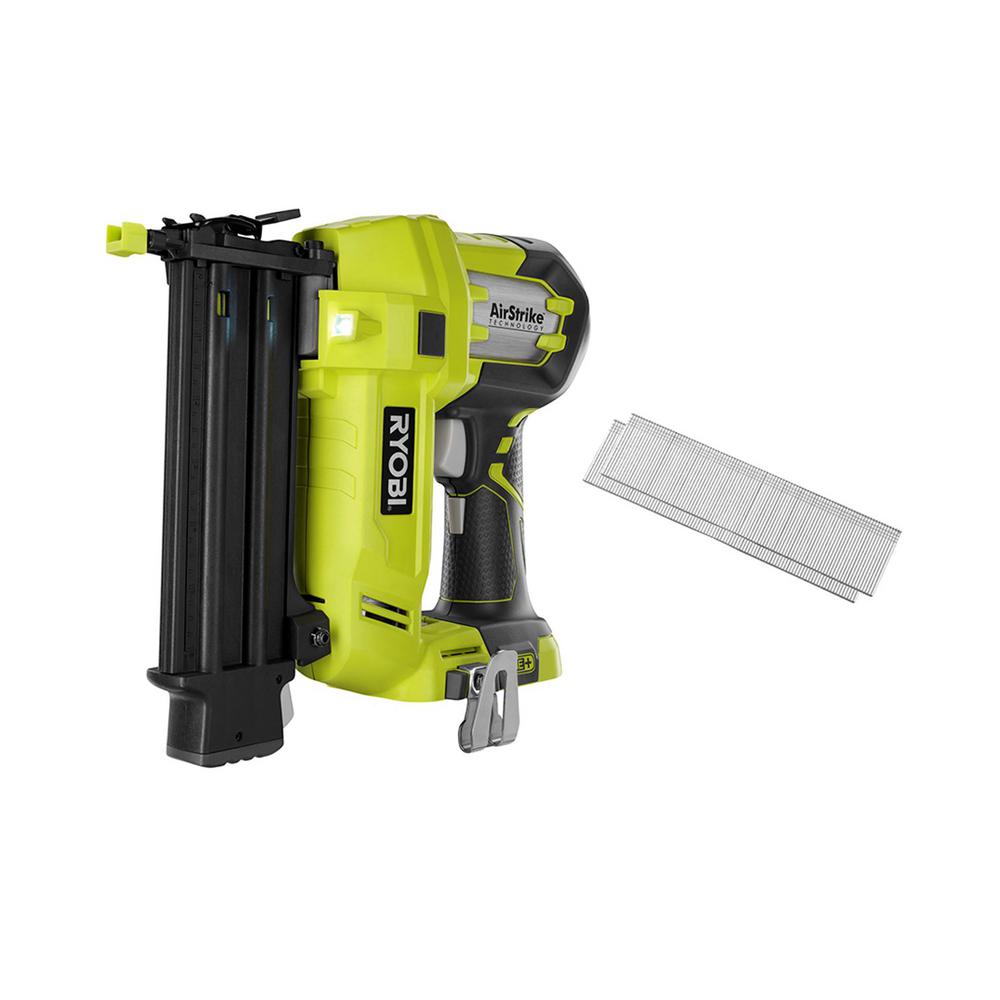
- Brad or Pin Nailer
 |
 |
 |
 |
 |
 |
 |
 |
Cut List
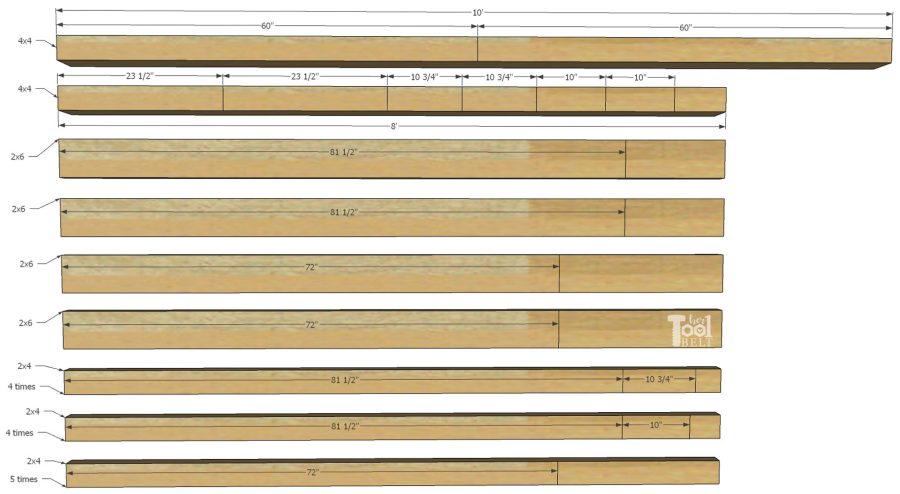
- 2 – 3 1/2″ x 3 1/2″ x 60″ (4×4) – headboard legs
- 2 – 3 1/2″ x 3 1/2″ x 23 1/2″ (4×4) – foot board legs
- 2 – 3 1/2″ x 3 1/2″ x 10 3/4″ (4×4) – outside storage base supports lg
- 2 – 3 1/2″ x 3 1/2″ x 10″ (4×4) – inner storage base supports lg
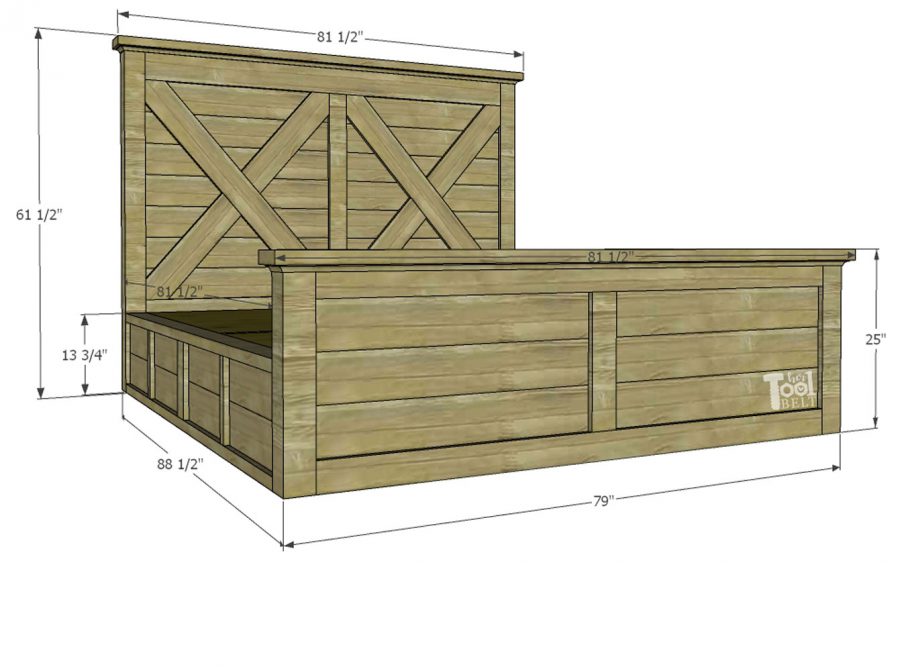
- 2 – 1 1/2″ x 5 1/2″ x 81 1/2″ (2×6) – headboard or foot board top (I trimmed mine down to 5″ wide, not required just personal preference)
- 2 – 1 1/2″ x 5 1/2″ x 72″ (2×6) – headboard frame
- 8 – 1 1/2″ x 3 1/2″ x 81 1/2″ (2×4) – storage base runners
- 4 – 1 1/2″ x 3 1/2″ x 10 3/4″ (2×4) – outside storage base supports sm
- 4 – 1 1/2″ x 3 1/2″ x 10″ (2×4) – inner storage base supports sm
- 5 – 1 1/2″ x 3 1/2″ x 72″ (2×4) – foot board frame/storage attach
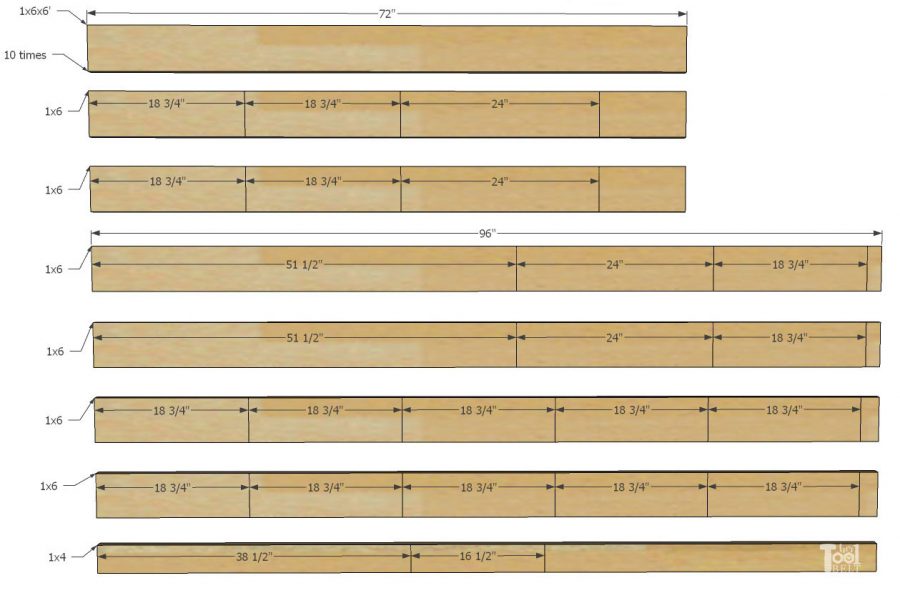
- 10 – 3/4″ x 5 1/2″ x 72″ (1×6) – head and foot board planks
- 2 – 3/4″ x 5 1/2″ x 51 1/2″ (1×6) – long X
- 4 – 3/4″ x 5 1/2″ x 24″ (1×6) – short X
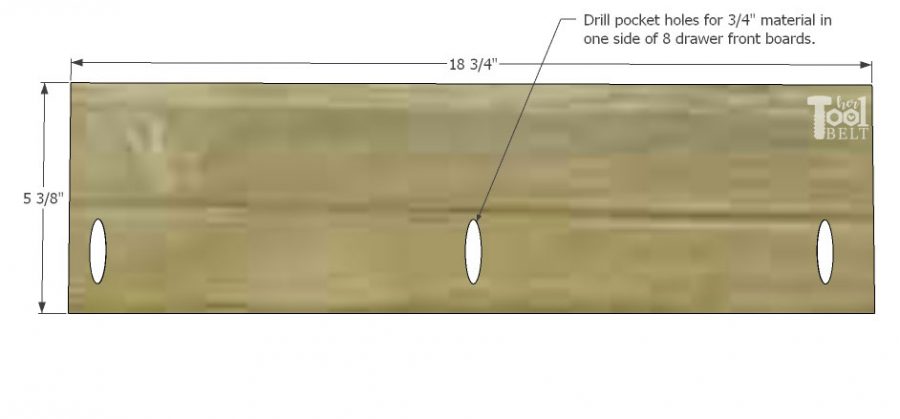
- 8 – 3/4″ x 5 1/2″ x 18 3/4″ (1×6) – drawer fronts
- 1 – 3/4″ x 3 1/2″ x 38 1/2″ (1×4) – headboard center
- 1 – 3/4″ x 3 1/2″ x 16 1/2″ (1×4) – foot board center
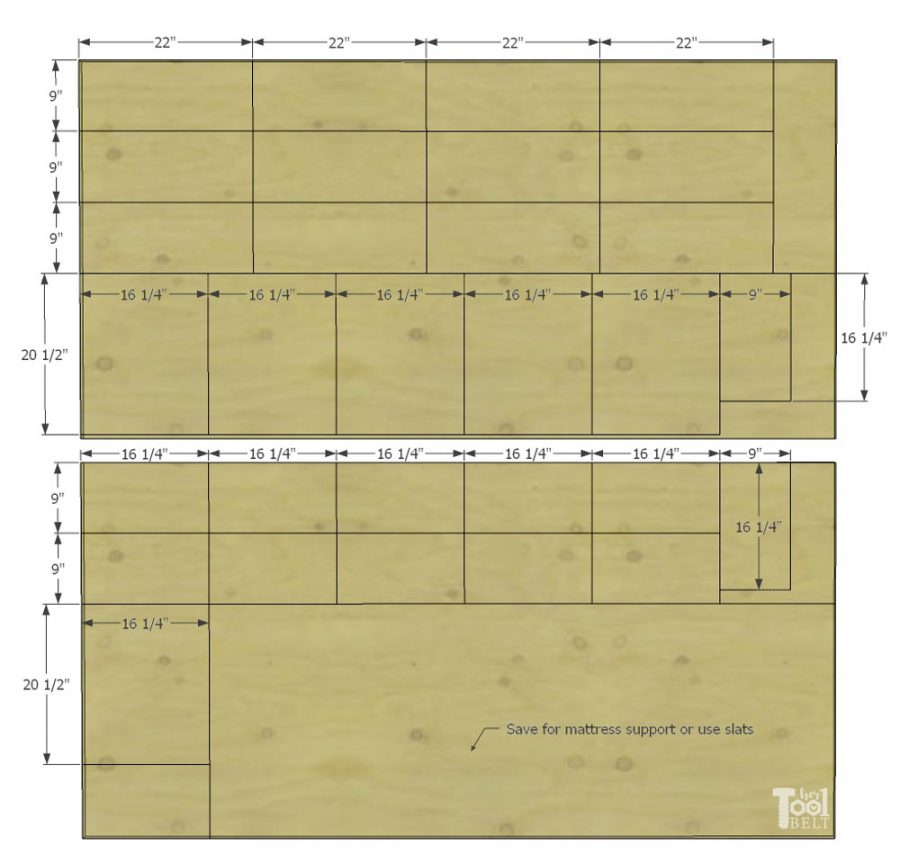
- 12 – 3/4″ x 9″ x 22″ (plywood) – drawer sides
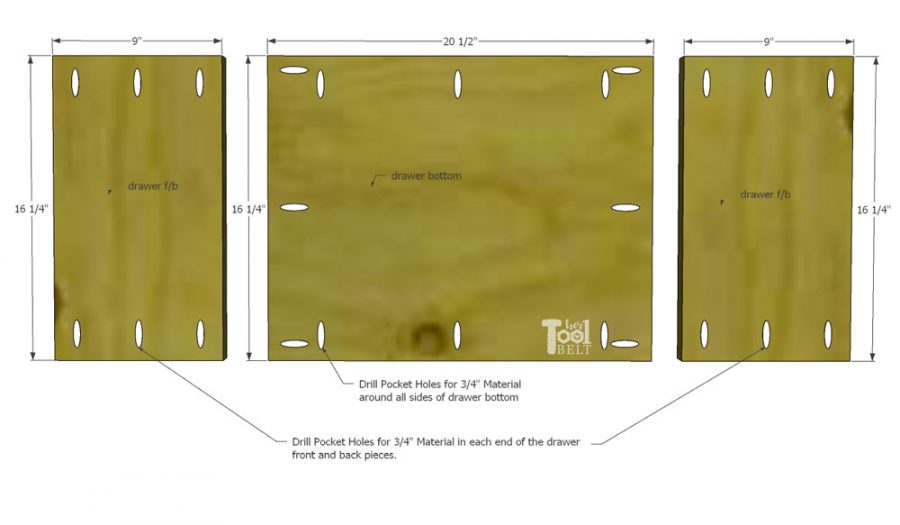
- 12 – 3/4″ x 9″ x 16 1/4″ (plywood) – drawer front and back
- 6 – 3/4″ x 16 1/4″ x 20 1/2″ (plywood) – drawer bottom
Cut Diagram
Boards
Plywood
Step 1 – Cut boards
Cut the boards according to the cut list and cut diagram.
Step 2 – Drill pocket holes
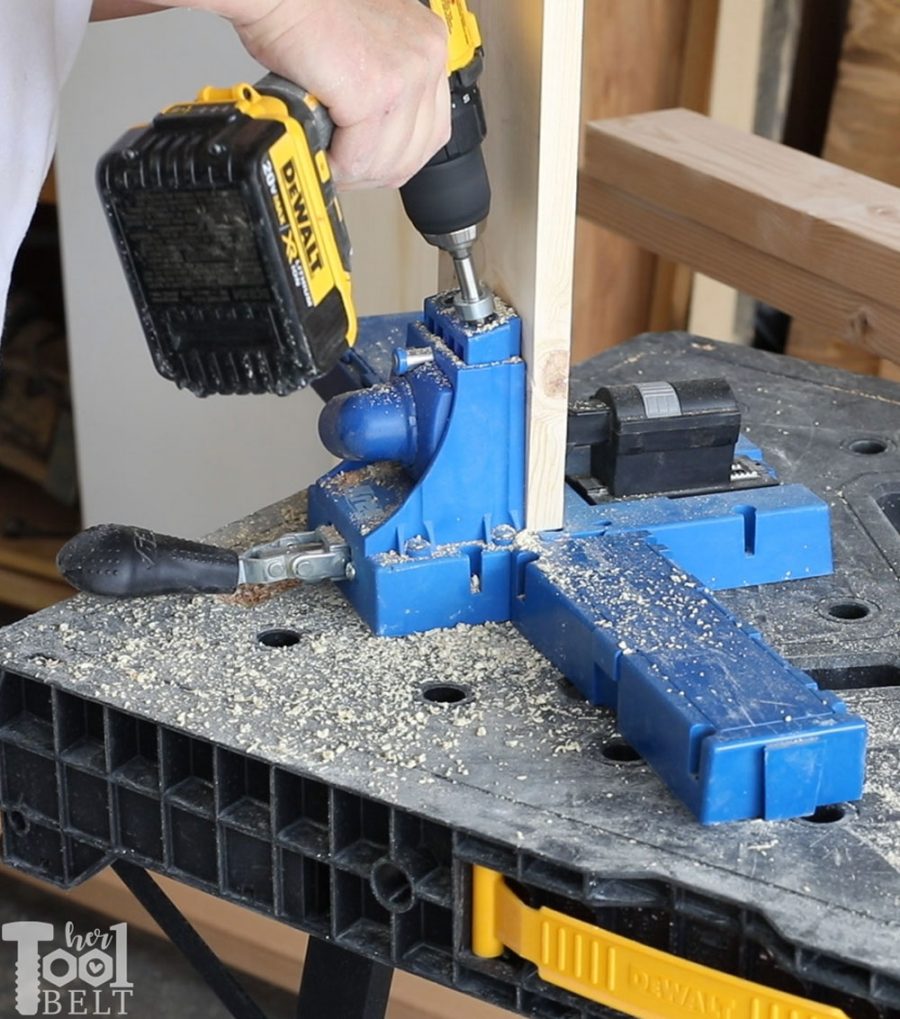
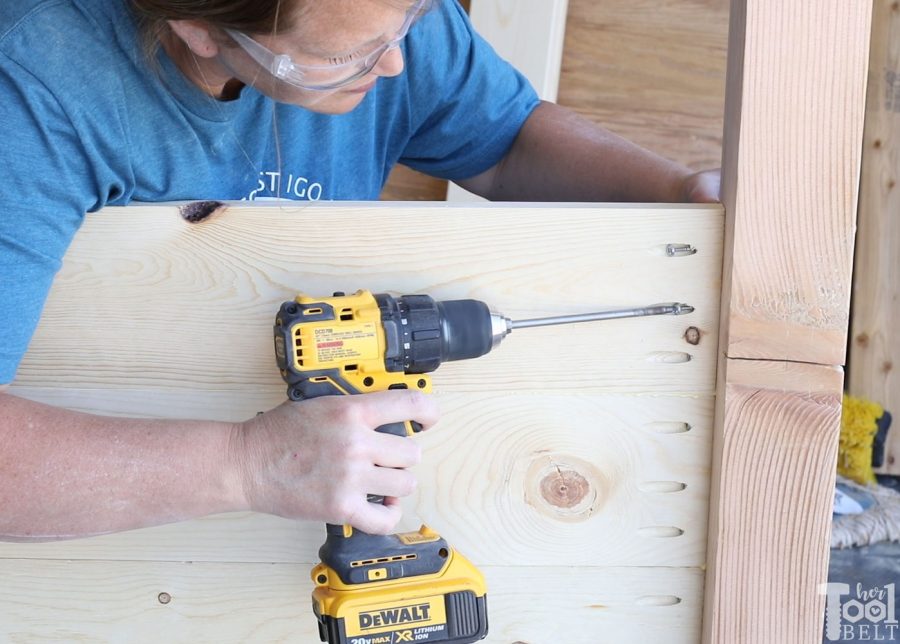
This barn door farmhouse bed uses pocket holes to join the wood together. I use the K5, but any of the pocket hole jigs should work.
I have been using this super handy DeWALT portable workbench too. It is a lightweight and sturdy little workbench with lots of clamping holes. The workbench folds up with the push of a button and lever arm. So great for projects that you don’t have a dedicated space.
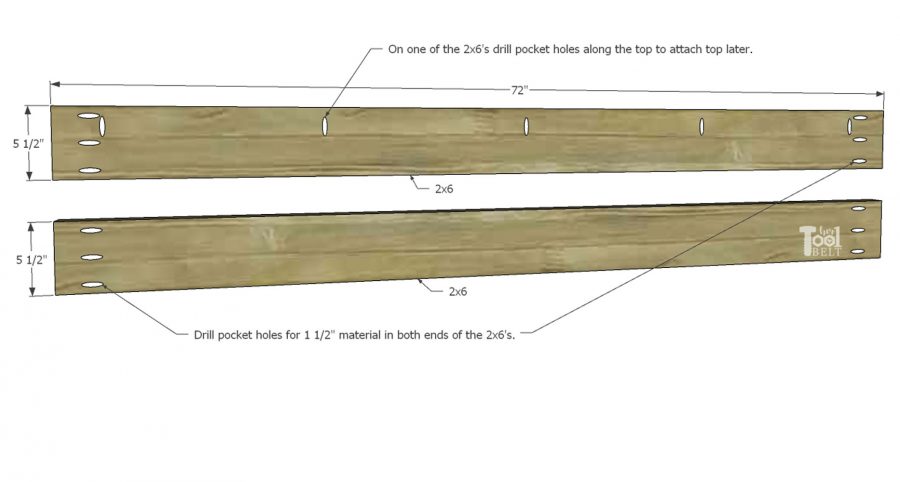
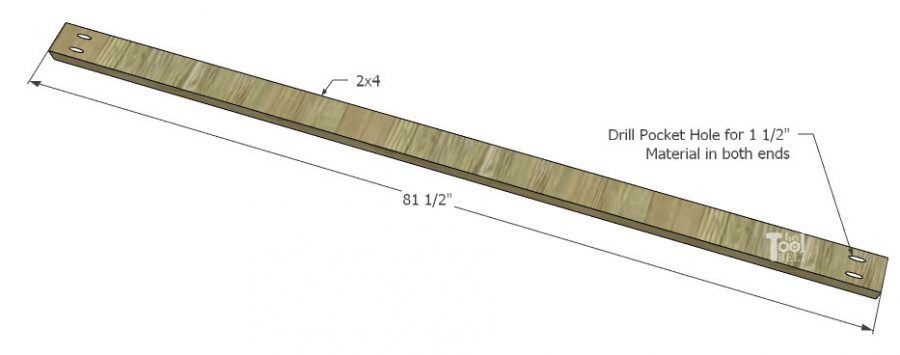
In the (2×6) x 72″ headboard frame boards, drill pocket holes for 1 1/2″ material in both ends. In one of the boards, drill pocket holes along the top side.
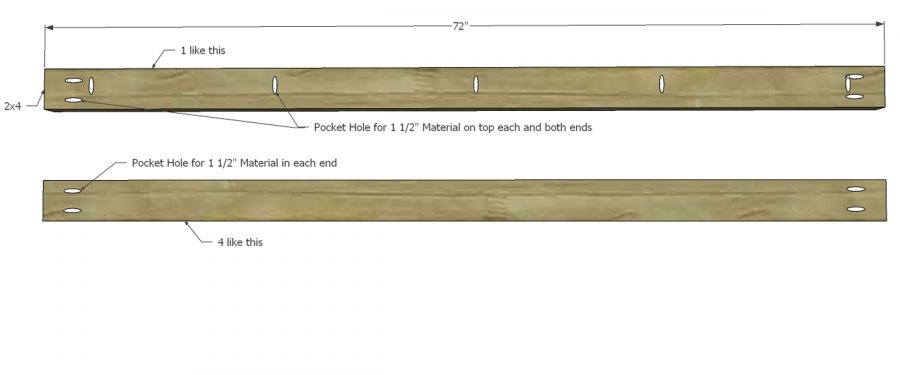
 In the 5 (2×4) x 72″ foot board frame/base attach boards, drill pocket holes for 1 1/2″ material in both ends. In one of the boards, drill pocket holes along the top side.
 In the 8 (2×4) x 81 1/2″ base runners, drill pocket holes for 1 1/2″ material in both ends.
In the (1×6) x 72″ headboard frame boards, drill pocket holes for 3/4″ material in both ends. In 6 of the boards, drill pocket holes along the top and bottom sides.
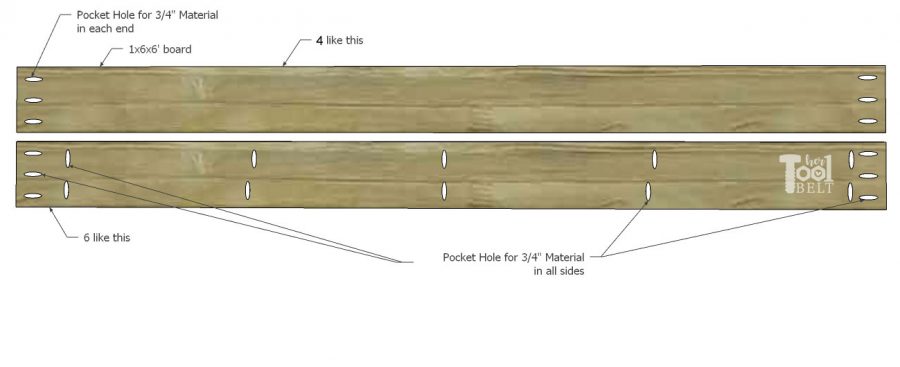 In the 12 drawer front/back pieces (9″ x 16 1/4″) drill pocket holes for 3/4″ material in both ends. In the 6 drawer bottoms (16 1/4″ x 20 1/2″) drill pocket holes for 3/4″ material in all sides.
Drill pocket holes for 3/4″ material in one side of 8 drawer front boards.
Step 3 – Assemble Foot Board
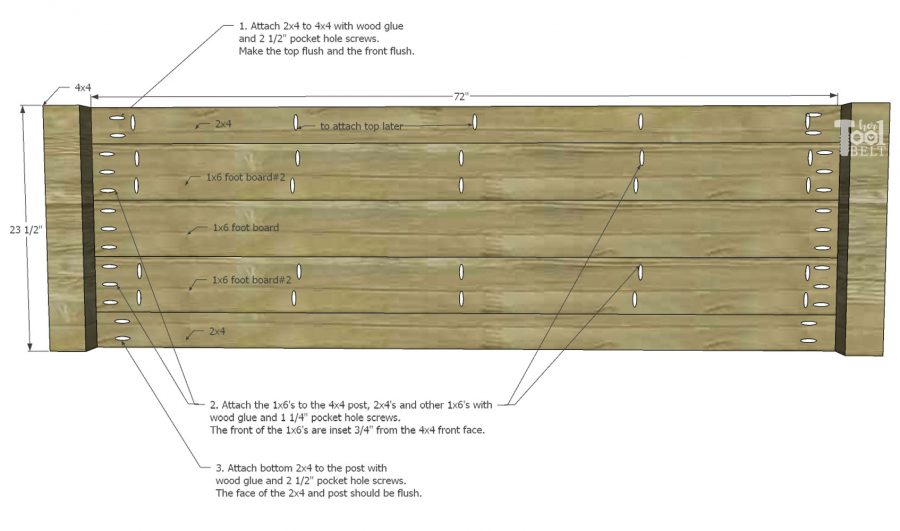
- Attach the foot board frame board (2×4) x 72″ that has the pocket holes drilled along the top side to the 2 (4×4) x 23 1/2″ posts with wood glue and 2 1/2″ pocket hole screws. Make the front of the 2×4 flush with the 4×4 front face, also make the tops of the boards flush.
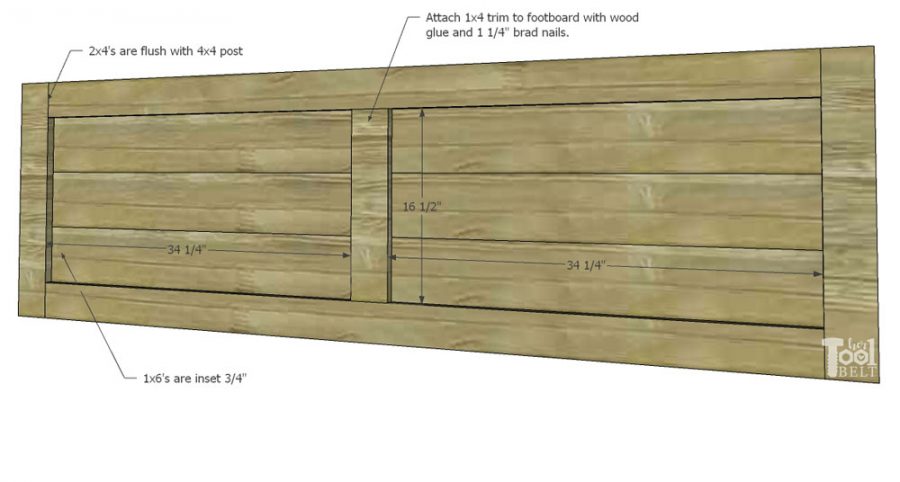
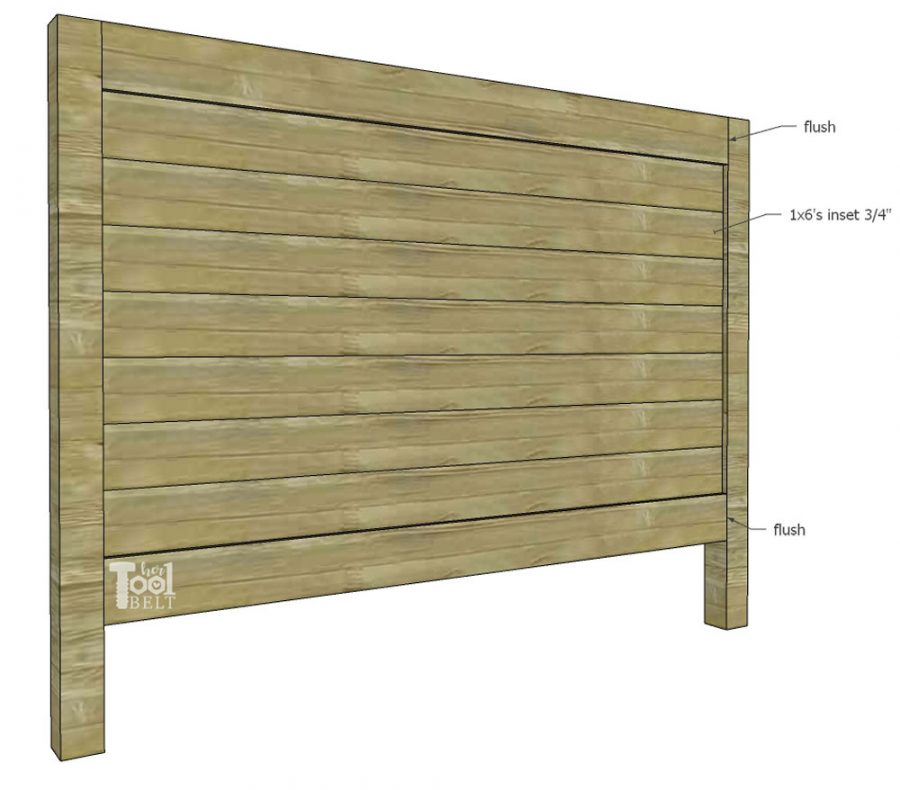
- Attach a (1×6) x 72″ with pocket holes around each side next with wood glue and 1 1/4″ pocket hole screws. Then attach a (1×6) with on pocket holes on the ends with wood glue and 1 1/4″ pocket hole screws, followed by another (1×6) with pocket holes all around. All of the 1×6 boards will be inset 3/4″ from the front face of the 4×4/2×4’s.
- Then attach the bottom (2×4) x 72″ board to the (1×6) with wood glue and 1 1/4″ pocket hole screws and to the (4×4) post with 2 1/2″ pocket hole screws.
Cut to fit a piece of 1×4 (about 16 1/2″ long) for the center of the foot board front. Mark the center of the foot board and center of the 1×4, attach the 1×4 to the foot board with wood glue and 1 1/4″ brad or pin nails.
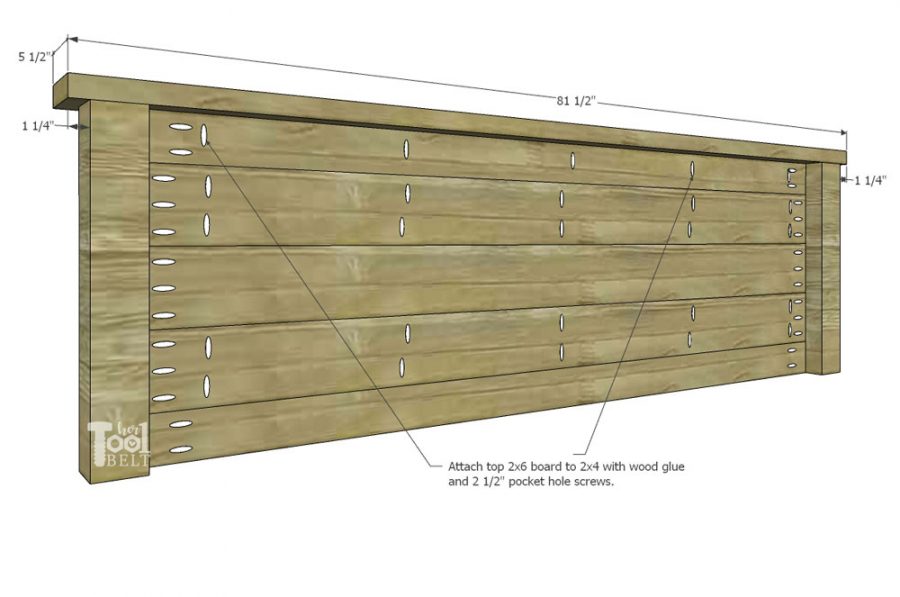
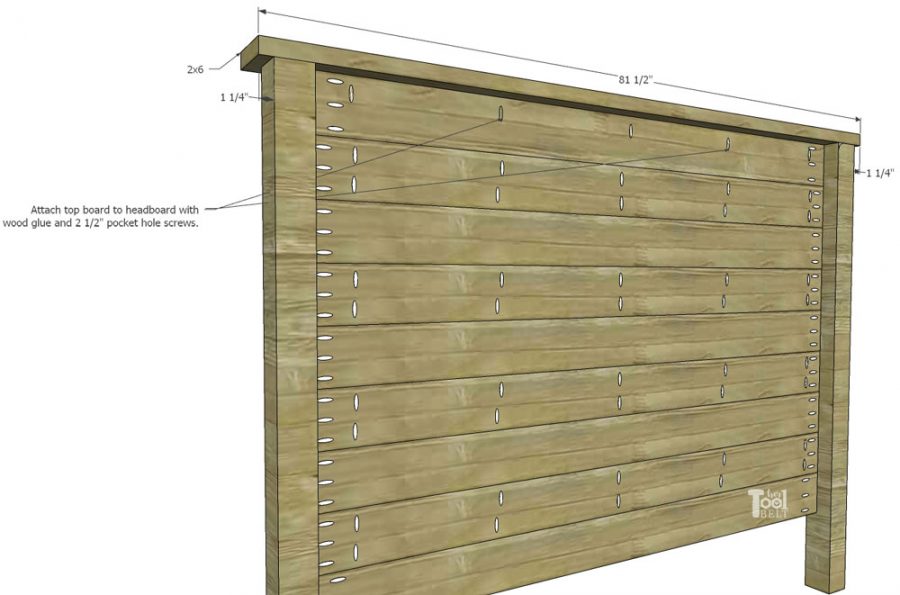
Center the foot board top (2×6) x 81 1/2″ on top of the foot board, then use the holes in the top 2×4 board, and attach it with wood glue and 2 1/2″ pocket hole screws.
Note: I didn’t want my top board sticking out quite so much, so I trimmed the width down to 5″, and also cut small 45 deg on the outside corners.
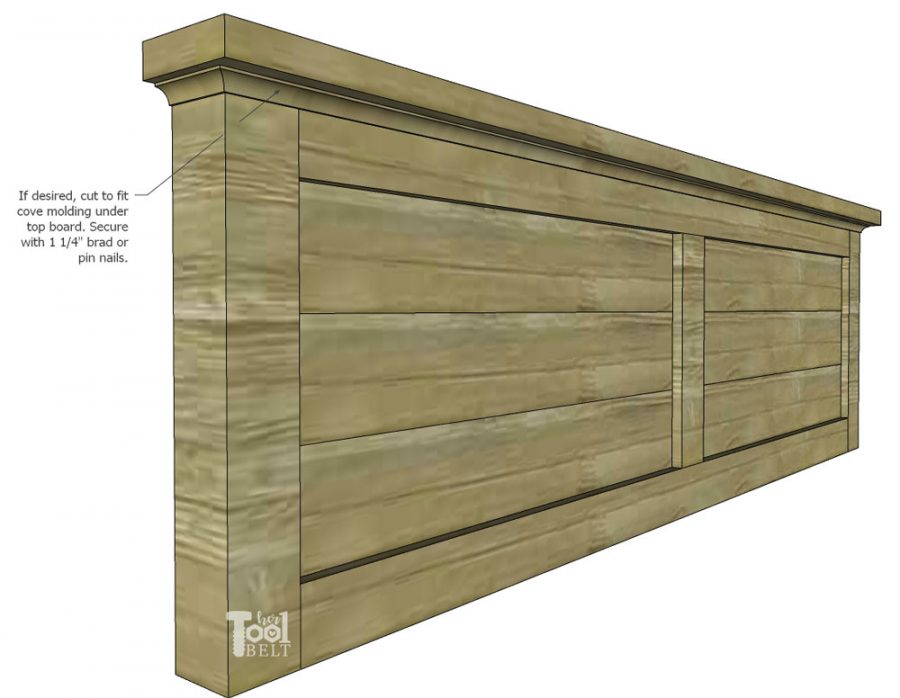
If desired, cut cove molding to fit under the top board. Attach the cove molding with wood glue and 1 1/4″ brad or pin nails.
If doing the drawers under the bed option, then attach 2 (2×4) x 72″ board to the bottom of the foot board with 2 1/2″ pocket hole screws. Attach another board 13″ up from the bottom of the foot board.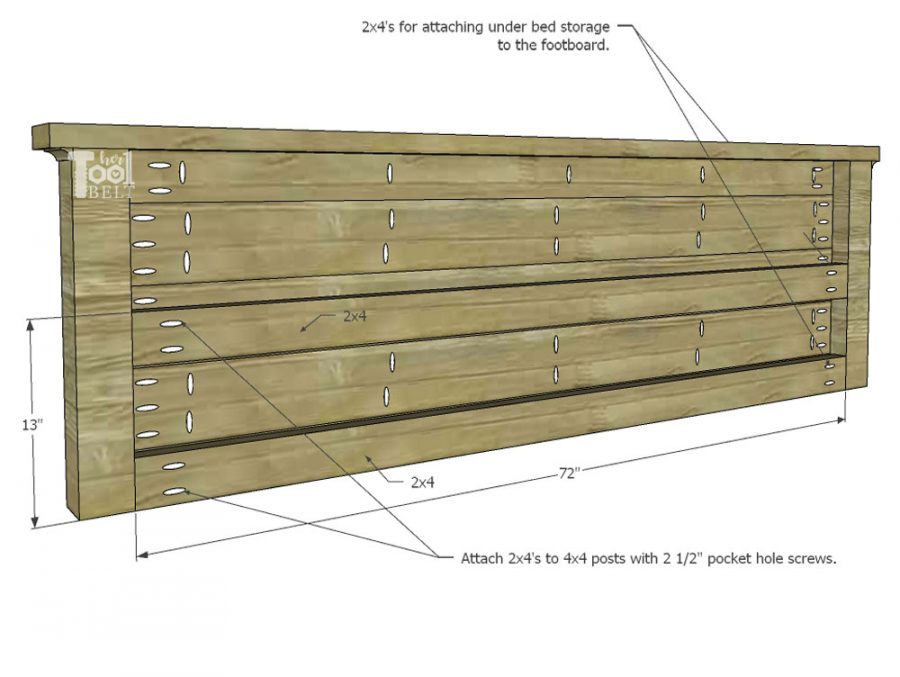
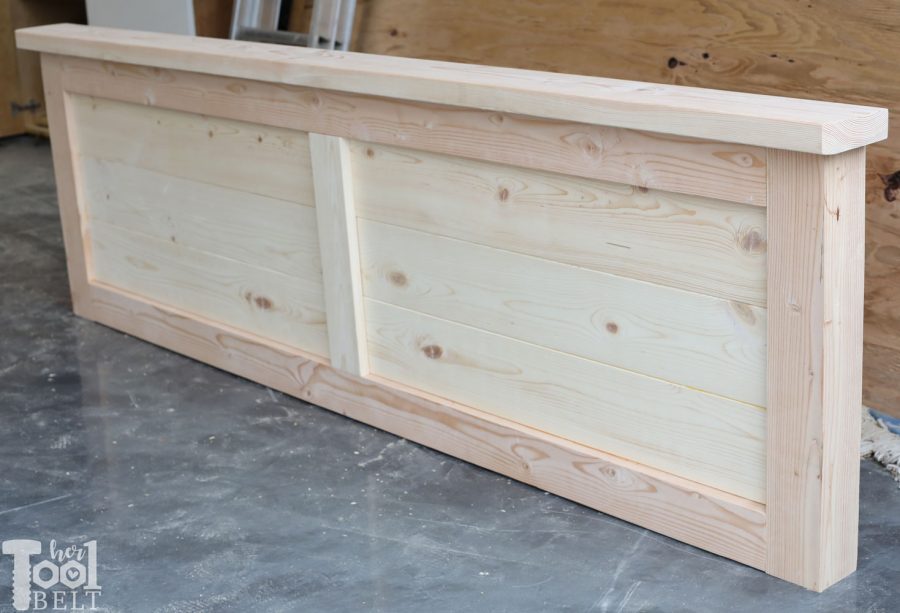
Step 4 – Assemble the Headboard
When assembling the headboard, I found it easiest to build it upside down, because I wanted to make sure the top of the headboard is flush.
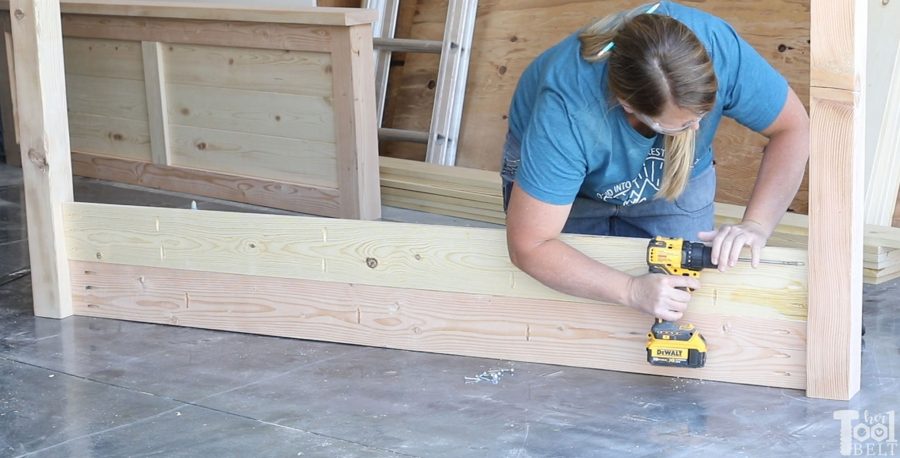
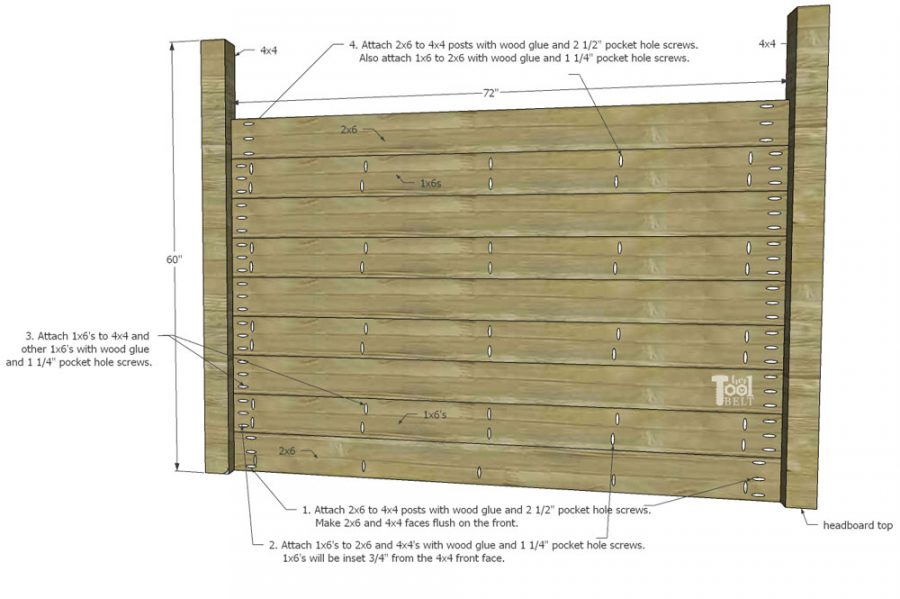
- Attach the headboard frame board (2×6) x 72″ that has the pocket holes drilled along the top side to the 2 (4×4) x 60″ posts with wood glue and 2 1/2″ pocket hole screws. Make the front of the 2×6 flush with the 4×4 front face, also make the tops of the boards flush.
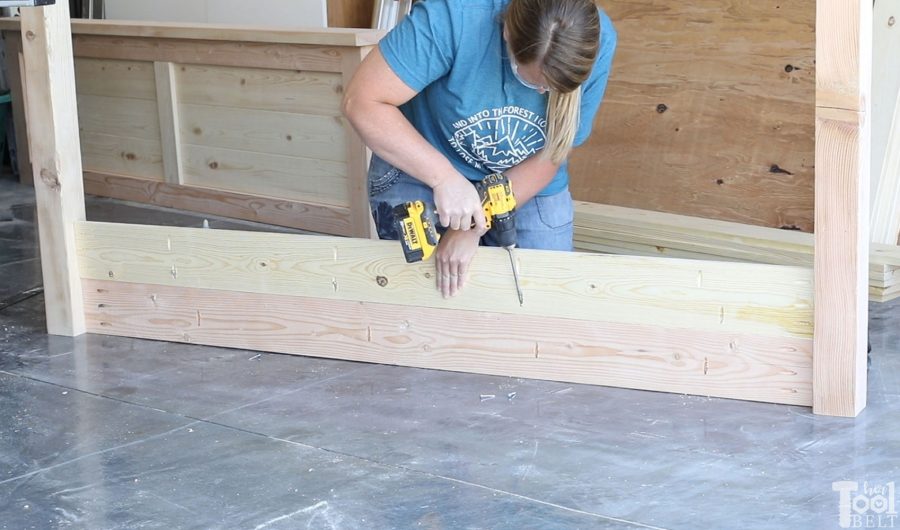
- Attach a (1×6) x 72″ with pocket holes around each side next with wood glue and 1 1/4″ pocket hole screws. Then attach a (1×6) with on pocket holes on the ends with wood glue and 1 1/4″ pocket hole screws, followed by another (1×6) with pocket holes all around. All of the 1×6 boards will be inset 3/4″ from the front face of the 4×4/2×6’s.
- Repeat alternating between 1×6’s with pocket holes all around and pocket holes only on the ends.
- Then attach the bottom (2×6) x 72″ board to the (1×6) with wood glue and 1 1/4″ pocket hole screws and to the (4×4) post with 2 1/2″ pocket hole screws.
(The 2×6’s are flush with the 4×4’s, the 1×6’s are inset 3/4″)
Center the headboard top (2×6) x 81 1/2″ on top of the headboard, then use the holes in the headboard frame 2×6 board, and attach it with wood glue and 2 1/2″ pocket hole screws.
If desired, cut cove molding to fit under the top board. Attach the cove molding with wood glue and 1 1/4″ brad or pin nails.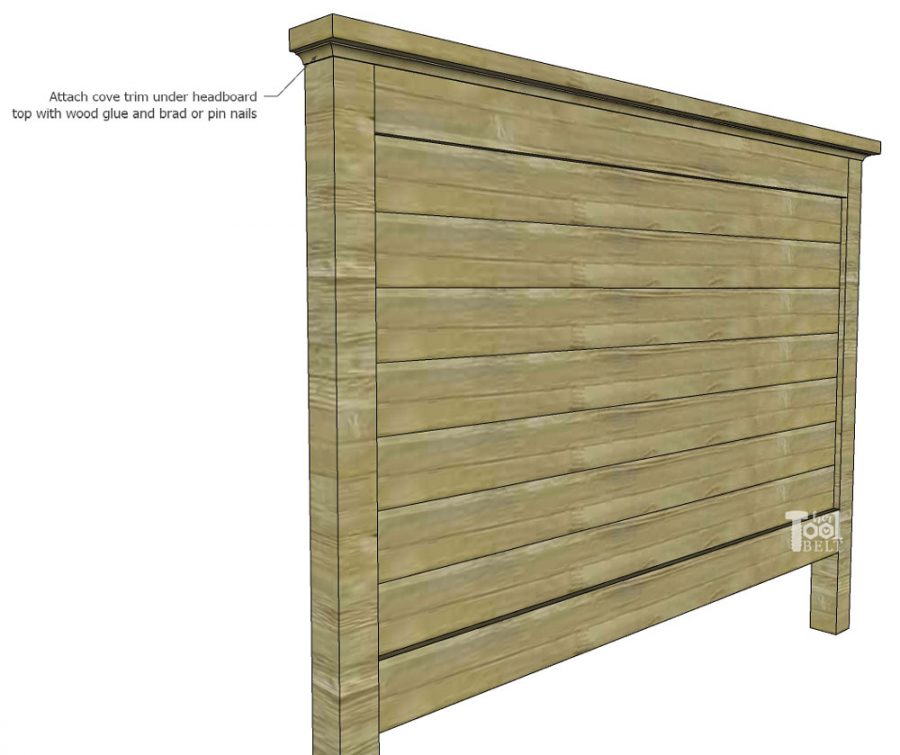
Cut to fit a piece of 1×4 (about 38 1/2″ long) for the center of the headboard front. Mark the center of the headboard and center of the 1×4, attach the 1×4 to the headboard with wood glue and 1 1/4″ brad or pin nails.
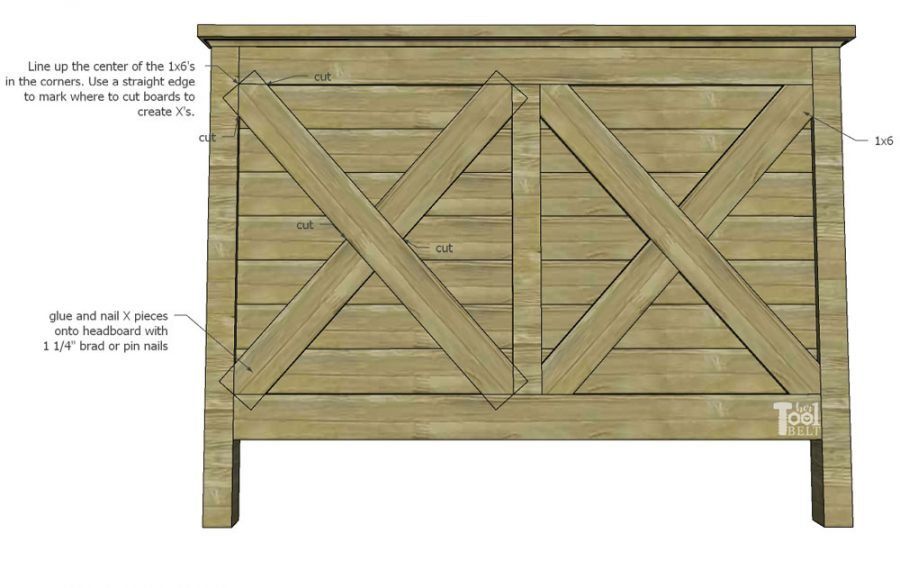
It is probably easiest to cut the X pieces to fit. Find the centerline of each 1×6 X piece (51 1/2″ and 24″ boards). Line up the board centerlines with the headboard corners. Use a straight edge or square to mark where to cut. Cut the X pieces to fit. Use wood glue and 1 1/4″ brad or pin nails to attach the X pieces to the headboard.
Step 5 – Build Storage Bases
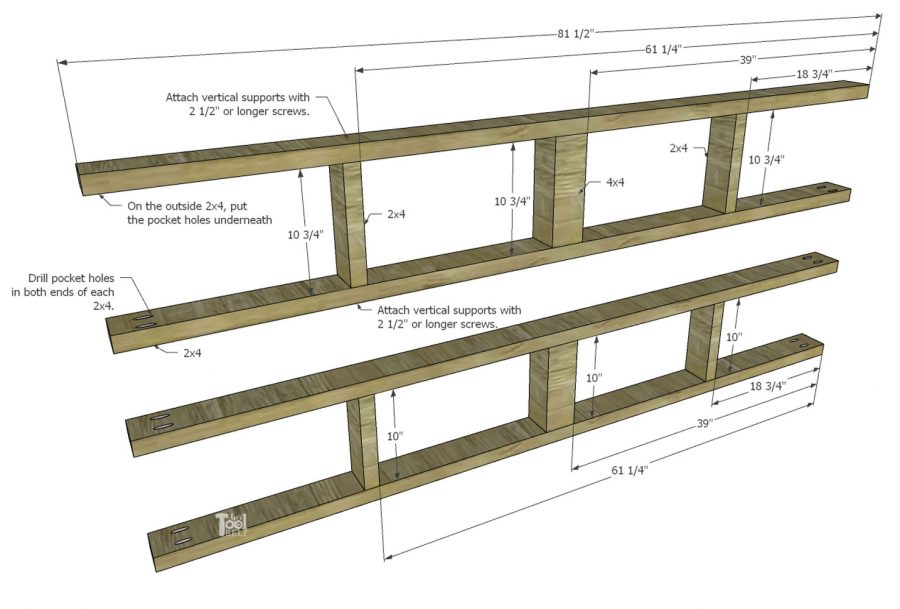
- Measure and mark over 18 3/4″, 39″, and 61 1/4″ on each of the storage base runners (2×4) x 81 1/2″ boards.
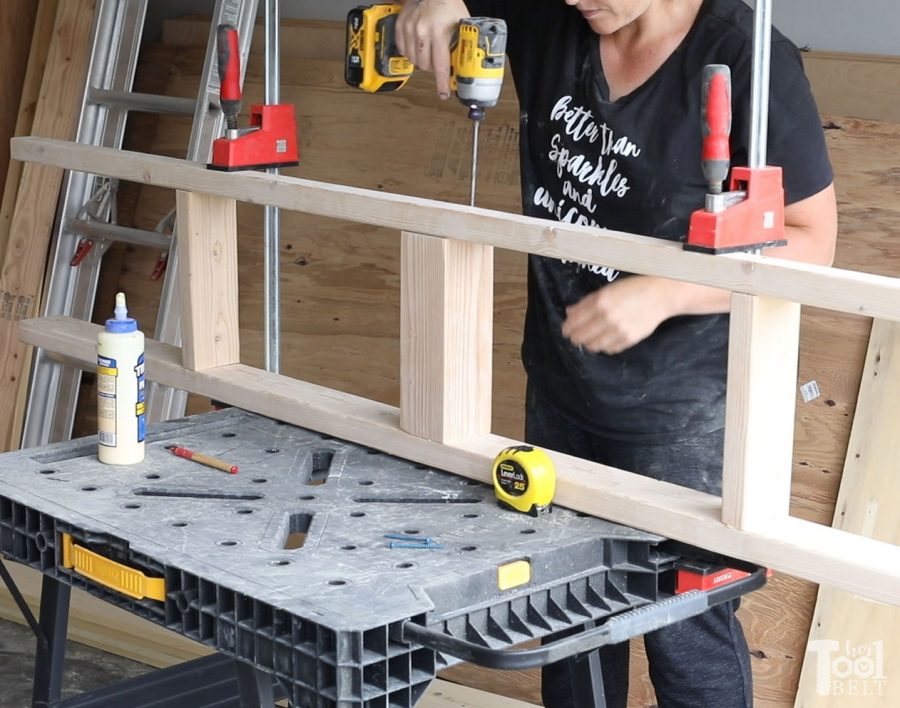
- Use wood glue and 2 1/2″ screws to attach the vertical supports between runner boards.
- The 2 outside storage base runners have 10 3/4″ long vertical supports (2×4), (4×4) and (2×4). Make sure the pocket holes on the top boards are facing down.
- The 2 inner storage base runners have 10″ long vertical supports (2×4), (4×4) and (2×4).
- Make 2 of each of the following:
Step 6 – Build the Drawers
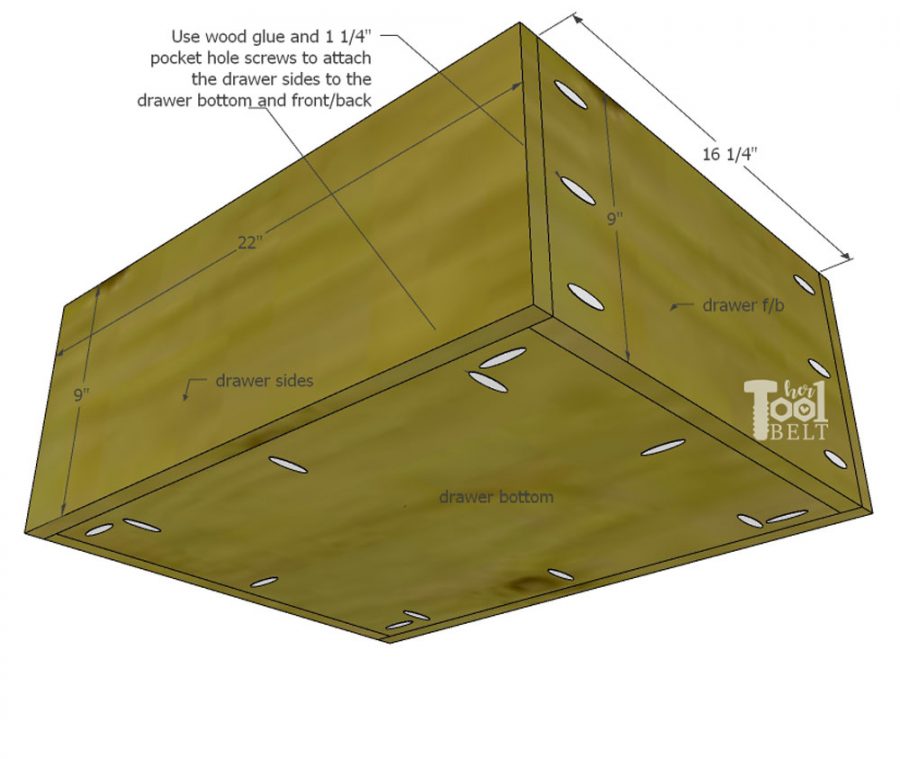
Attach a drawer front and back pieces to the 16 1/4″ sides of the drawer bottoms with wood glue and 1 1/4″ pocket hole screws.
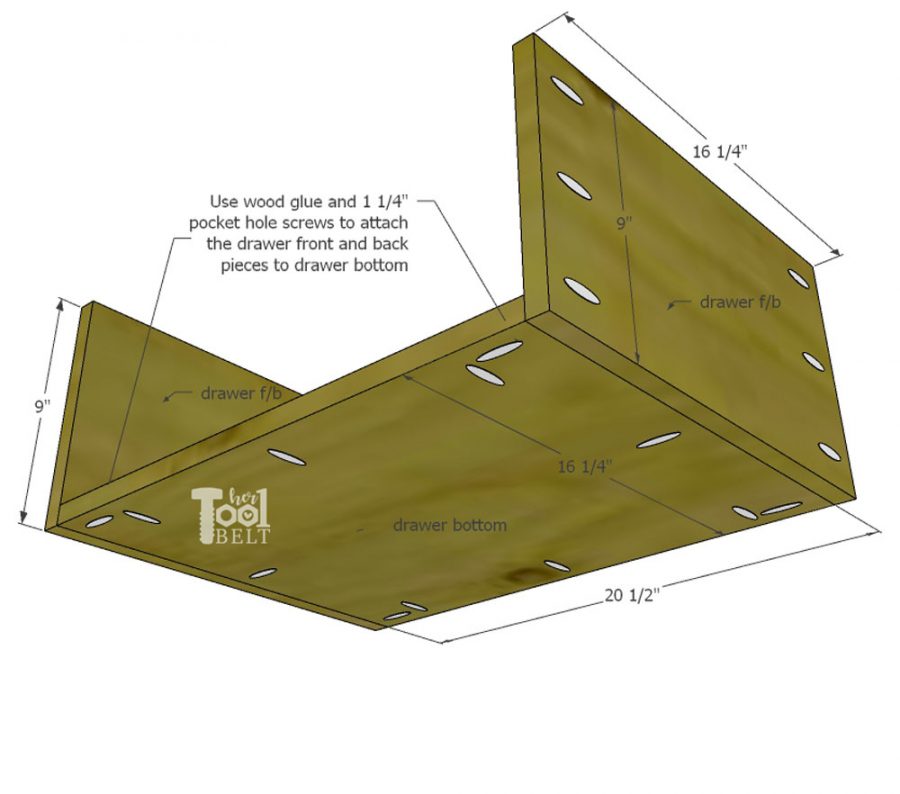 Attach the drawer sides to the drawer bottom and front/back pieces with wood glue and 1 1/4″ pocket hole screws.
Repeat for 6 drawers.
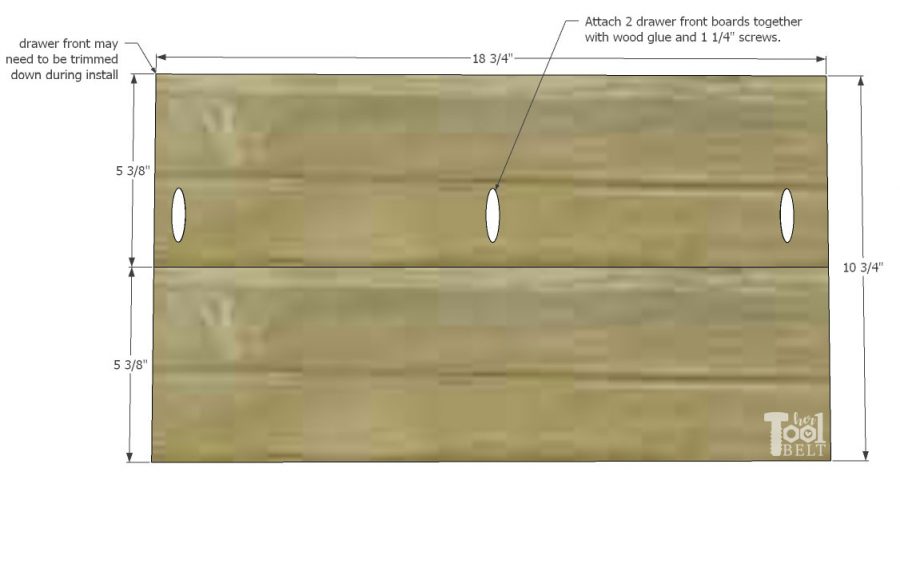
Assemble the drawer front boards. Use wood glue and 1 1/4″ pocket hole screws to attach 2 drawer front boards together. Repeat to make 8 drawer front assemblies. The drawer front boards may have to be trimmed to fit later.
Step 7 – Sand and Finish
Fill any holes, cracks or unwanted blemishes with wood putty/filler and allow to dry. Sand the barn door farmhouse bed until it is smooth, finishing with 180-220 grit sandpaper. I stained the bed with Rustoleum Briarsmoke. After the stain dried, I applied polyurethane.
Assembly time!
This bed is very stout, you’ll probably want to assemble it in it’s final location. 🙂
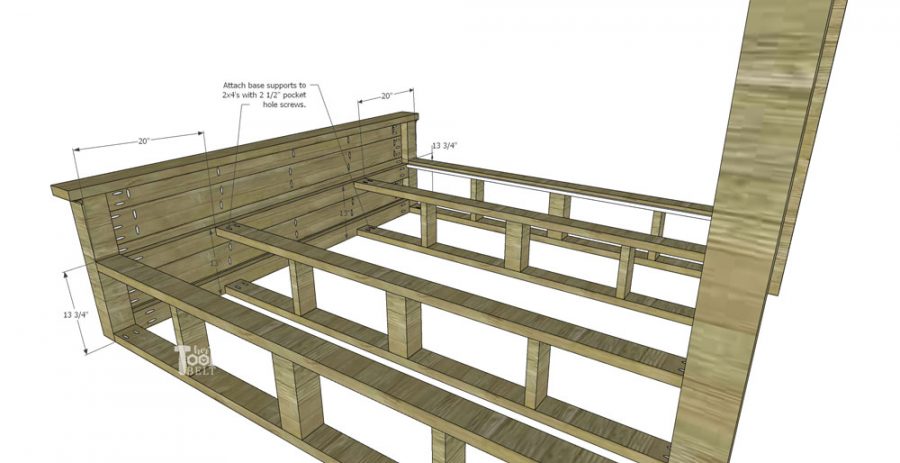
- On the headboard posts, mark up 13 3/4″. Secure the outside storage base runners to the headboard posts with 2 1/2″ pocket hole screws.
- Then mark over 20″ and up 13″ from the floor. Secure the inner storage base runners to the headboard with 2 1/2″ pocket hole screws. (Ignore that bottom board on the headboard sketch, it’s not needed.)
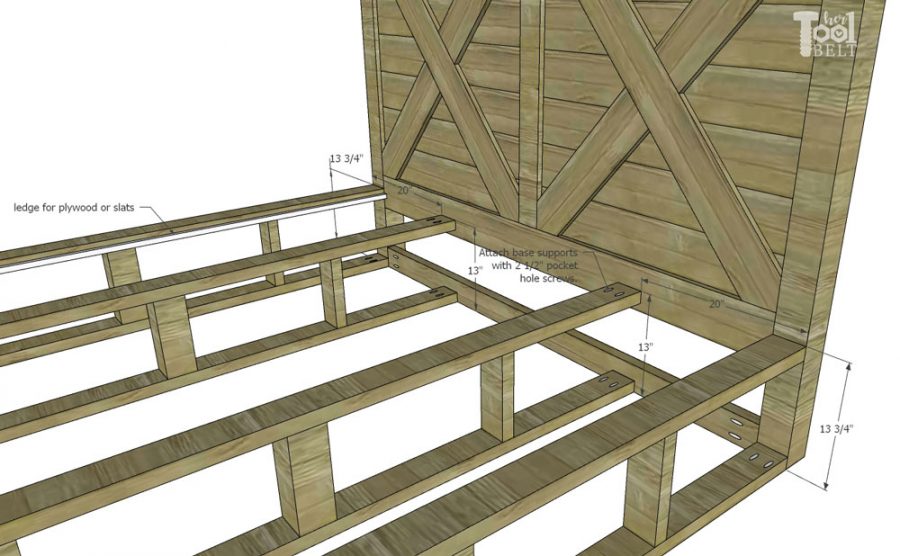
- On the foot board posts, mark up 13 3/4″. Secure the outside storage base runners to the foot board posts with 2 1/2″ pocket hole screws.
- Then mark over 20″ and up 13″ from the floor. Secure the inner storage base runners to the foot board with 2 1/2″ pocket hole screws. Also attach the lower runner to the bottom support board on the foot board.
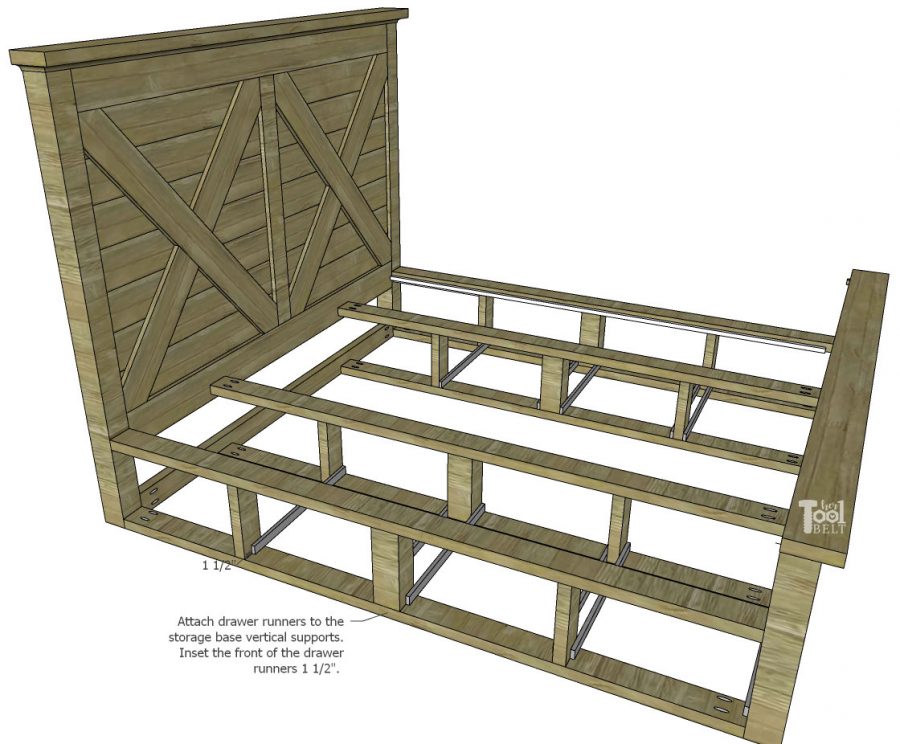
Attach drawer runners to the 6 drawer locations. Inset the drawer runners 1 1/2″ on the vertical supports.
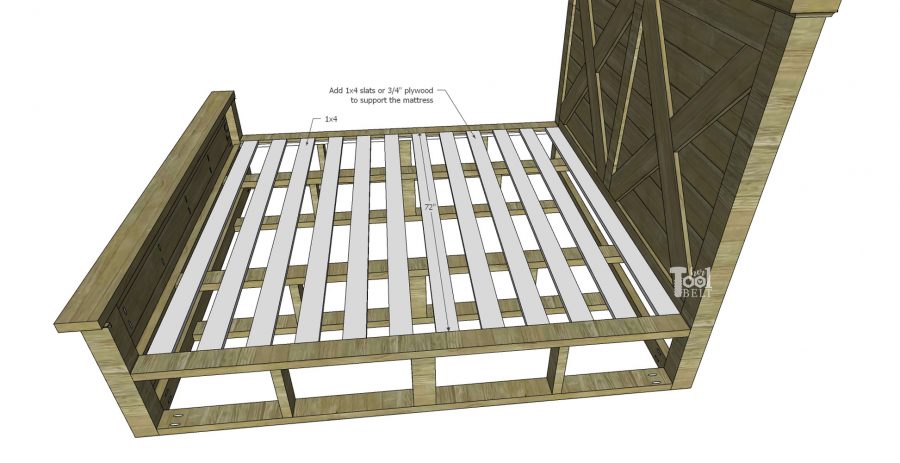
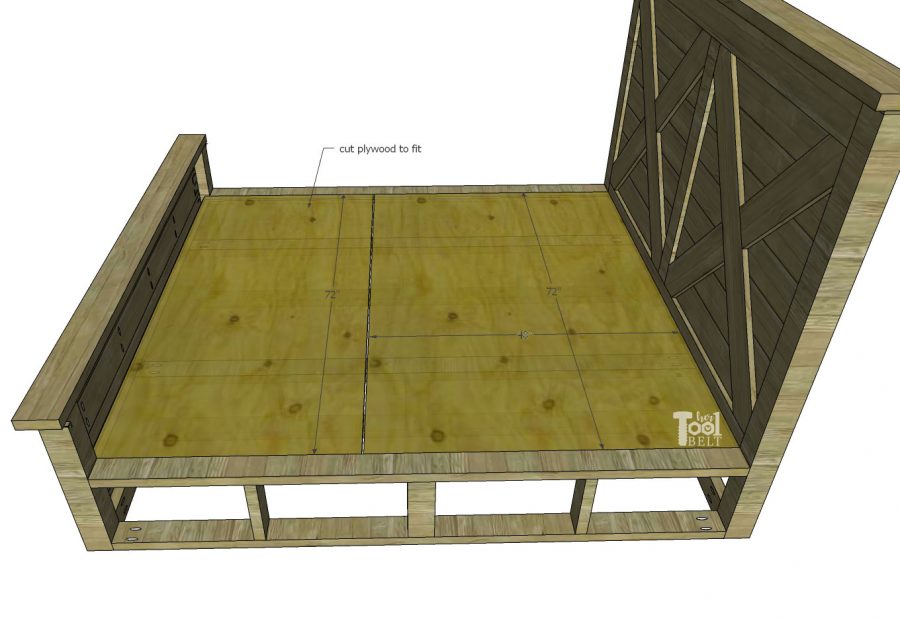
Attach a 3/4″ x 3/4″ x 80″ piece of wood to the inside edge of the outside base support runners with 2 1/2″ screws. This creates a ledge for the mattress slats or plywood to sit on. If using slats, cut 12 – 1×4’s to fit a crossed the bed and rest on the ledge.
Or cut plywood to fit. I used plywood because I bought a Purple mattress and wasn’t sure how the rubber would work with slats.
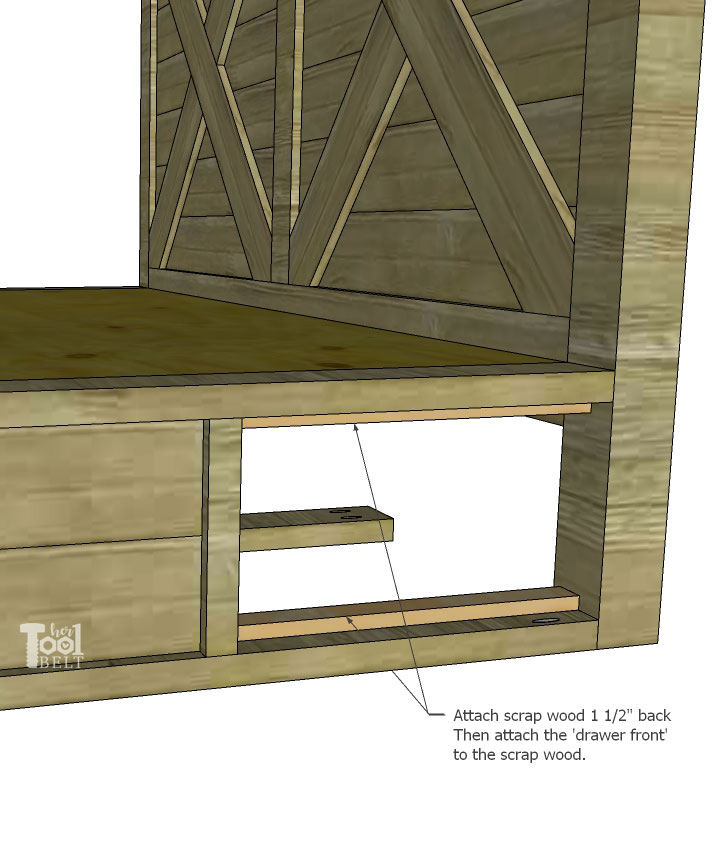
Attach the drawer boxes to the drawer runners. Attach the drawer fronts onto the drawer boxes, the drawer fronts may need to be trimmed to fit. Install drawer pulls to the drawer fronts.
Use some 18″ pieces of scrap wood inset 1 1/2″ in the ‘faux’ drawer opening. Use a brad nailer to attach the ‘drawer front’ to the scrap wood.
I’m excited for all of the extra storage.
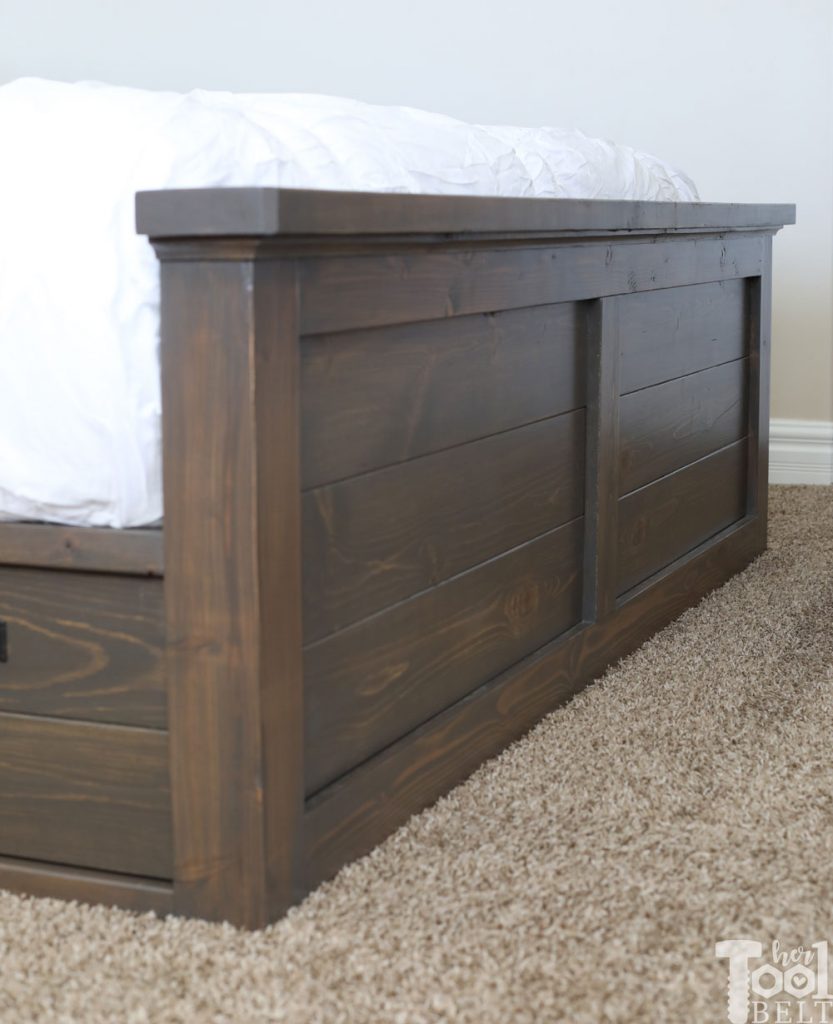
Close up of the foot board.
Thanks for pinning!
–>Download King Bed Plans Here <–
During this barn door farmhouse bed build, I have been reviewing the new subcompact DeWALT Atomic drill and driver combo kit. The drill in this kit is so small and comfortable to use, 6.3″ front t back and 2.4 lbs. The drill and driver are 20 volt brushless motors for efficiency and longer run time. The drill has a 1/2″ chuck opening and the driver is the standard 1/4″. I really like the small size of tools in this kit and that they both have a variable speed trigger to allow for more precision while working. Great kit if space is an issue in your projects/work.
“I acknowledge that The Home Depot is partnering with me to participate in the Tool Review Program. As a part of the Program, I am receiving compensation in the form of products and services, for the purpose of promoting The Home Depot. All expressed opinions and experiences are my own words. My post complies with the Word Of Mouth Marketing Association (WOMMA) Ethics Code and applicable Federal Trade Commission guidelines.”
Do you have these plans for a cal king?
On the list 🙂
How do you attach the drawer fronts on to the drawers the two 1×6 to the plywood I mean
Hi Kevin,
I just use 4 – 1 1/4″ screws and drill through the plywood drawer into the drawer front. One screw in about each corner (ish). Hope that helps.
Are there directions for a cal king?
Hello, thank you in advance for the plans for the Cali King. I am EXTREMELY new to the DIY world but have found your instructions very helpful.
Great directions easy to follow, head top make some modifications since we have amotion base, but love the way it turned out
I would like this plan in the Queen with the storage. Do you have those?
Can you use a box spring with this design?! Thanks its beautiful!
Hi Chelsea,
You can use a box spring with this bed, but it might be really really high with the storage drawers underneath. If you want to use box springs, I would suggest the no storage option like on this queen bed: https://www.hertoolbelt.com/queen-x-barn-door-farmhouse-bed-plan/ . The Queen and King are the same length of bed, so you can swap the storage drawers for the bed rails if you want.
Hope that helps.
HEY I was curious about adjusting these plans to make full bed frame, any advice on this would be awesome so far I m not sure how it will affect the drawer situation but if I adjust the length and width overall I should be alright… right?
What type of wood did you use for the 1×6 and 1×4? I believe i saw options like common or select as well as different types of wood. Also what type of wood is the plywood? I really like the look of the grain on the one you built after the stain and want to make sure I can replicate the same results.
Hi Larry,
I used common for the 1×6’s and 1×4’s. For the plywood, I used 3/4″ birch.
So it looks like it would be difficult to move kater correct? You woul have to take all of the pocket screws out to break it down into moveable pieces?
The headboard and foot board can stay assembled. But the bed rails/drawer assembly would have to be unscrewed and reassembled.
I am curious what type of lumber you used, whas it Standard Douglas fit or did you you use a oak or cedar by chance
Any chance you can provide what type common wood you used is greatly appreciated
Yes the lumber was douglas fir. The ‘common boards’ (what Home Depot calls them) I believe are just a pine or white wood.
Oak or cedar would look amazing and be better materials…I just didn’t want to pay for them 🙂
This is awesome! Thank you for the details on how to build this! Do you happen to have plans for the queen size with drawers or would you just suggest I follow the one you have for a regular queen size without the drawers?
Hi Diane,
You shouldn’t have any problems making the Queen head and foot boards. Then building the king storage. The lengths of the king and queen are the same. HTH
I hope to have time to do stand alone plans for queen with storage, but haven’t had time yet.
Thanks,
Amy
Hi! How’s the Purple Mattress been since you put it on this platform? It’s the design I want to build but my SO keeps telling me that it won’t work with a Purple.
Oh I wonder why your SO says that? It’s been great for us. I did use 3/4″ plywood under the mattress instead of 1×4 slats. I was having back issues before the Purple and now they are gone, so I’m definitely happy with it. We have the purple 3.
Do you have these plans for king size without the storage underneath? Thank you
You can swap the storage portion of the king, with the bed rails of the Queen. https://www.hertoolbelt.com/queen-x-barn-door-farmhouse-bed-plan/
They are the same length bed.
HTH
I just want to say how you broke this down is amazing. From how to cut each board to where to put the pocket holes. Great post
Thank you!
Fabulous bed! I used the plans to make a headboard for a friend. Question … after staining did you polyurethane?
Great, that’s super nice of you! Yes I used polyurethane in satin sheen.
Thank you
Where did you get the drawer pulls? And what was the name of them?
Hi Bridget,
They are mission pulls with bails. https://www.dlawlesshardware.com/mispullmpn80.html I believe Home Depot carries them also.
Why did you use 4×4’s in the middle of the runners? It looks like your draw faces are a bit inside the runner frames; does that mean you can tell 4×4’s were used in that spot when the drawers are closed? Ultimately Im asking if when looking at the side of the bed with the drawers closed, can you tell one of the supports are wider then the others?
Yes you can tell it is wider. I did it on purpose, it mimics the headboard/footboard with the center divider.
Hey there!
We have started staining with the Varathane Briarsmoke and the color looks way more grey than your pictures show. Are you sure that’s the right stain color? We are also using the same wood you specify.
Hi sorry for the delayed response. Briarsmoke is an interesting stain. If you brush it on and don’t wipe it off, it will dry very gray. If you brush it on, then wipe off the excess, it will be brown. I’m not sure how it does that, but it does.
Thanks for this plan and design! Just finished final assembly, and it looks great. One question – why the 81-1/2” length instead of something closer to 80” (standard king length)? I just realized we have a 1-1/2” gap between the mattress and headboard, and I’m not sure what to fill that with. Maybe we’ll push it tight to the headboard and roll up a blanket to stuff in the gap at the footboard.
I was trying to leave enough space to comfortably tuck blankets/comforters in. Also even though the mattresses are standard ’80″‘, a lot of the brands will vary in length. I originally made this bed at the standard 80″, but it was too tight to tuck blankets with the Purple King mattress, so I had to modify the plan.
Did you stain the 2 inside base runners?
Is there any way we can download the instructs as a PDF? I have tried to print from here and
part of the instructions are covered up by the pop up ads. Thanks so much!
What nightstands did you put with it?
Hello. I live this bed but need it in a Queen. Could I follow your Queen plan then add in the storage drawers exactly how they are built here to the queen bed plan? Thanks
I could be wrong but I think your cut list is missing some boards. The list show 8 1×6 for the drawer fronts. Shouldn’t that be 16 since each drawer has 2 pieces?
What program do you use to make these plans with?
It’s called Sketchup