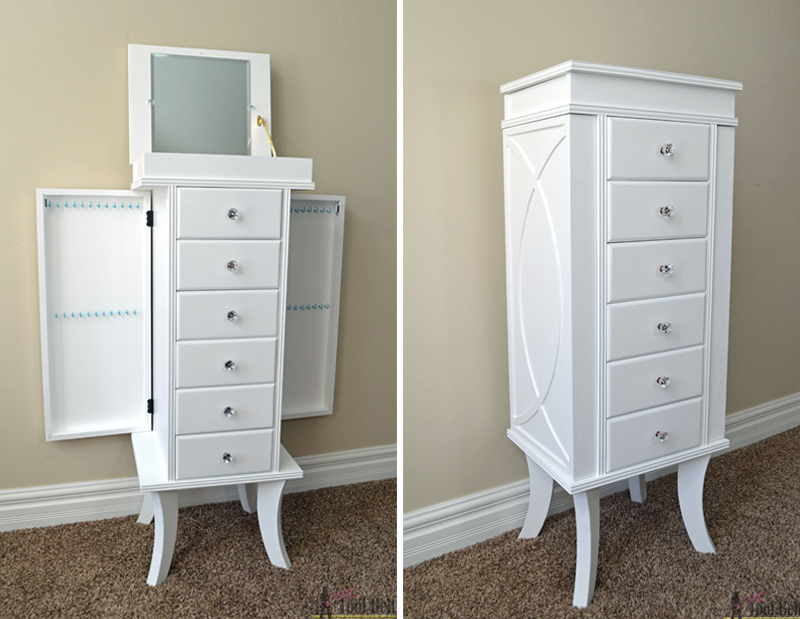
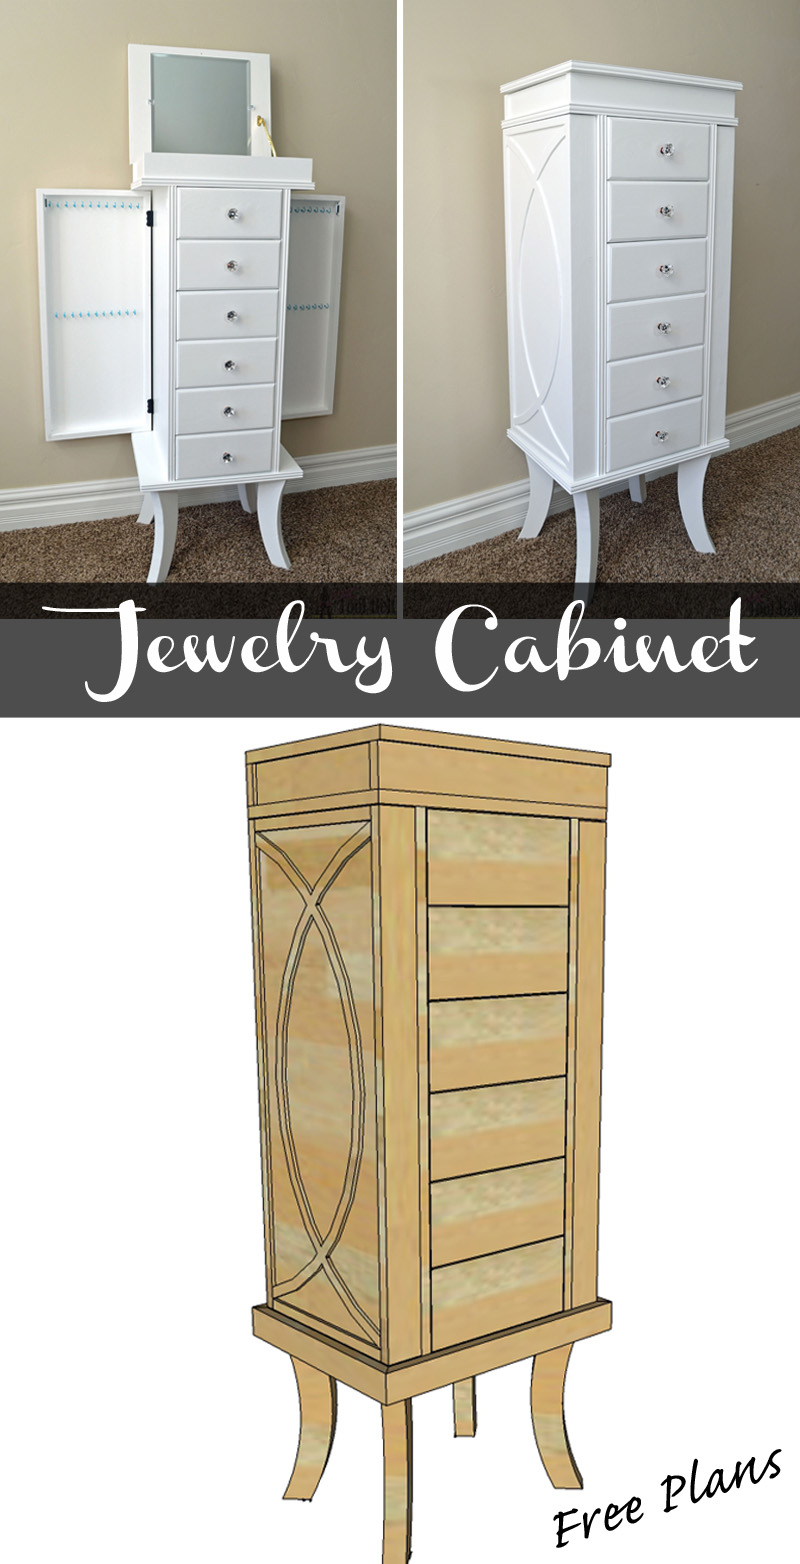
Mother’s Day is coming up soon. Do you ever struggle with ideas of what to get Mom? Really, what do you get for one of the most important people in your life :-)? I’m teaming up with Kreg Tool, to give you some great project ideas for Mom. Chances are that Mom has jewelry, so why not build her a beautiful jewelry cabinet to organize her beautiful things. This jewelry cabinet has loads of room for long and short necklaces, rings, scarfs, ear rings, nail polish, etc.
How to Build a Jewelry Cabinet
Materials:
- 1 – 4′ x 8′ sheet – 3/4″ plywood
- 5 – 1″ x 3″ x 8′ boards (or if not 2 1/2″ wide get 1×4’s)
- 1 – 1″ x 6″ x 8′ board
- 1/2 sheet – 3/16″ underlayment plywood (5mm sheathing)
- 1 – 2″ x 6″ x 8′ board
- molding – optional
- plywood banding – optional
- 1 1/4″ pocket hole screws (affiliate)
- 1 1/4″ brad nails
- 3/4″ brad nails
- 5/8″ brad nails
- wood glue
- sand paper
- wood filler
- 6 drawer knobs
- 3 – hinges (2 pack)
- mirror and supports
- magnet catch
- 1″ cup hooks
- lid support
- Primer/Paint
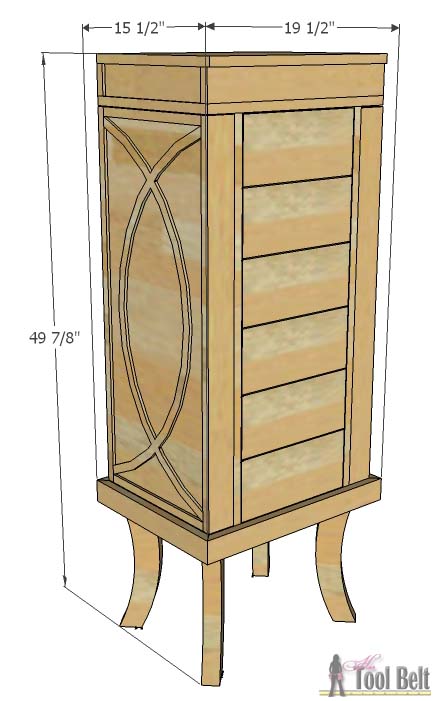
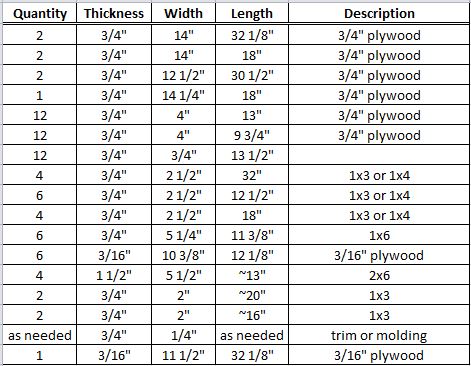
Cut List
Step 1
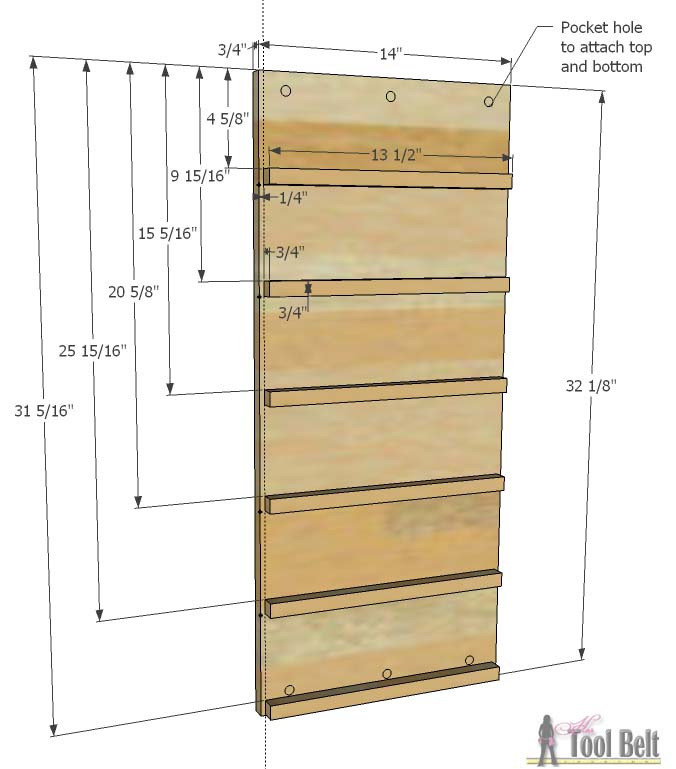
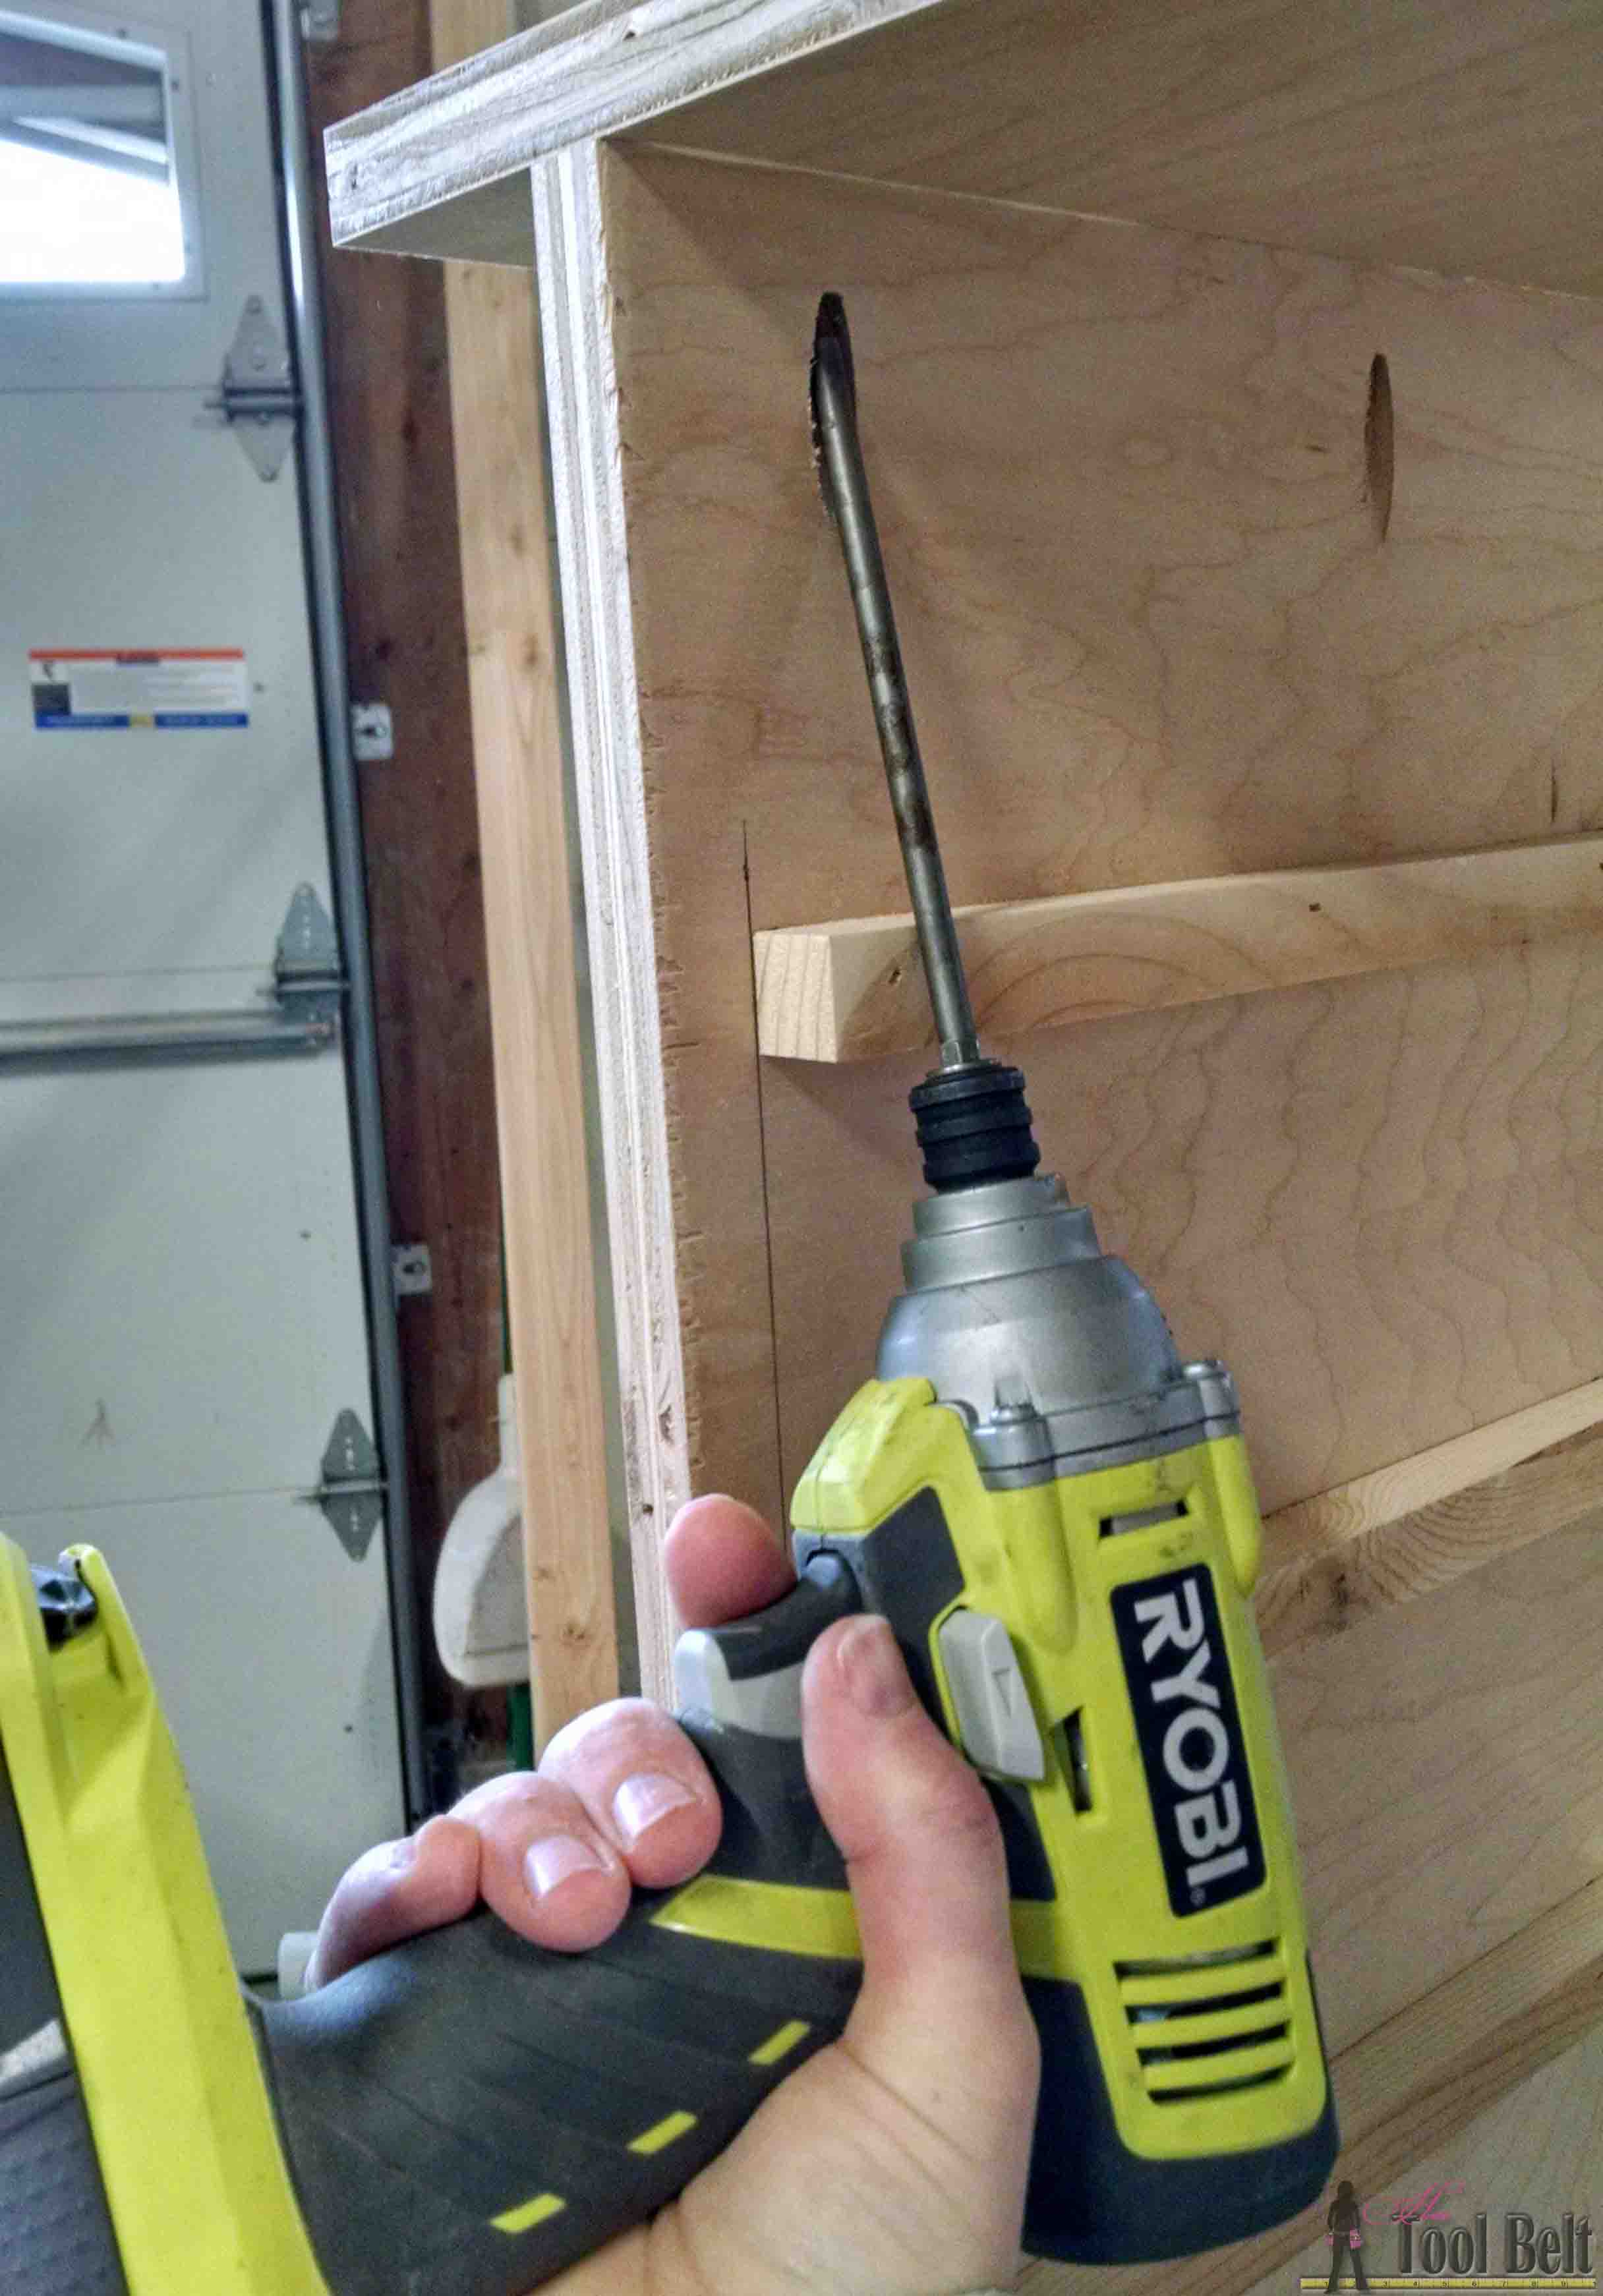
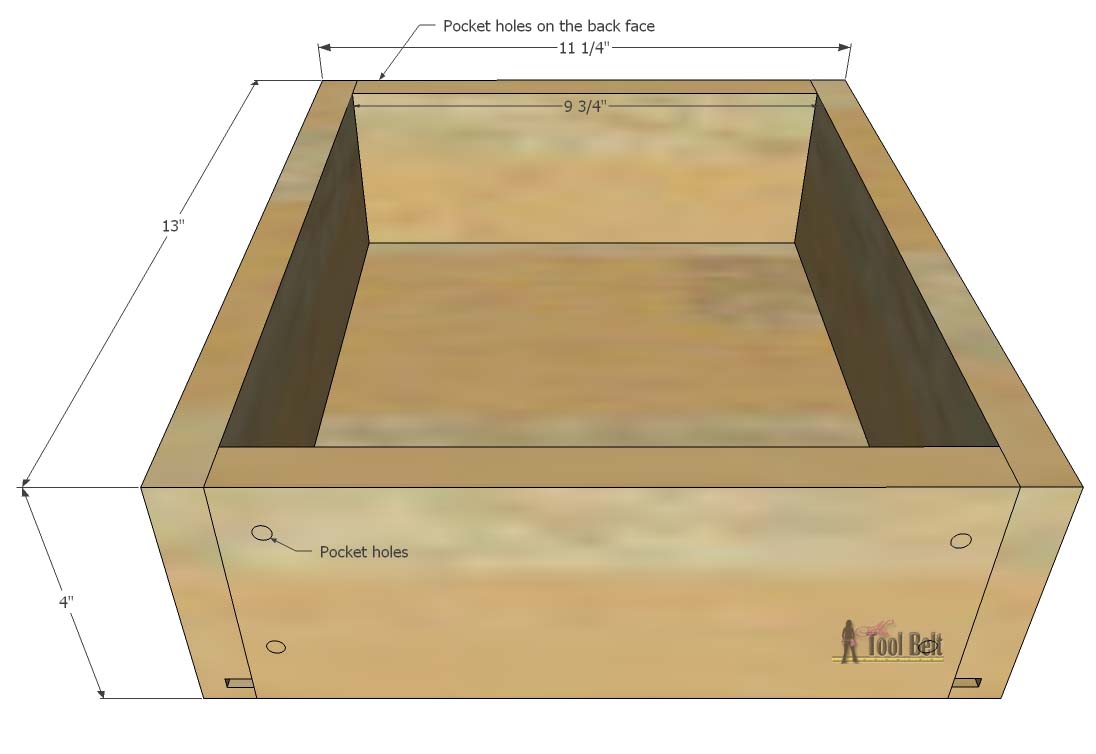
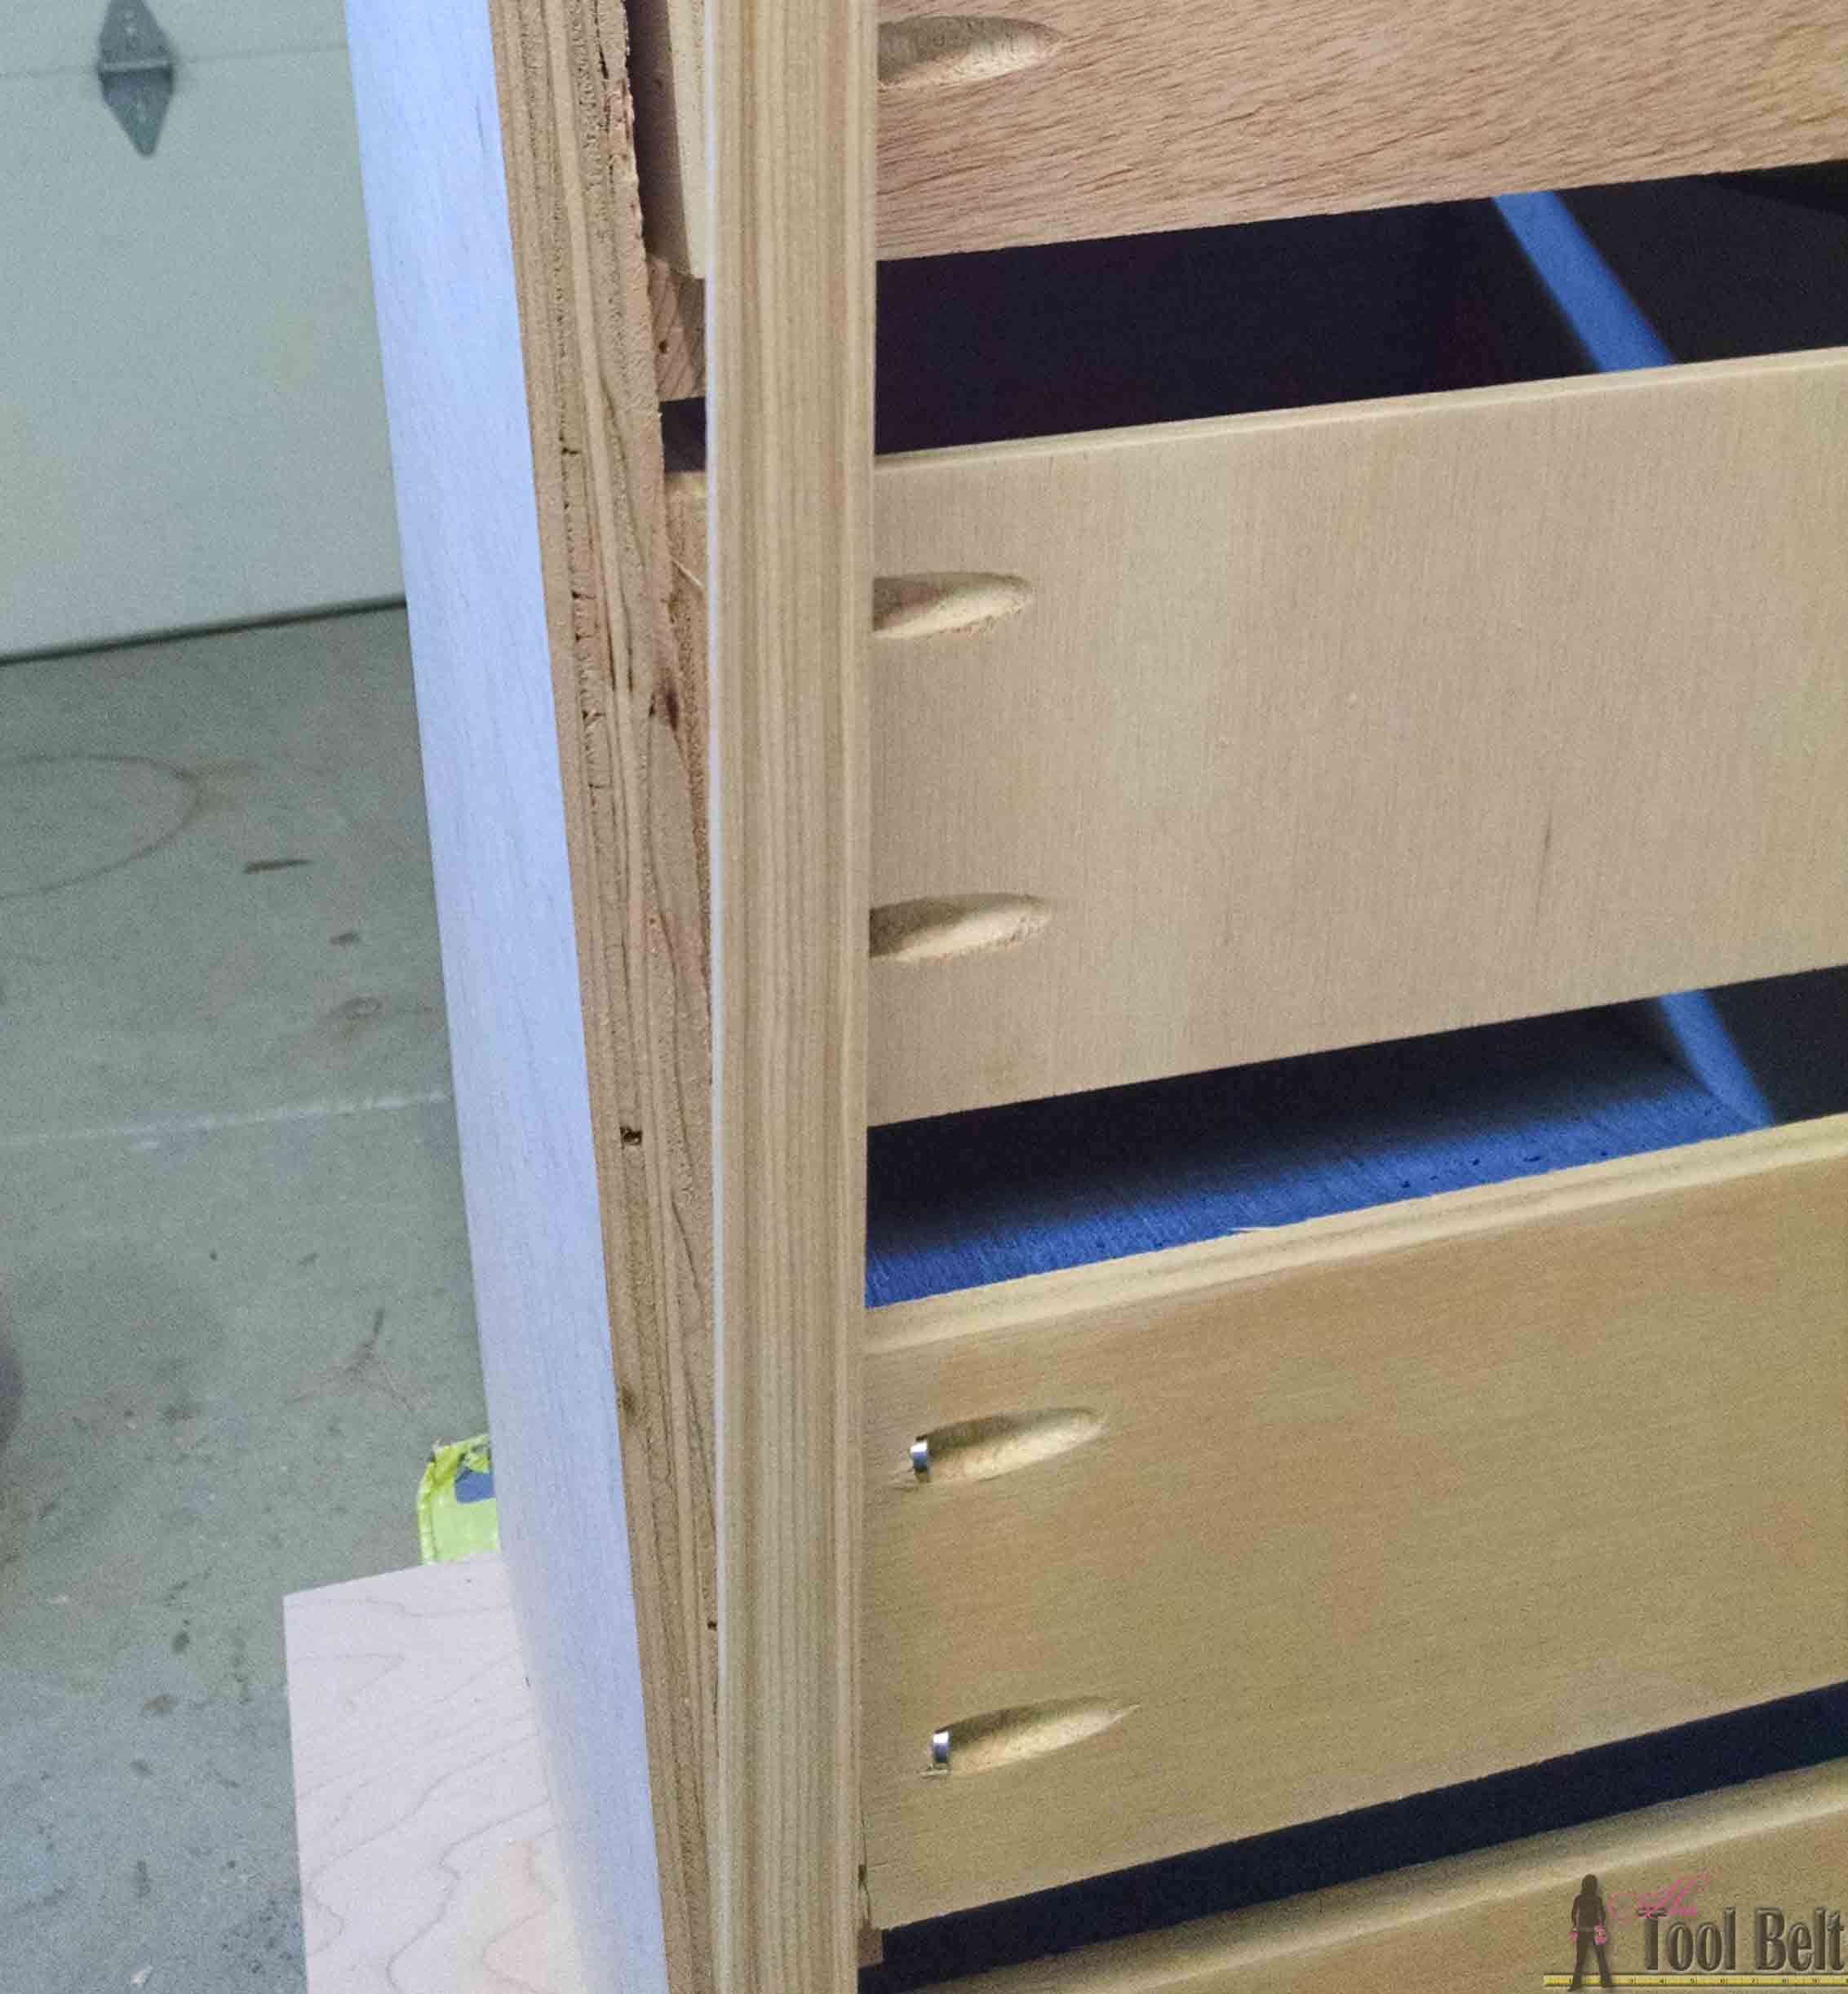
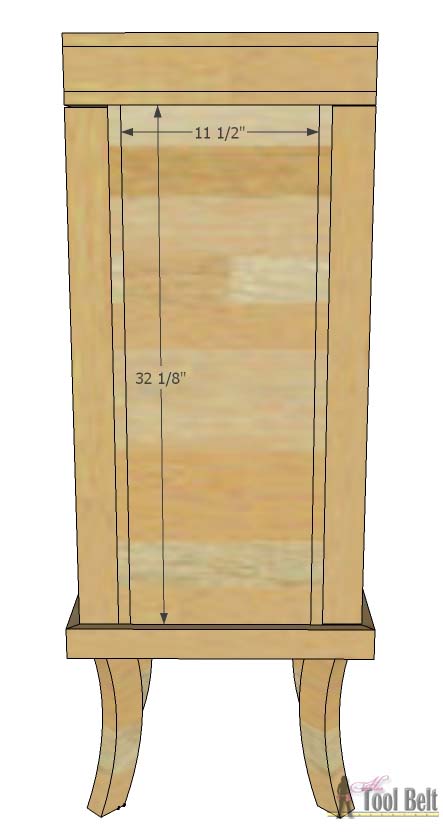
Cut the side panels, 14″ x 32 1/8″ plywood. Drill pocket holes (affiliate) on the inside face at the top and the bottom. Attach the 3/4″ x 3/4″ x 13 1/2″ drawer runners to the inside face with wood glue and 1 1/4″ brad nails according to the diagram below. On the opposite side panel, make sure to do the mirror image.
 On the two 14″ x 18″ pieces, mark in 2 1/2″ from the 14″ sides. Use wood glue and 1 1/4″ pocket screws to attach the side panels to the top and bottom.
 Step 2
Drill pocket holes around the inside face of the 12 1/2″ x 30 1/2″ door panel. Drill pocket holes on both ends of the 2 1/2″ x 12 1/2″ door pieces. Assemble the door with wood glue and 1 1/4″ pocket screws. I inset the front of the door panel 1/4″ to add a little detail. 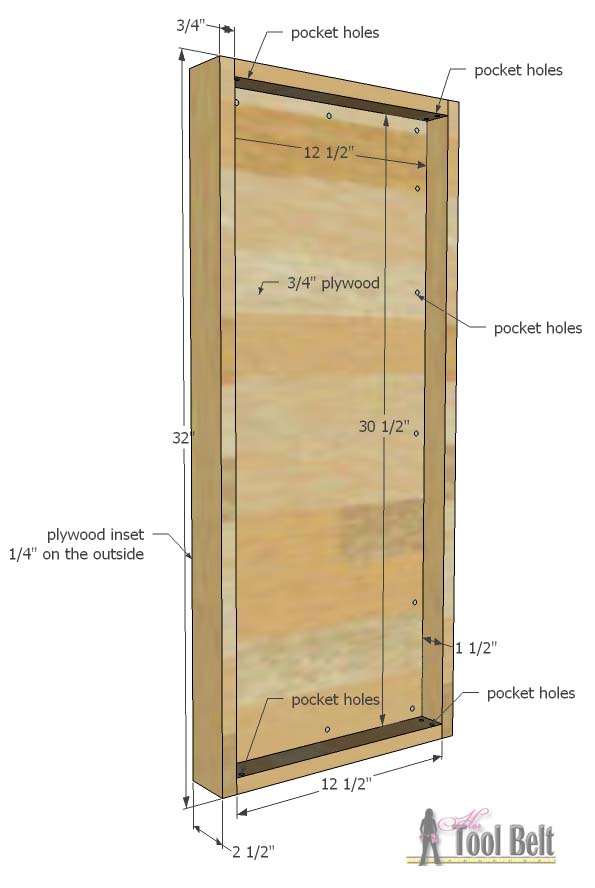
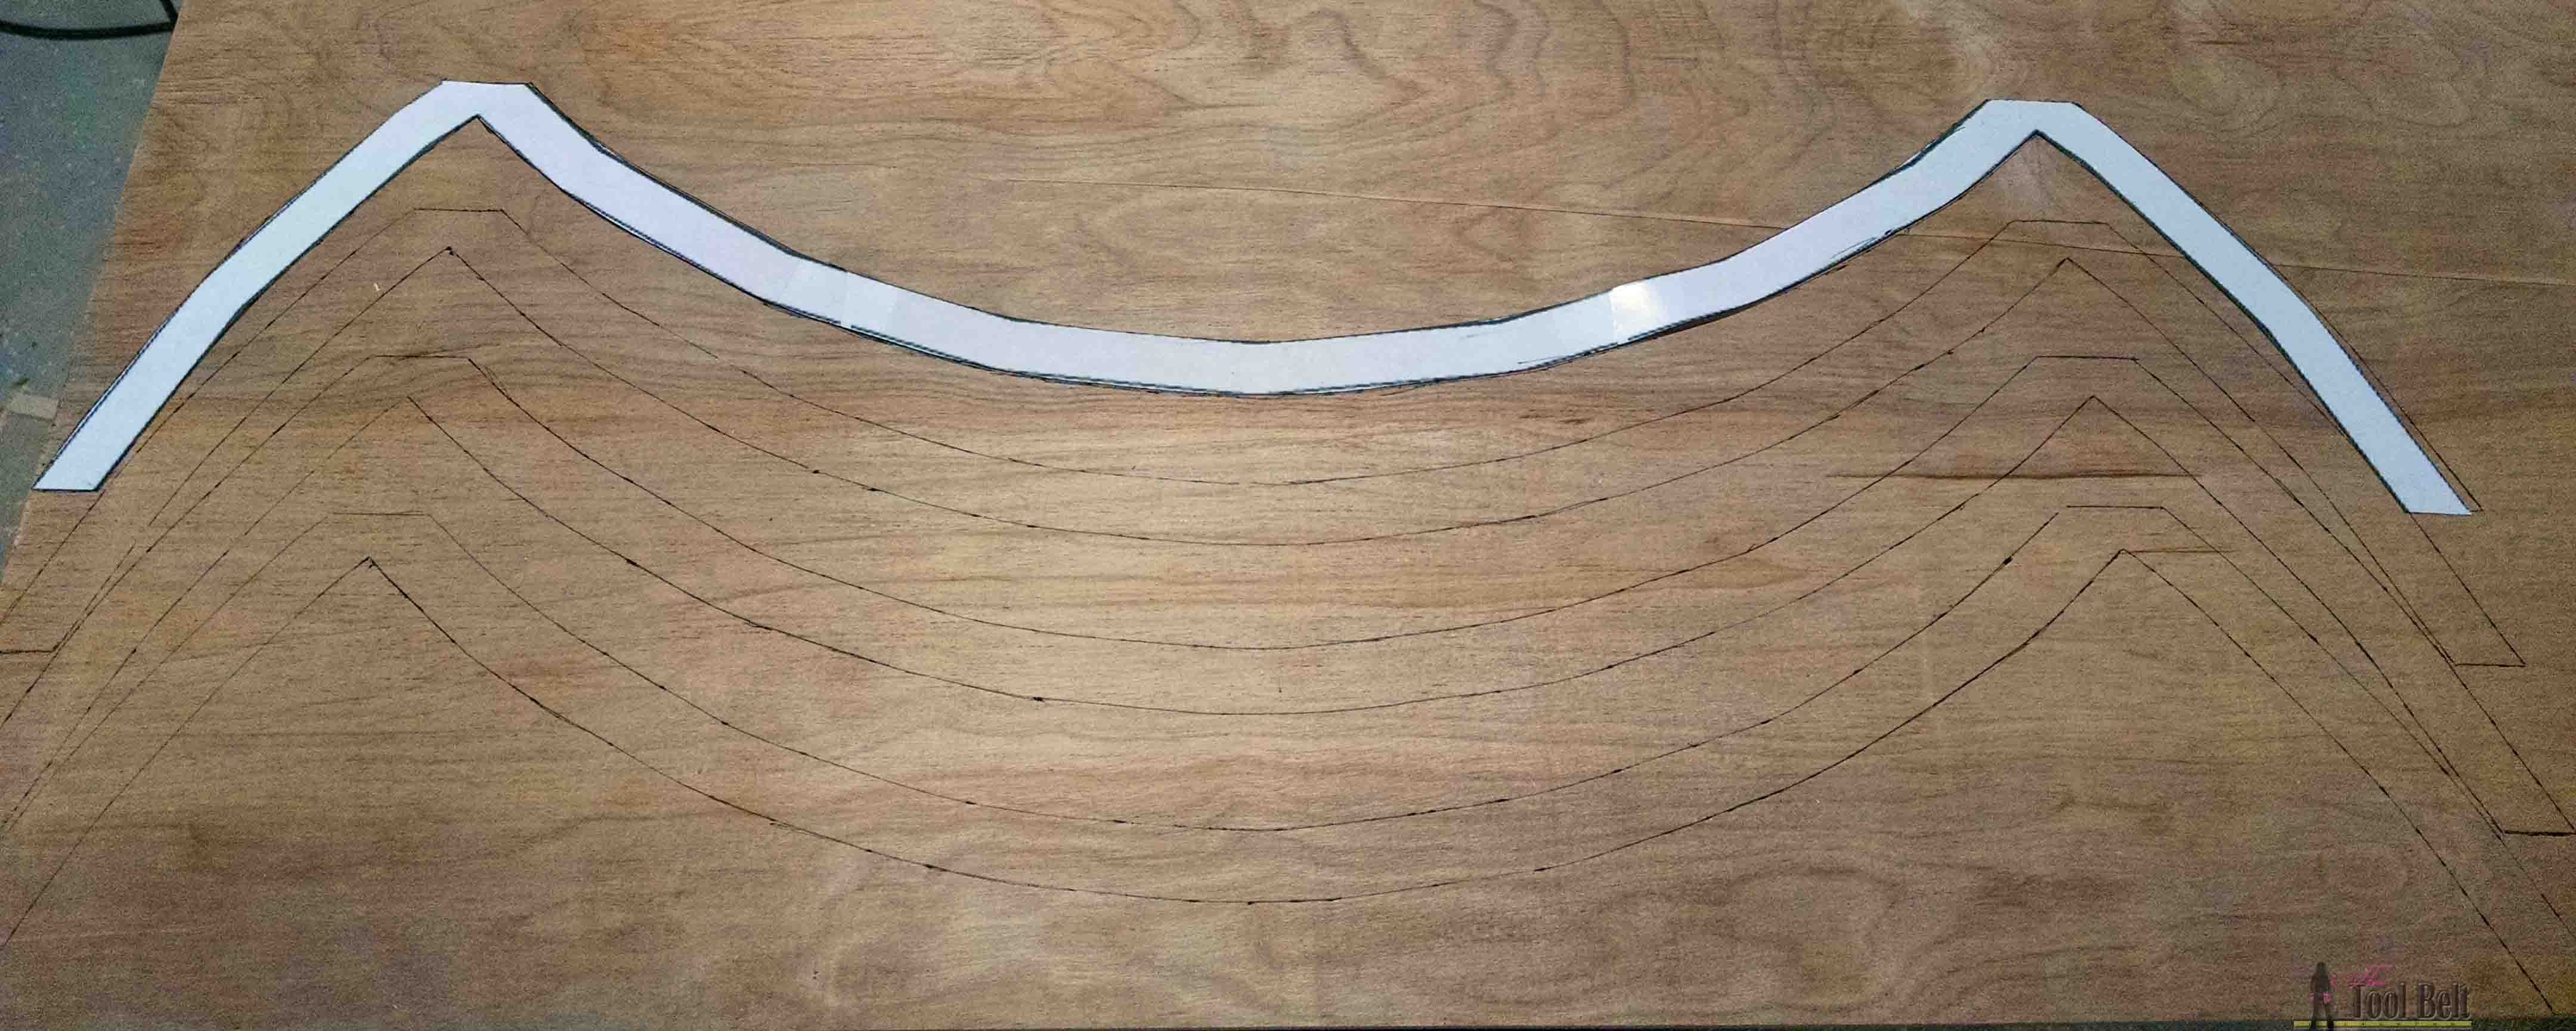
I made a little bit of trim to accent the doors. It is cut from 3/16″ plywood. Download and print (settings at 100%) Curvy molding 1, Curvy molding2, Curvy molding 3. Line up the pattern, tape together, cut out the curve (make it smooth) and trace onto the 3/16″ plywood. Use a band saw, scroll saw or jig saw to cut out the molding and sand smooth.
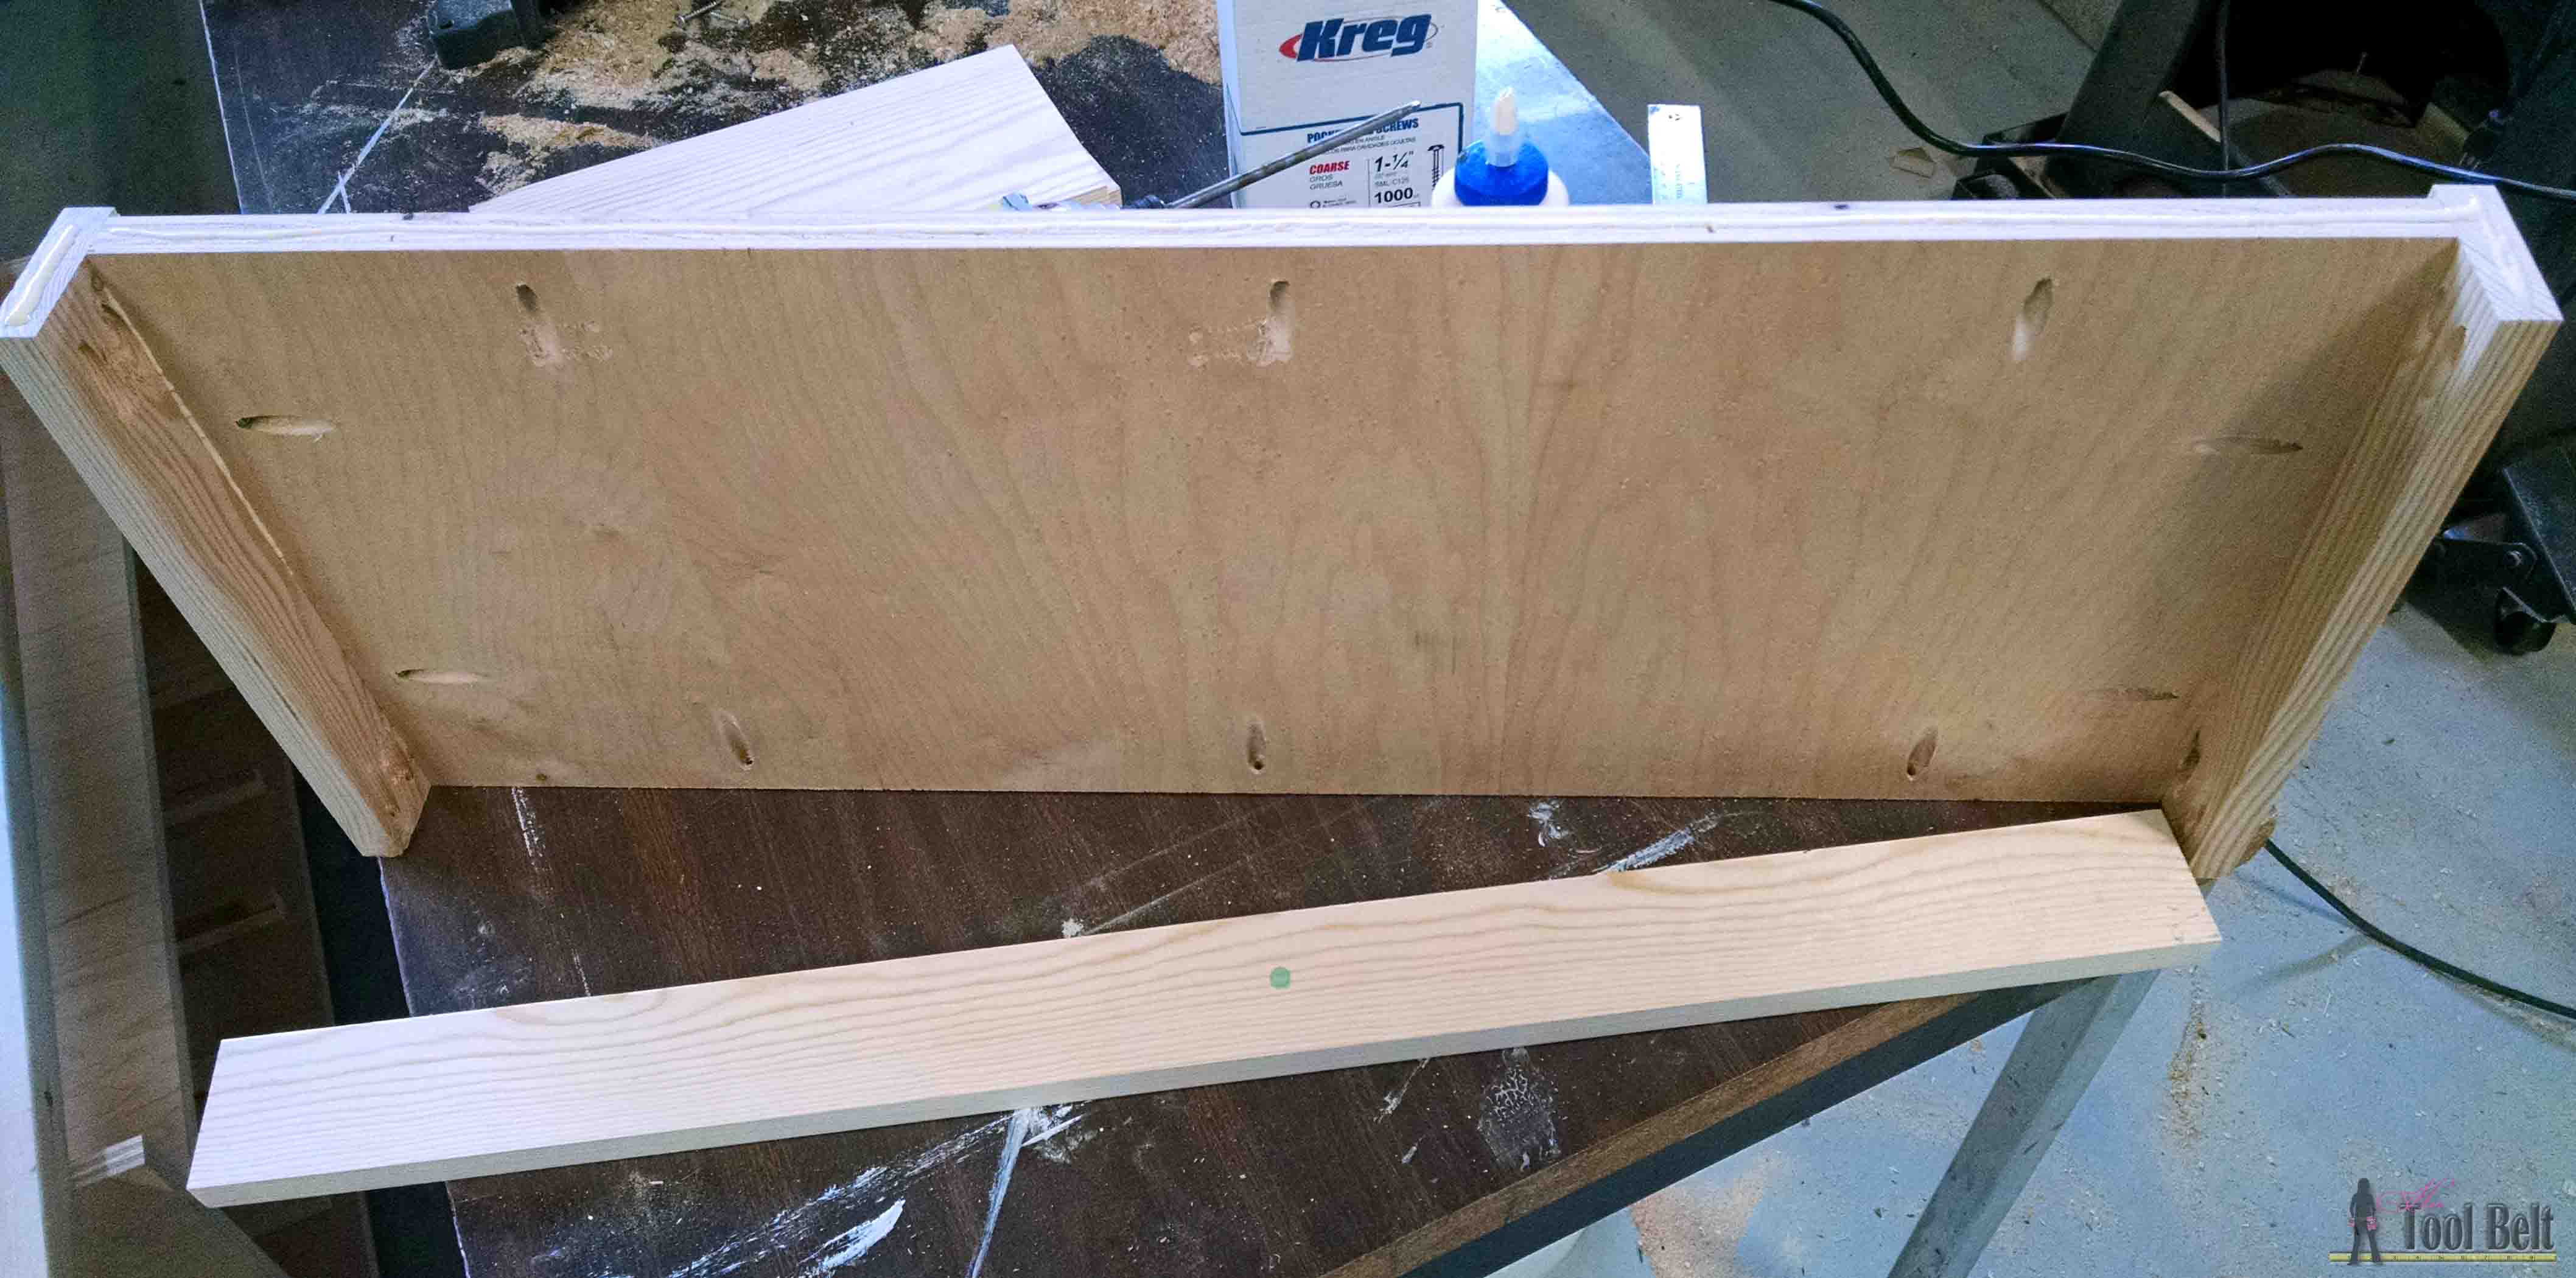
Glue and secure to the door with 5/8″ or 3/4″ brad nails.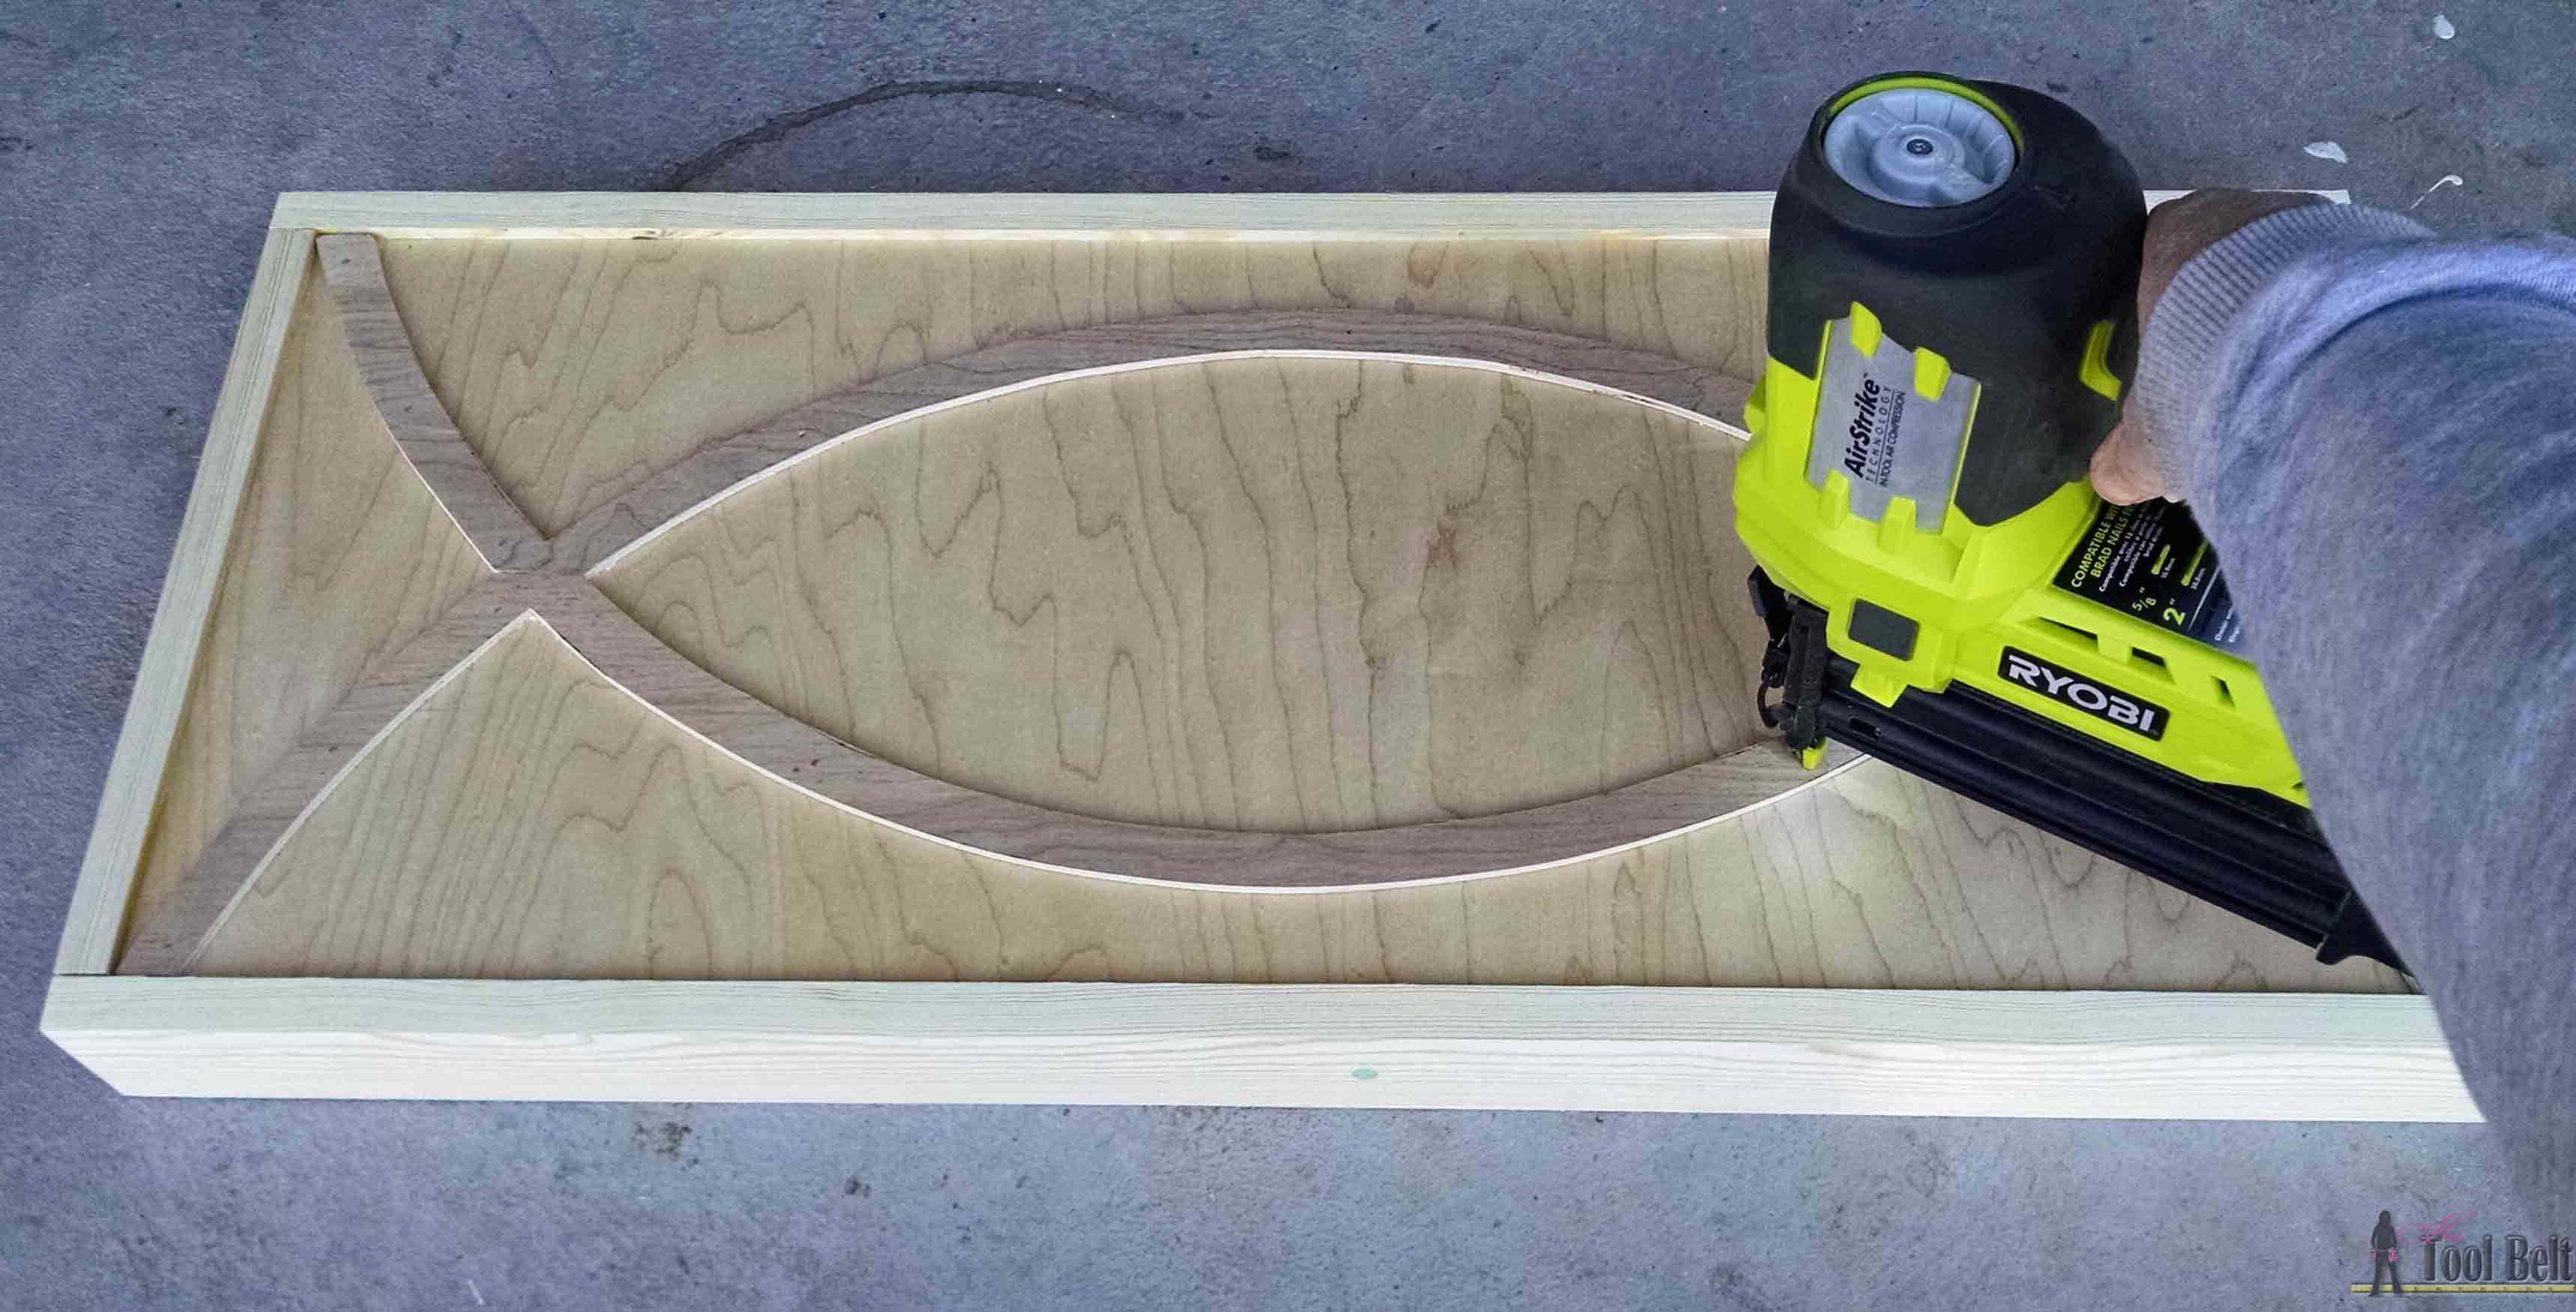 Mount the door onto the side panel of the cabinet with hinges. You’ll want a small gap above and below the door, so it can swing freely. Add magnet catch to keep the door closed.
Step 3
Drill pocket holes in both ends of the 2 1/2″ x 12 1/2″ pieces. Also drill pocket holes in the 2 1/2″ x 12 1/2″ and 2 1/2″ x 18″ pieces to attach to the 14″ x 18″ piece. Use wood glue and 1 1/4″ pocket screws to attach together. I inset the 12 1/2″ piece 1/4″ just to add detail.
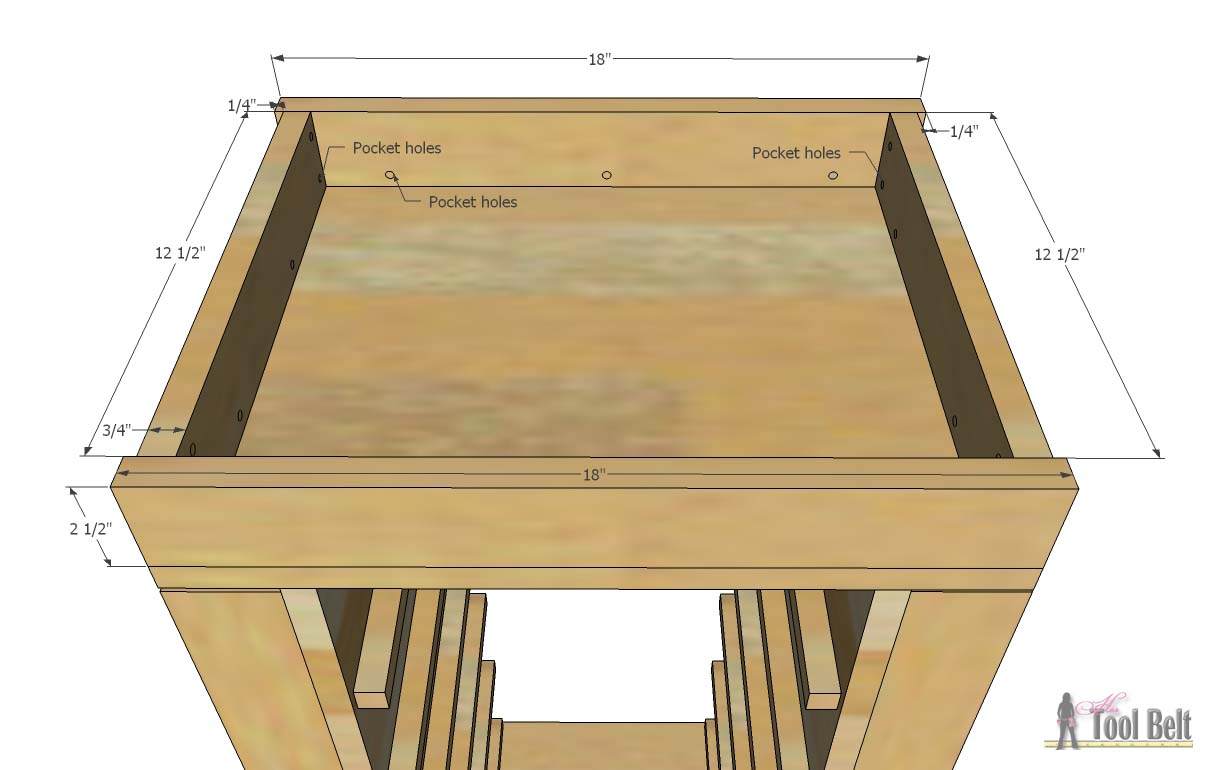
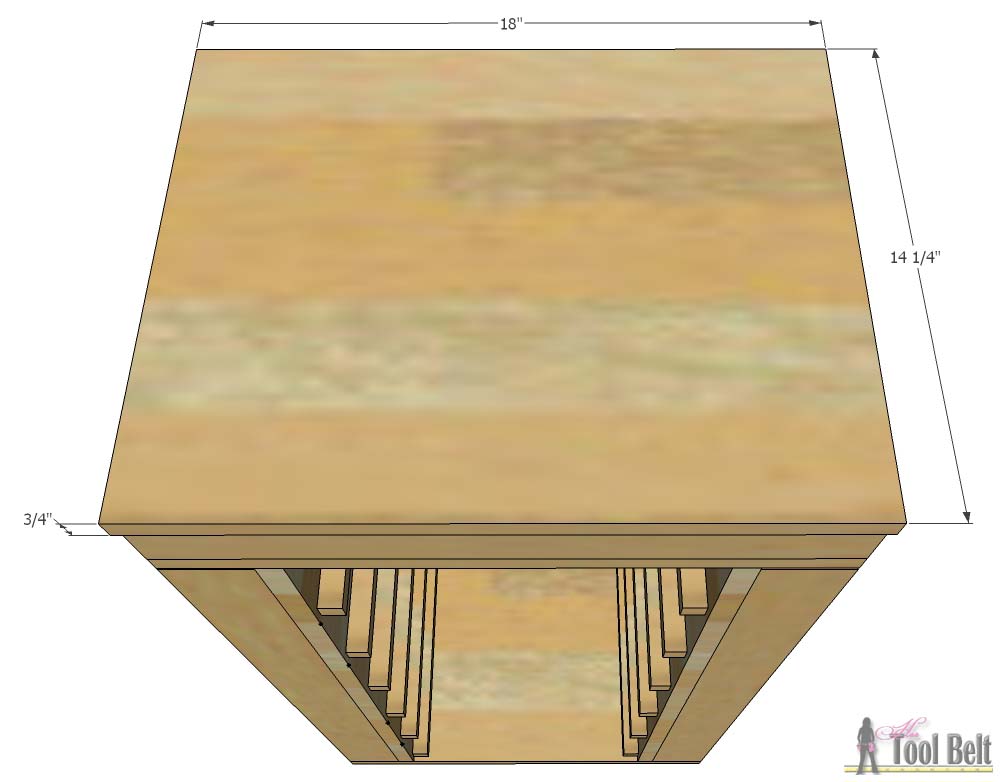
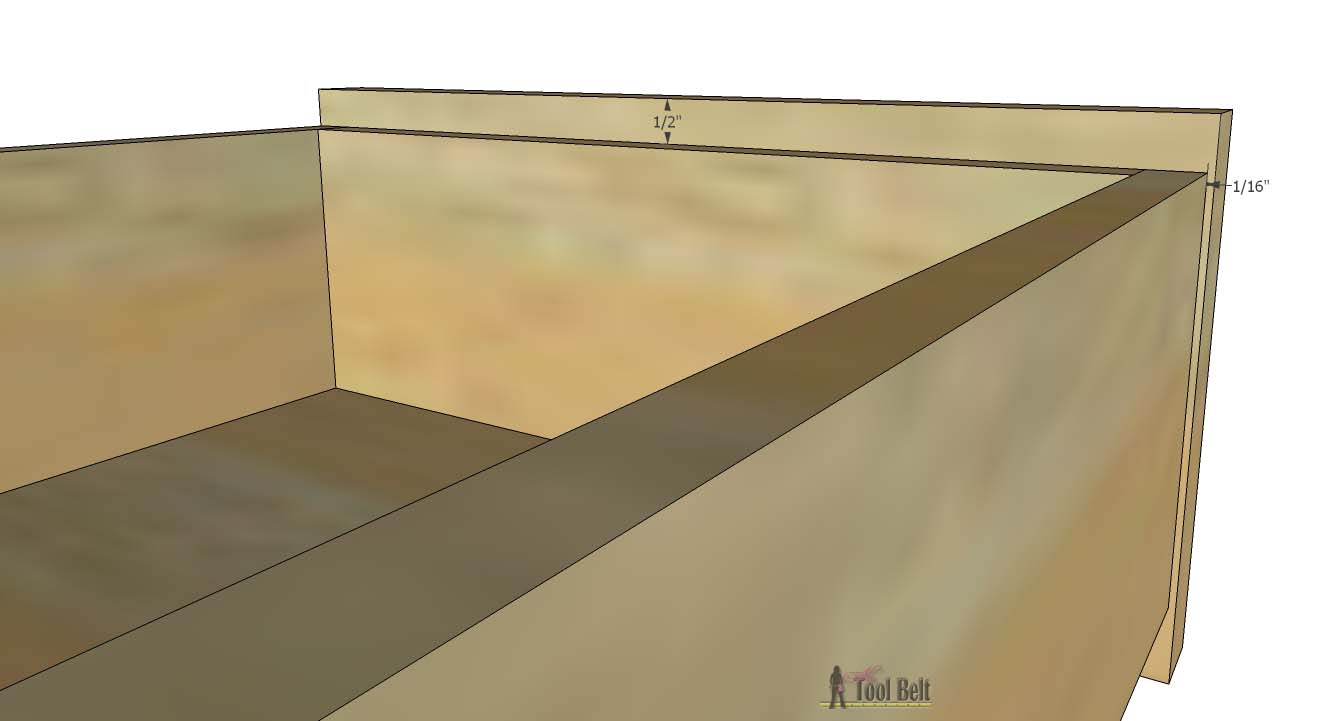
Attach the top piece with hinges, there is a 1/4″ hang over on the front.
 Step 4
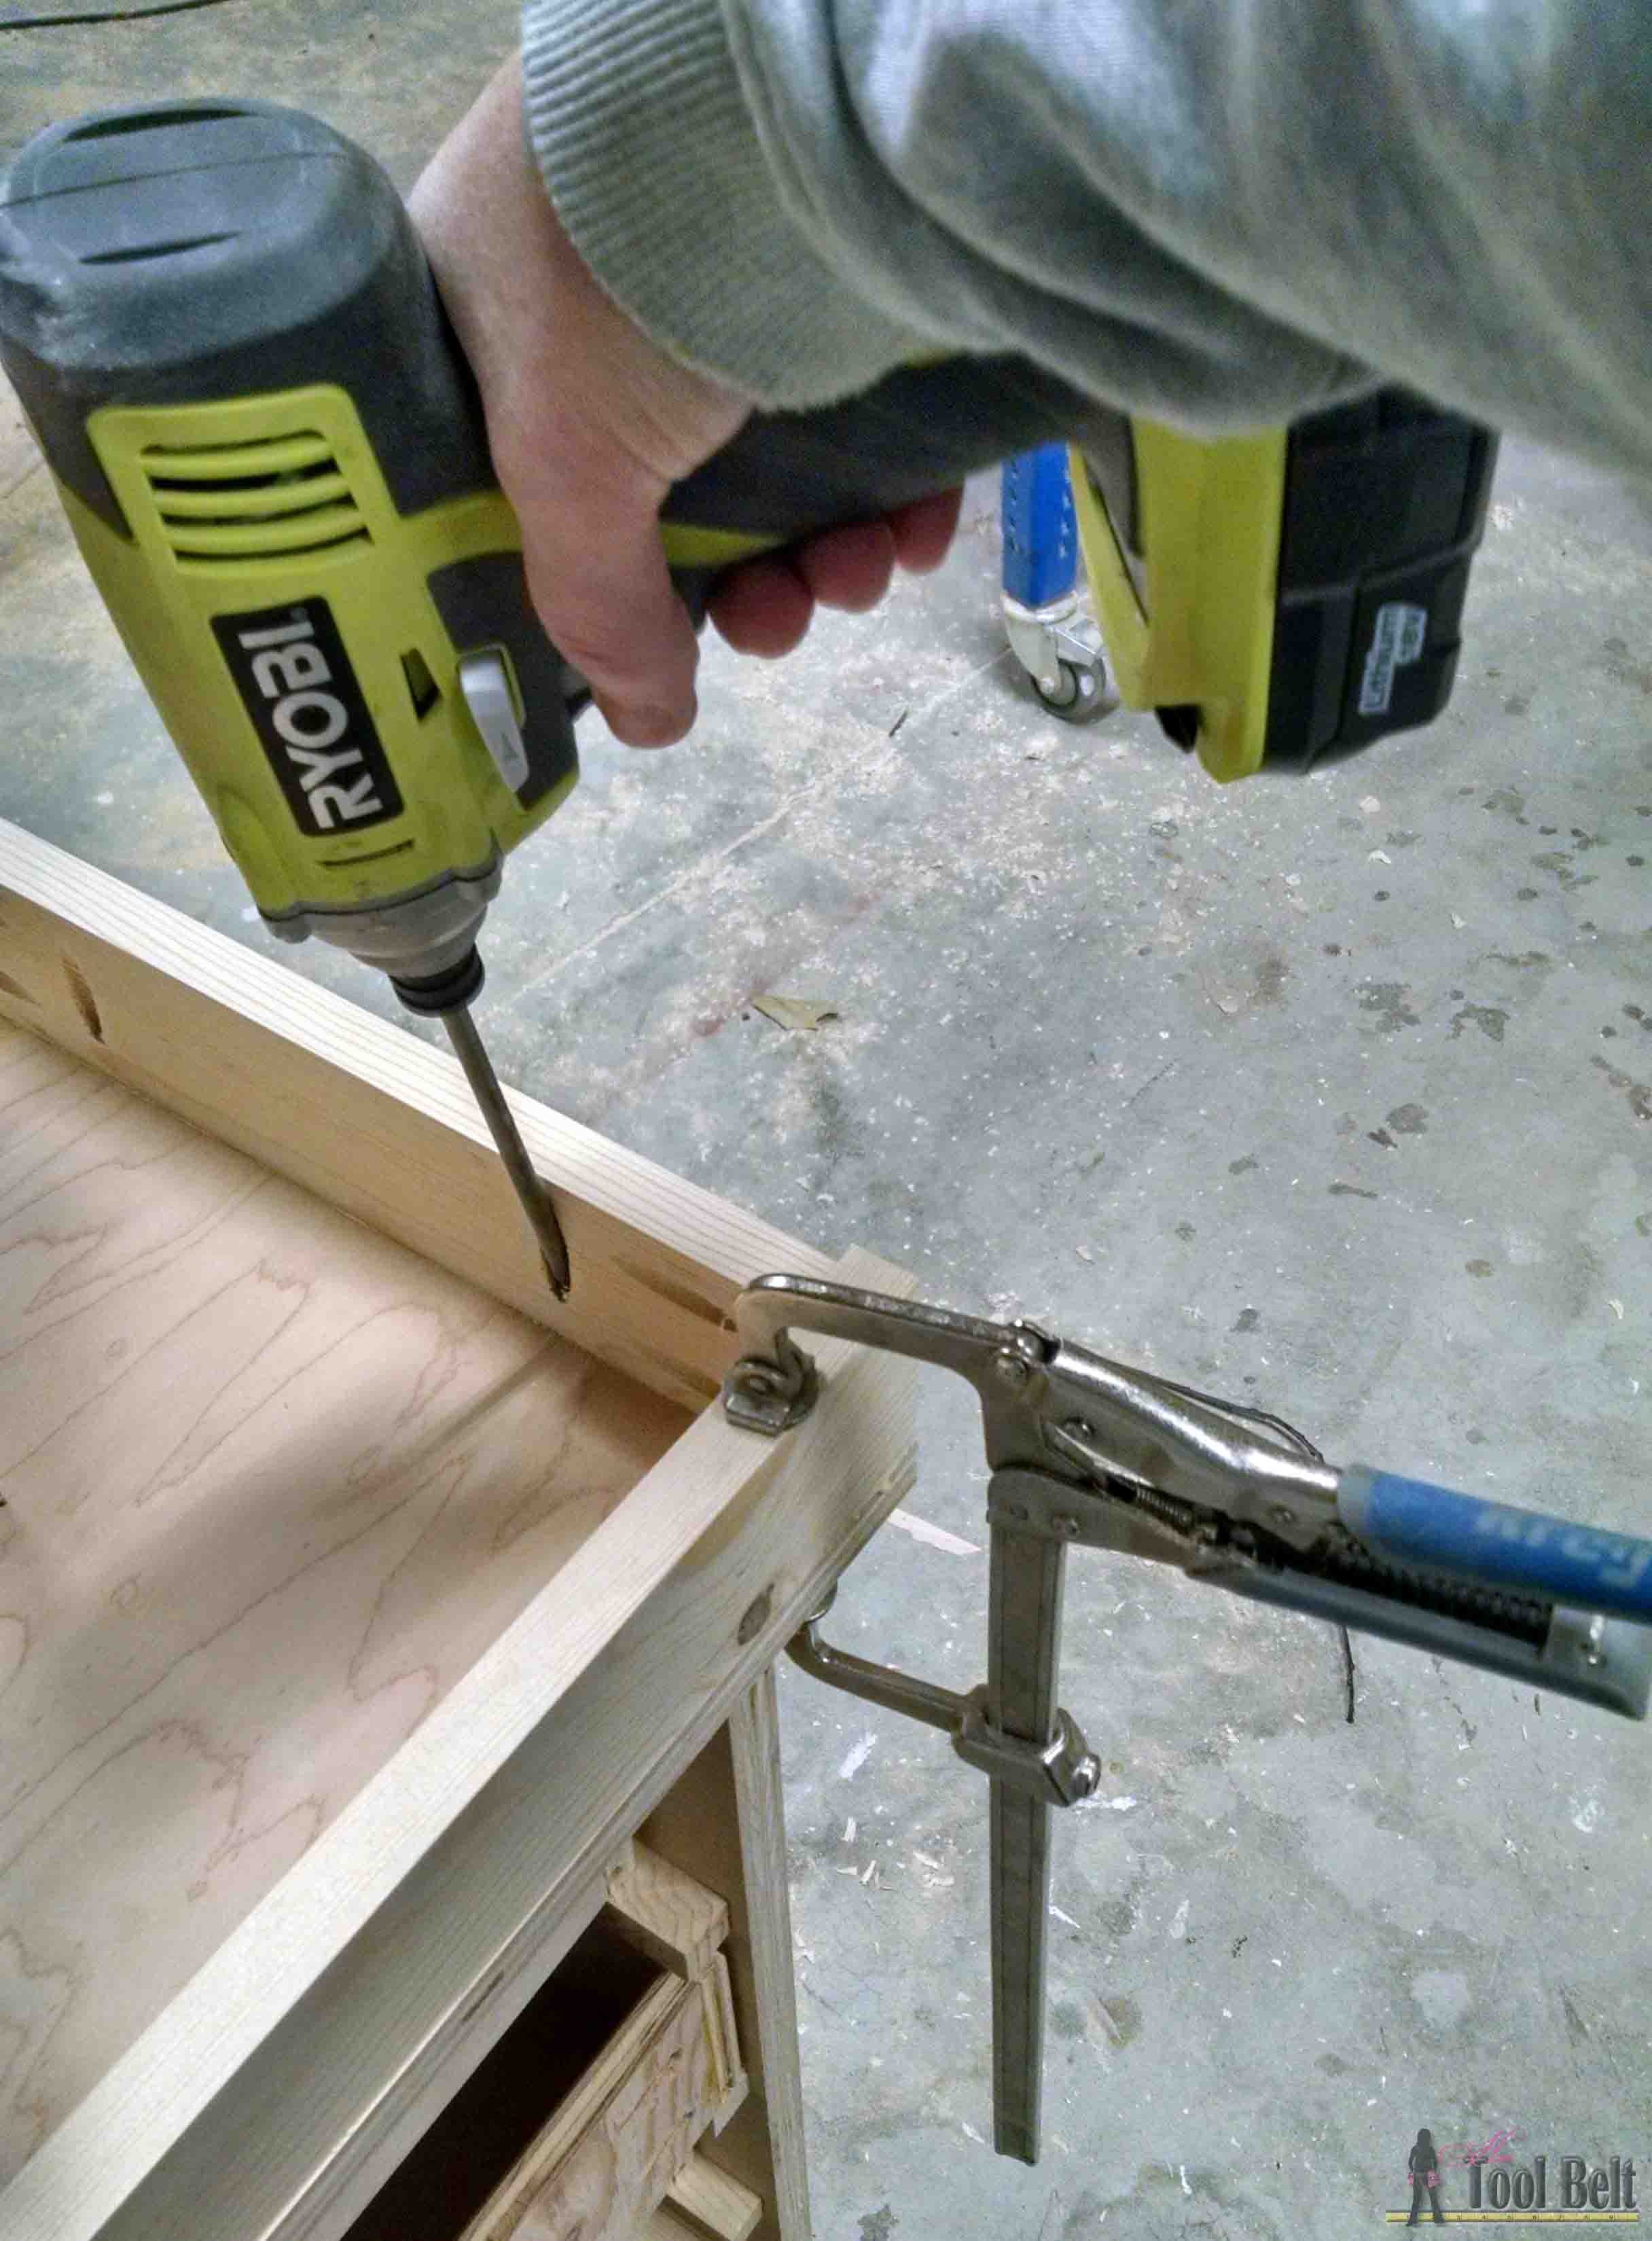
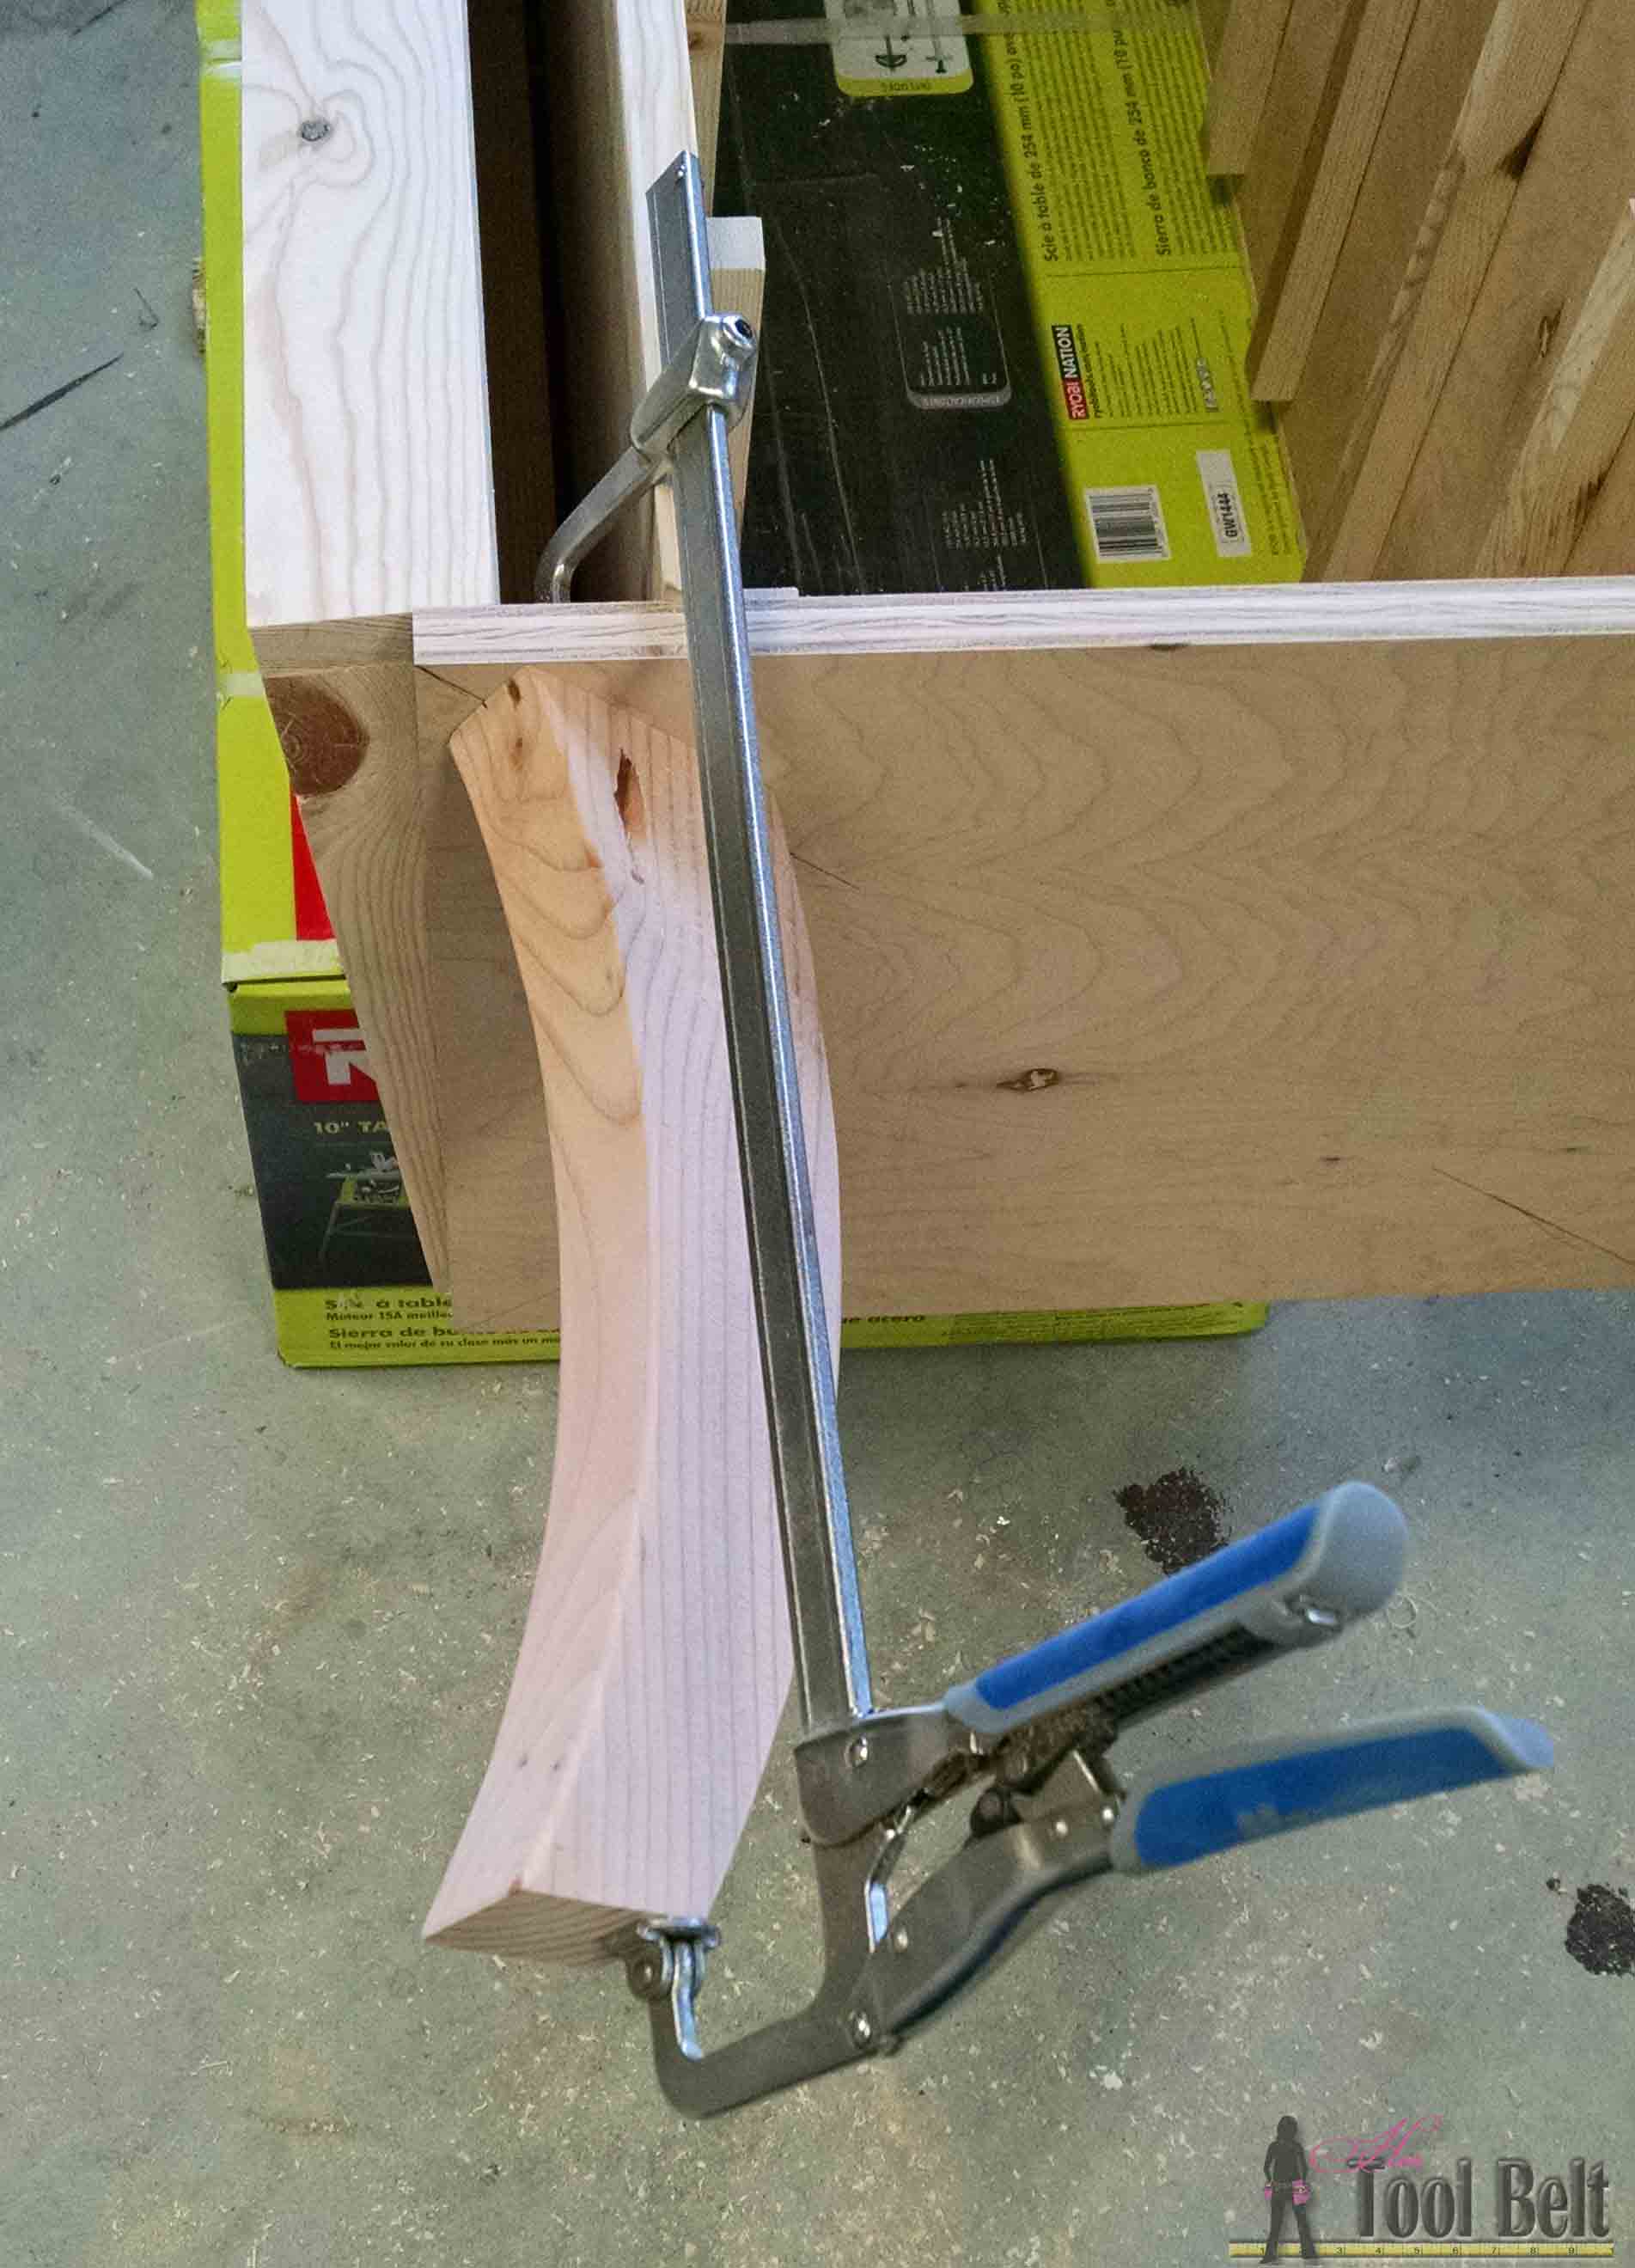
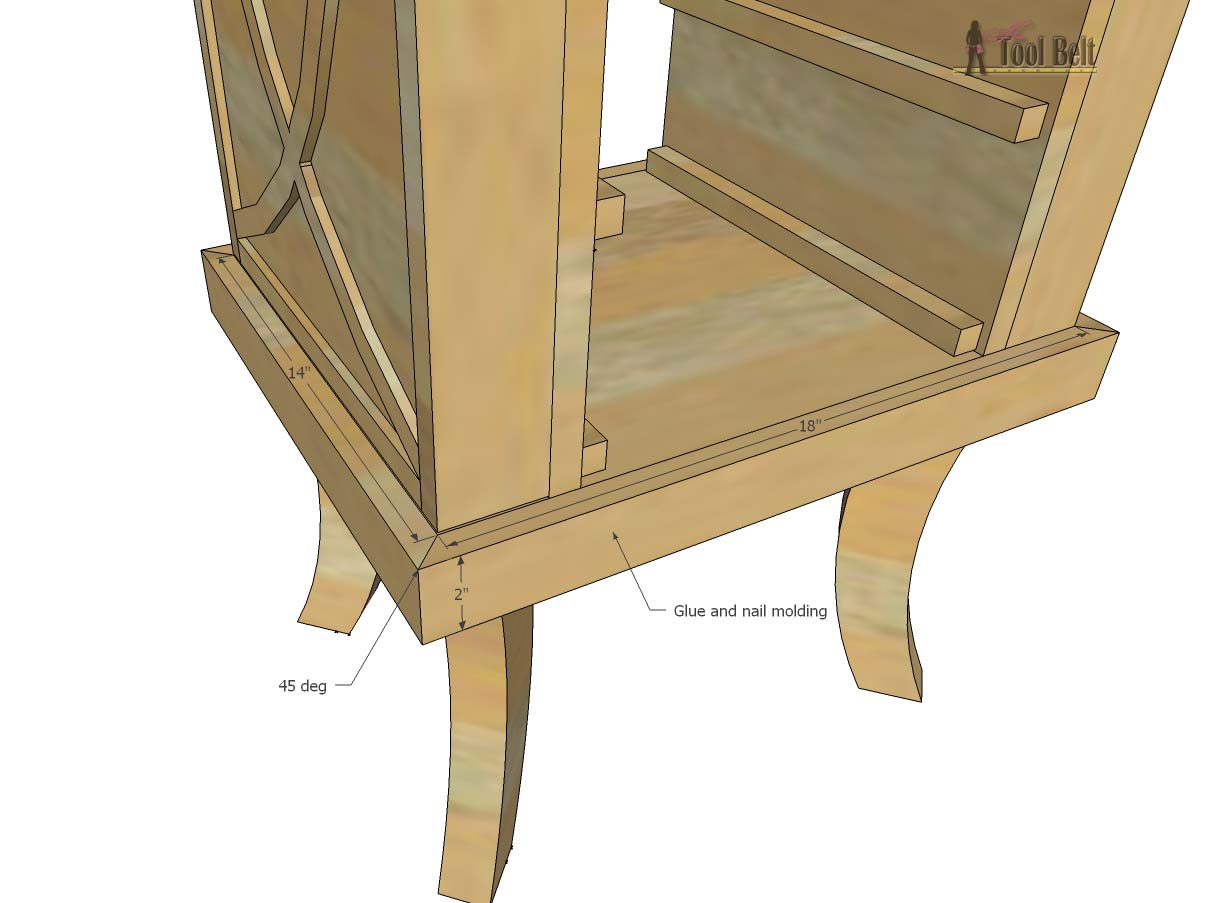
You can add whatever feet/legs you want. I wanted to keep the curve detail going and decided to make DIY legs. They are cut from a 2×6 using a band saw, scroll saw or jig saw. Download and print the pattern leg template 1 leg template-2. Line up the pattern, tape it, cut it out and trace onto the wood. Cut out the legs and sand smooth. Drill pocket holes for 3/4″ material on both sides of the legs.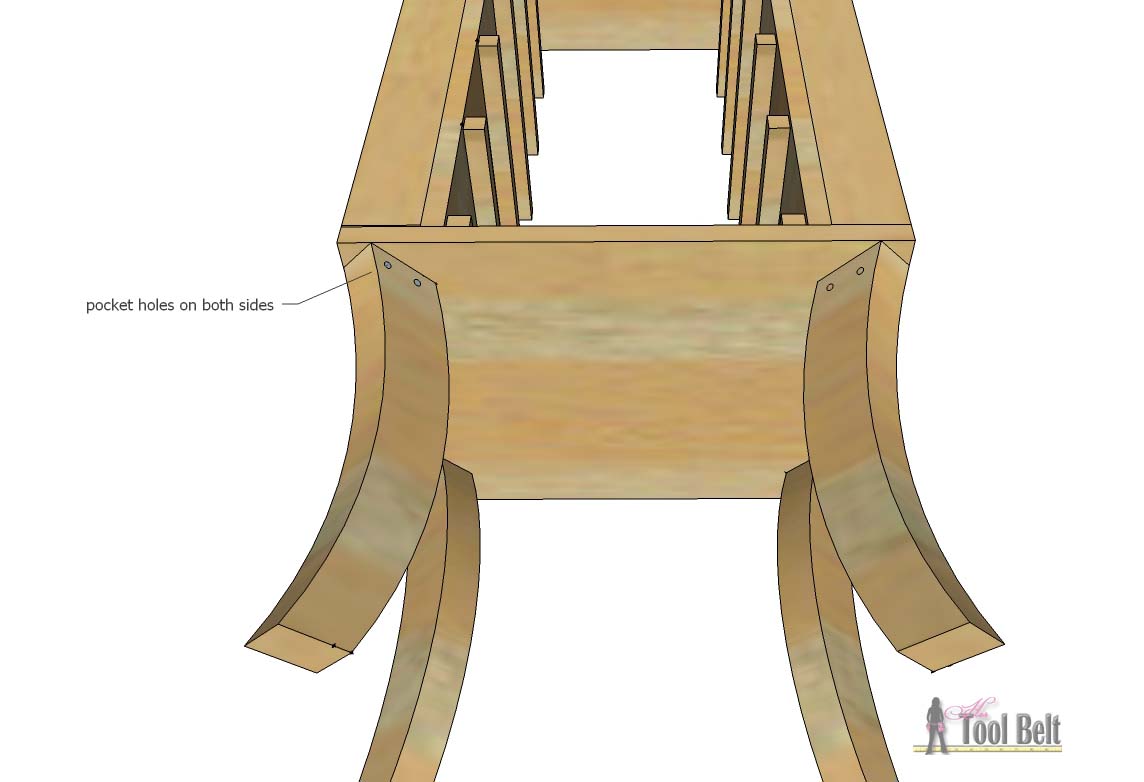 Use wood glue and 1 1/4″ pocket screws to attach the legs.
Step 5
On each of the 4″ x 13″ drawer pieces cut a dado that is 1/4″ from the bottom 3/8″ deep and 3/16″ wide (about 2 passes on the table saw).
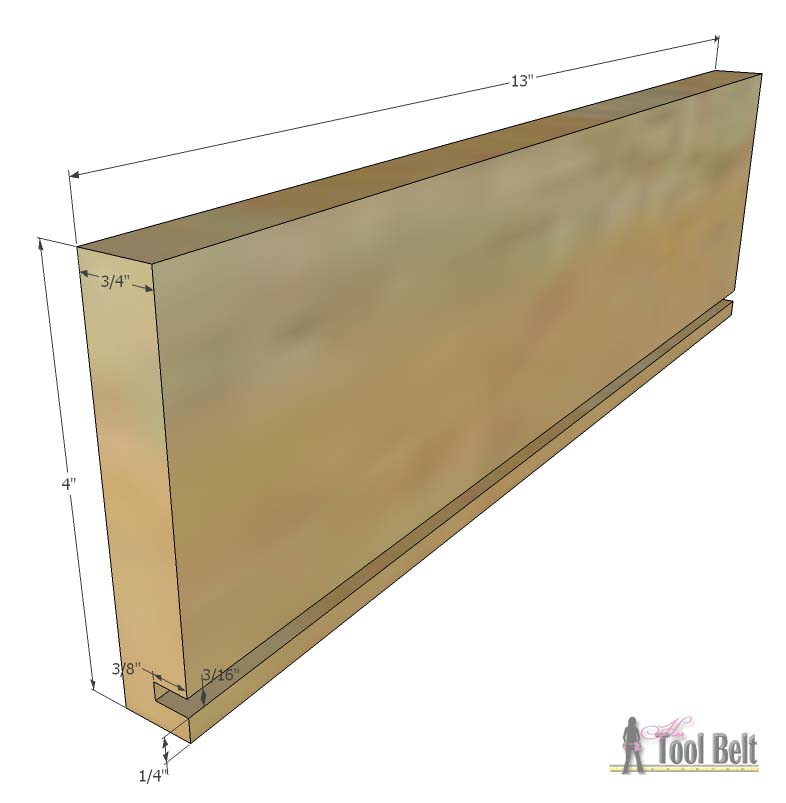
On each of the 4″ x 9 3/4″ drawer pieces cut a dado that is 1/4″ from the bottom 3/8″ deep and 3/16″ wide (about 2 passes on the table saw). On the opposite side as the dado, drill pocket holes in both ends to assemble the drawers.

Cut drawer bottoms from 3/16″ plywood (5 mm) that are 10 3/8″ x 12 1/8″.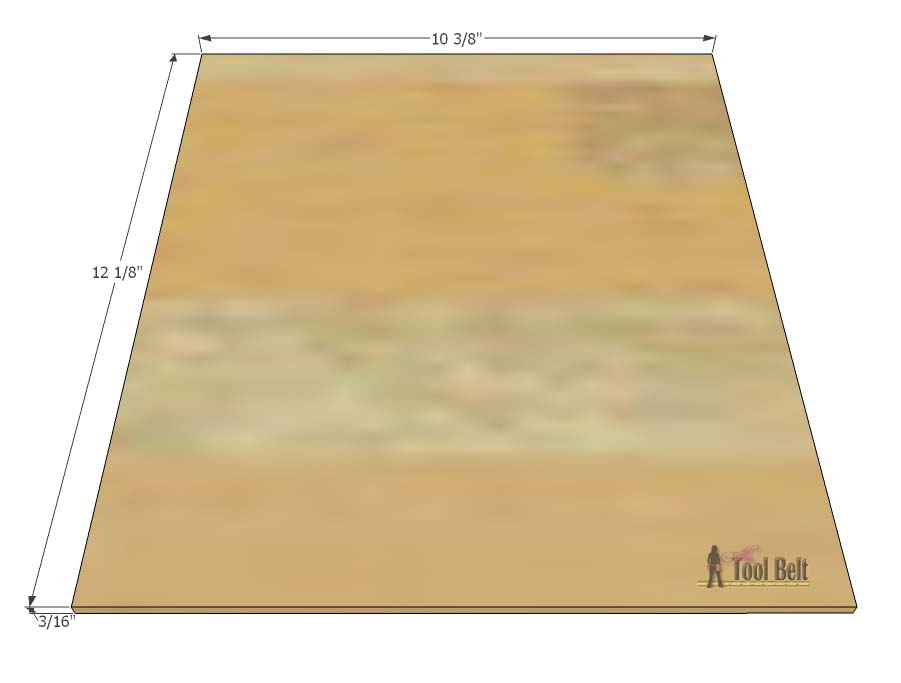
Use wood glue and 1 1/4″ pocket screws to assemble the drawers.
 Optional: I routed a 1/4″ round over profile on the top edges of the drawers.
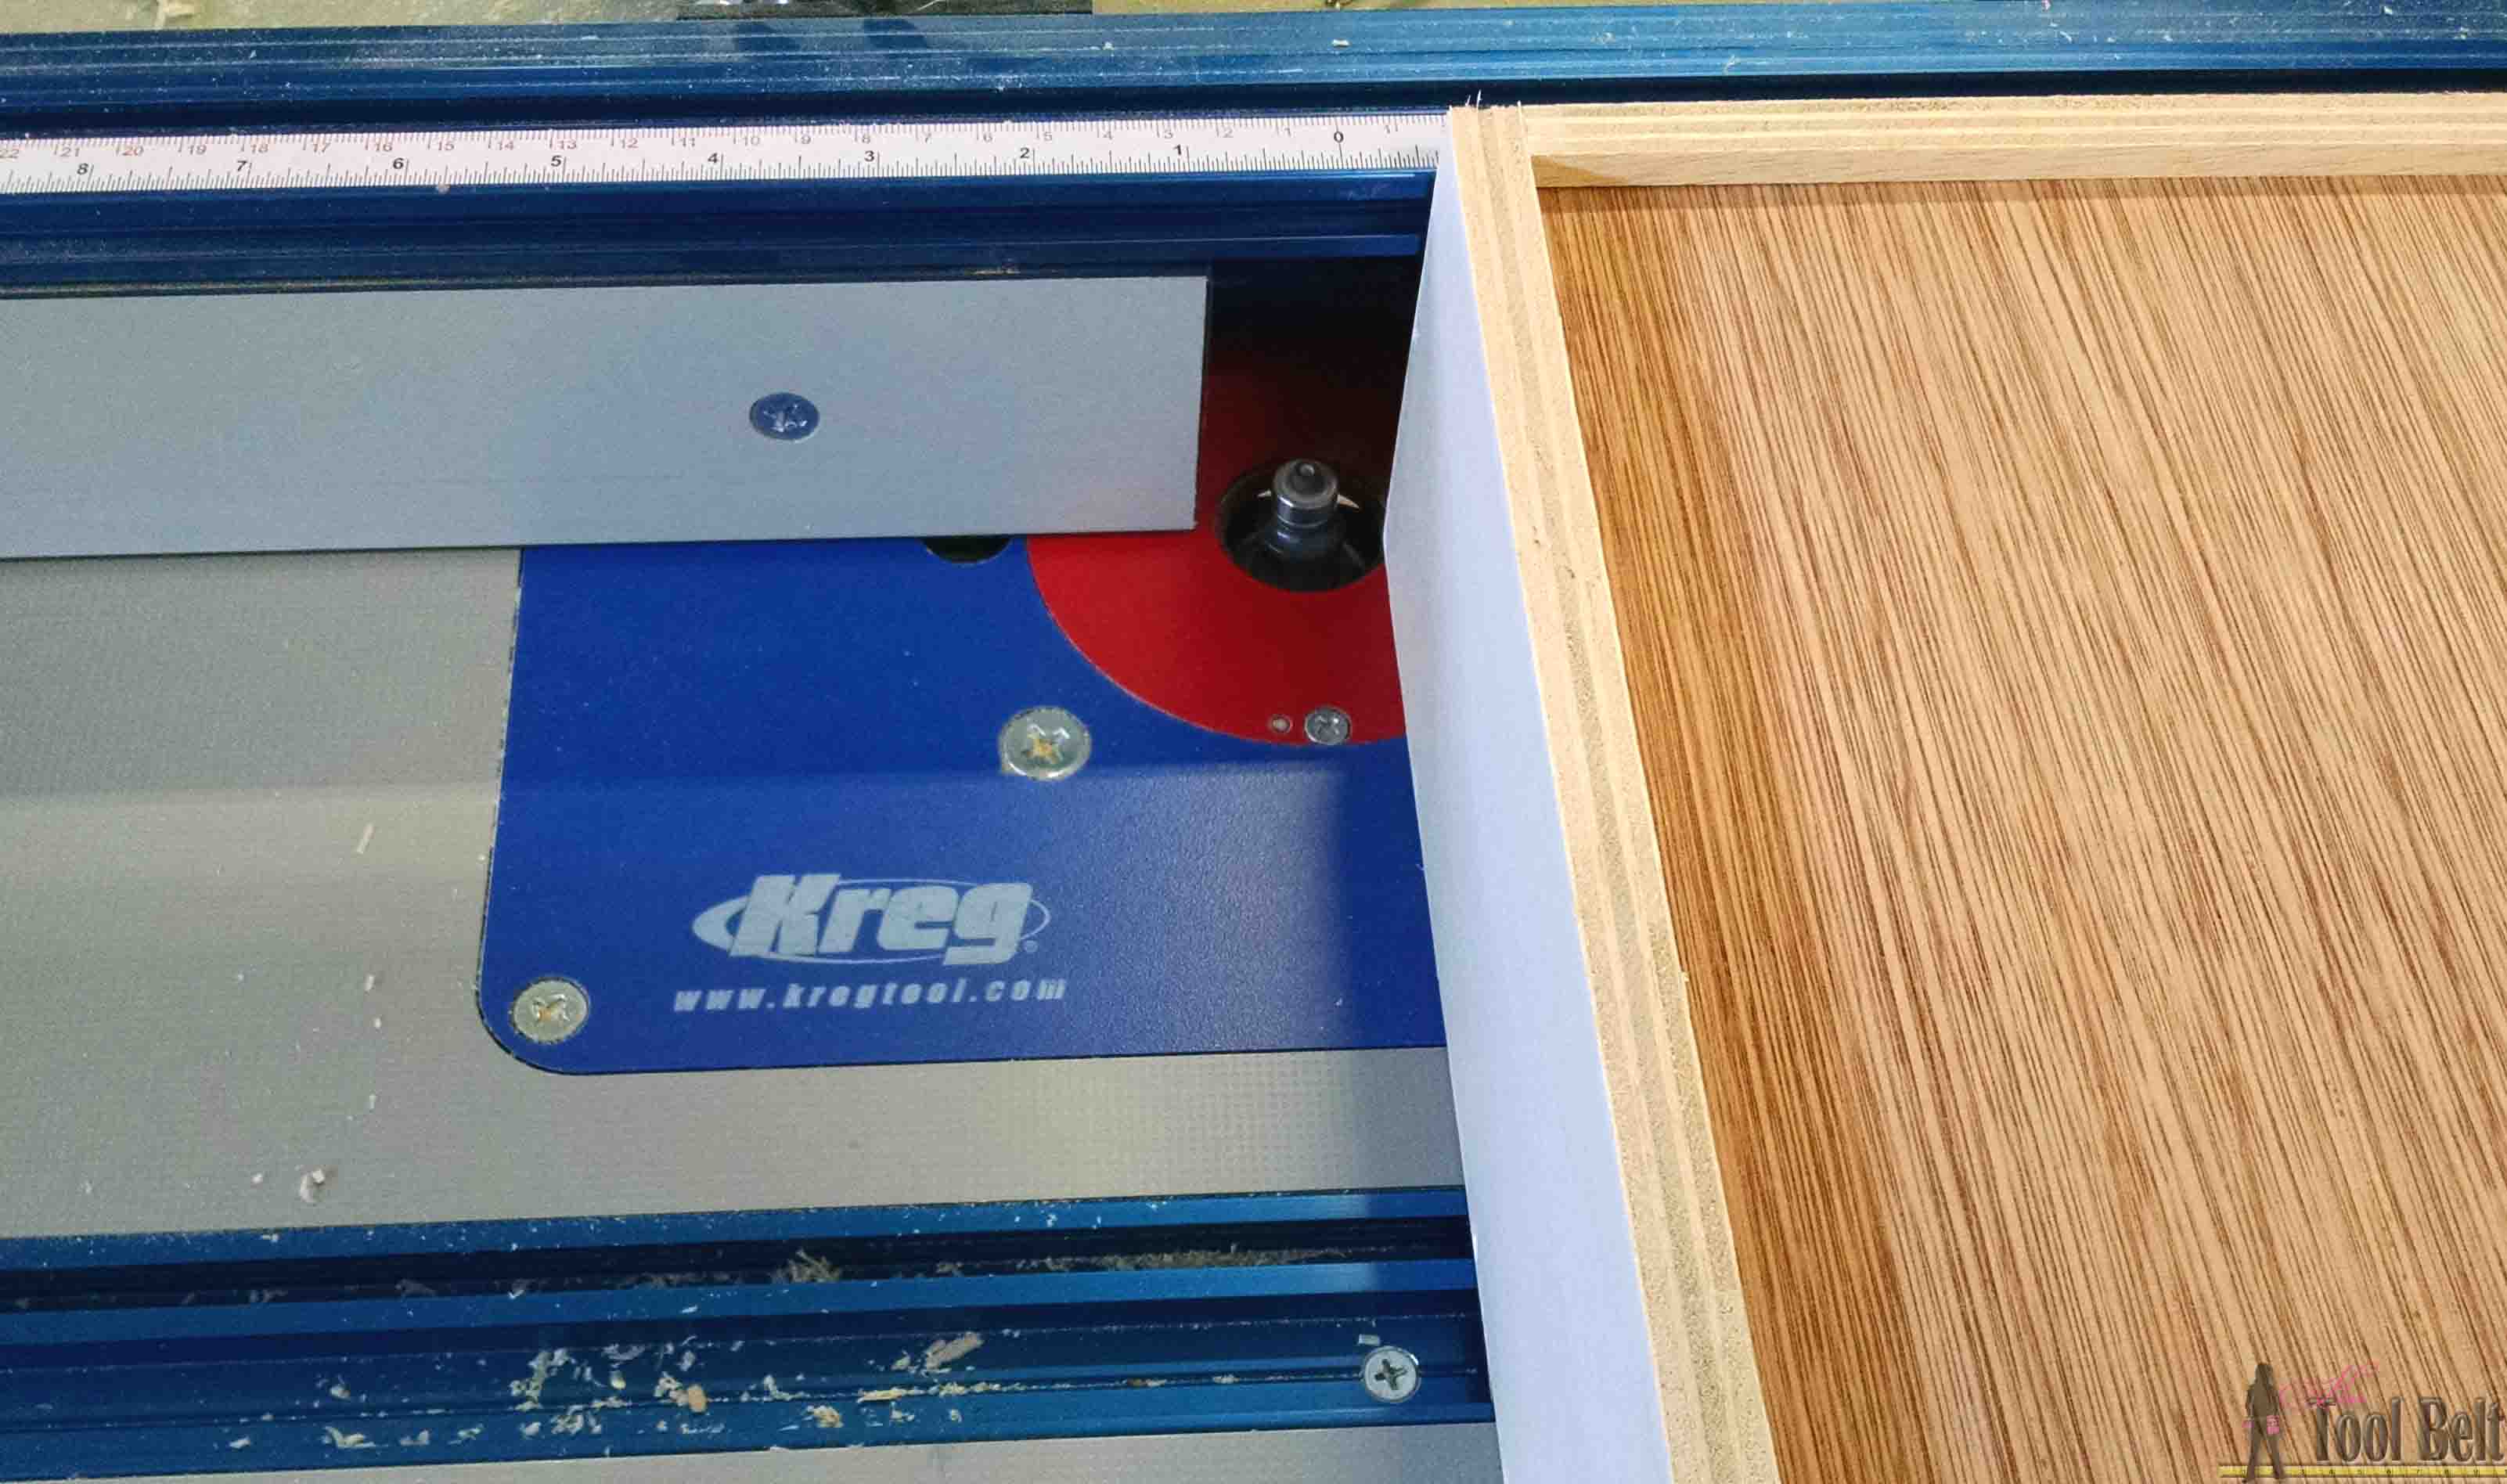
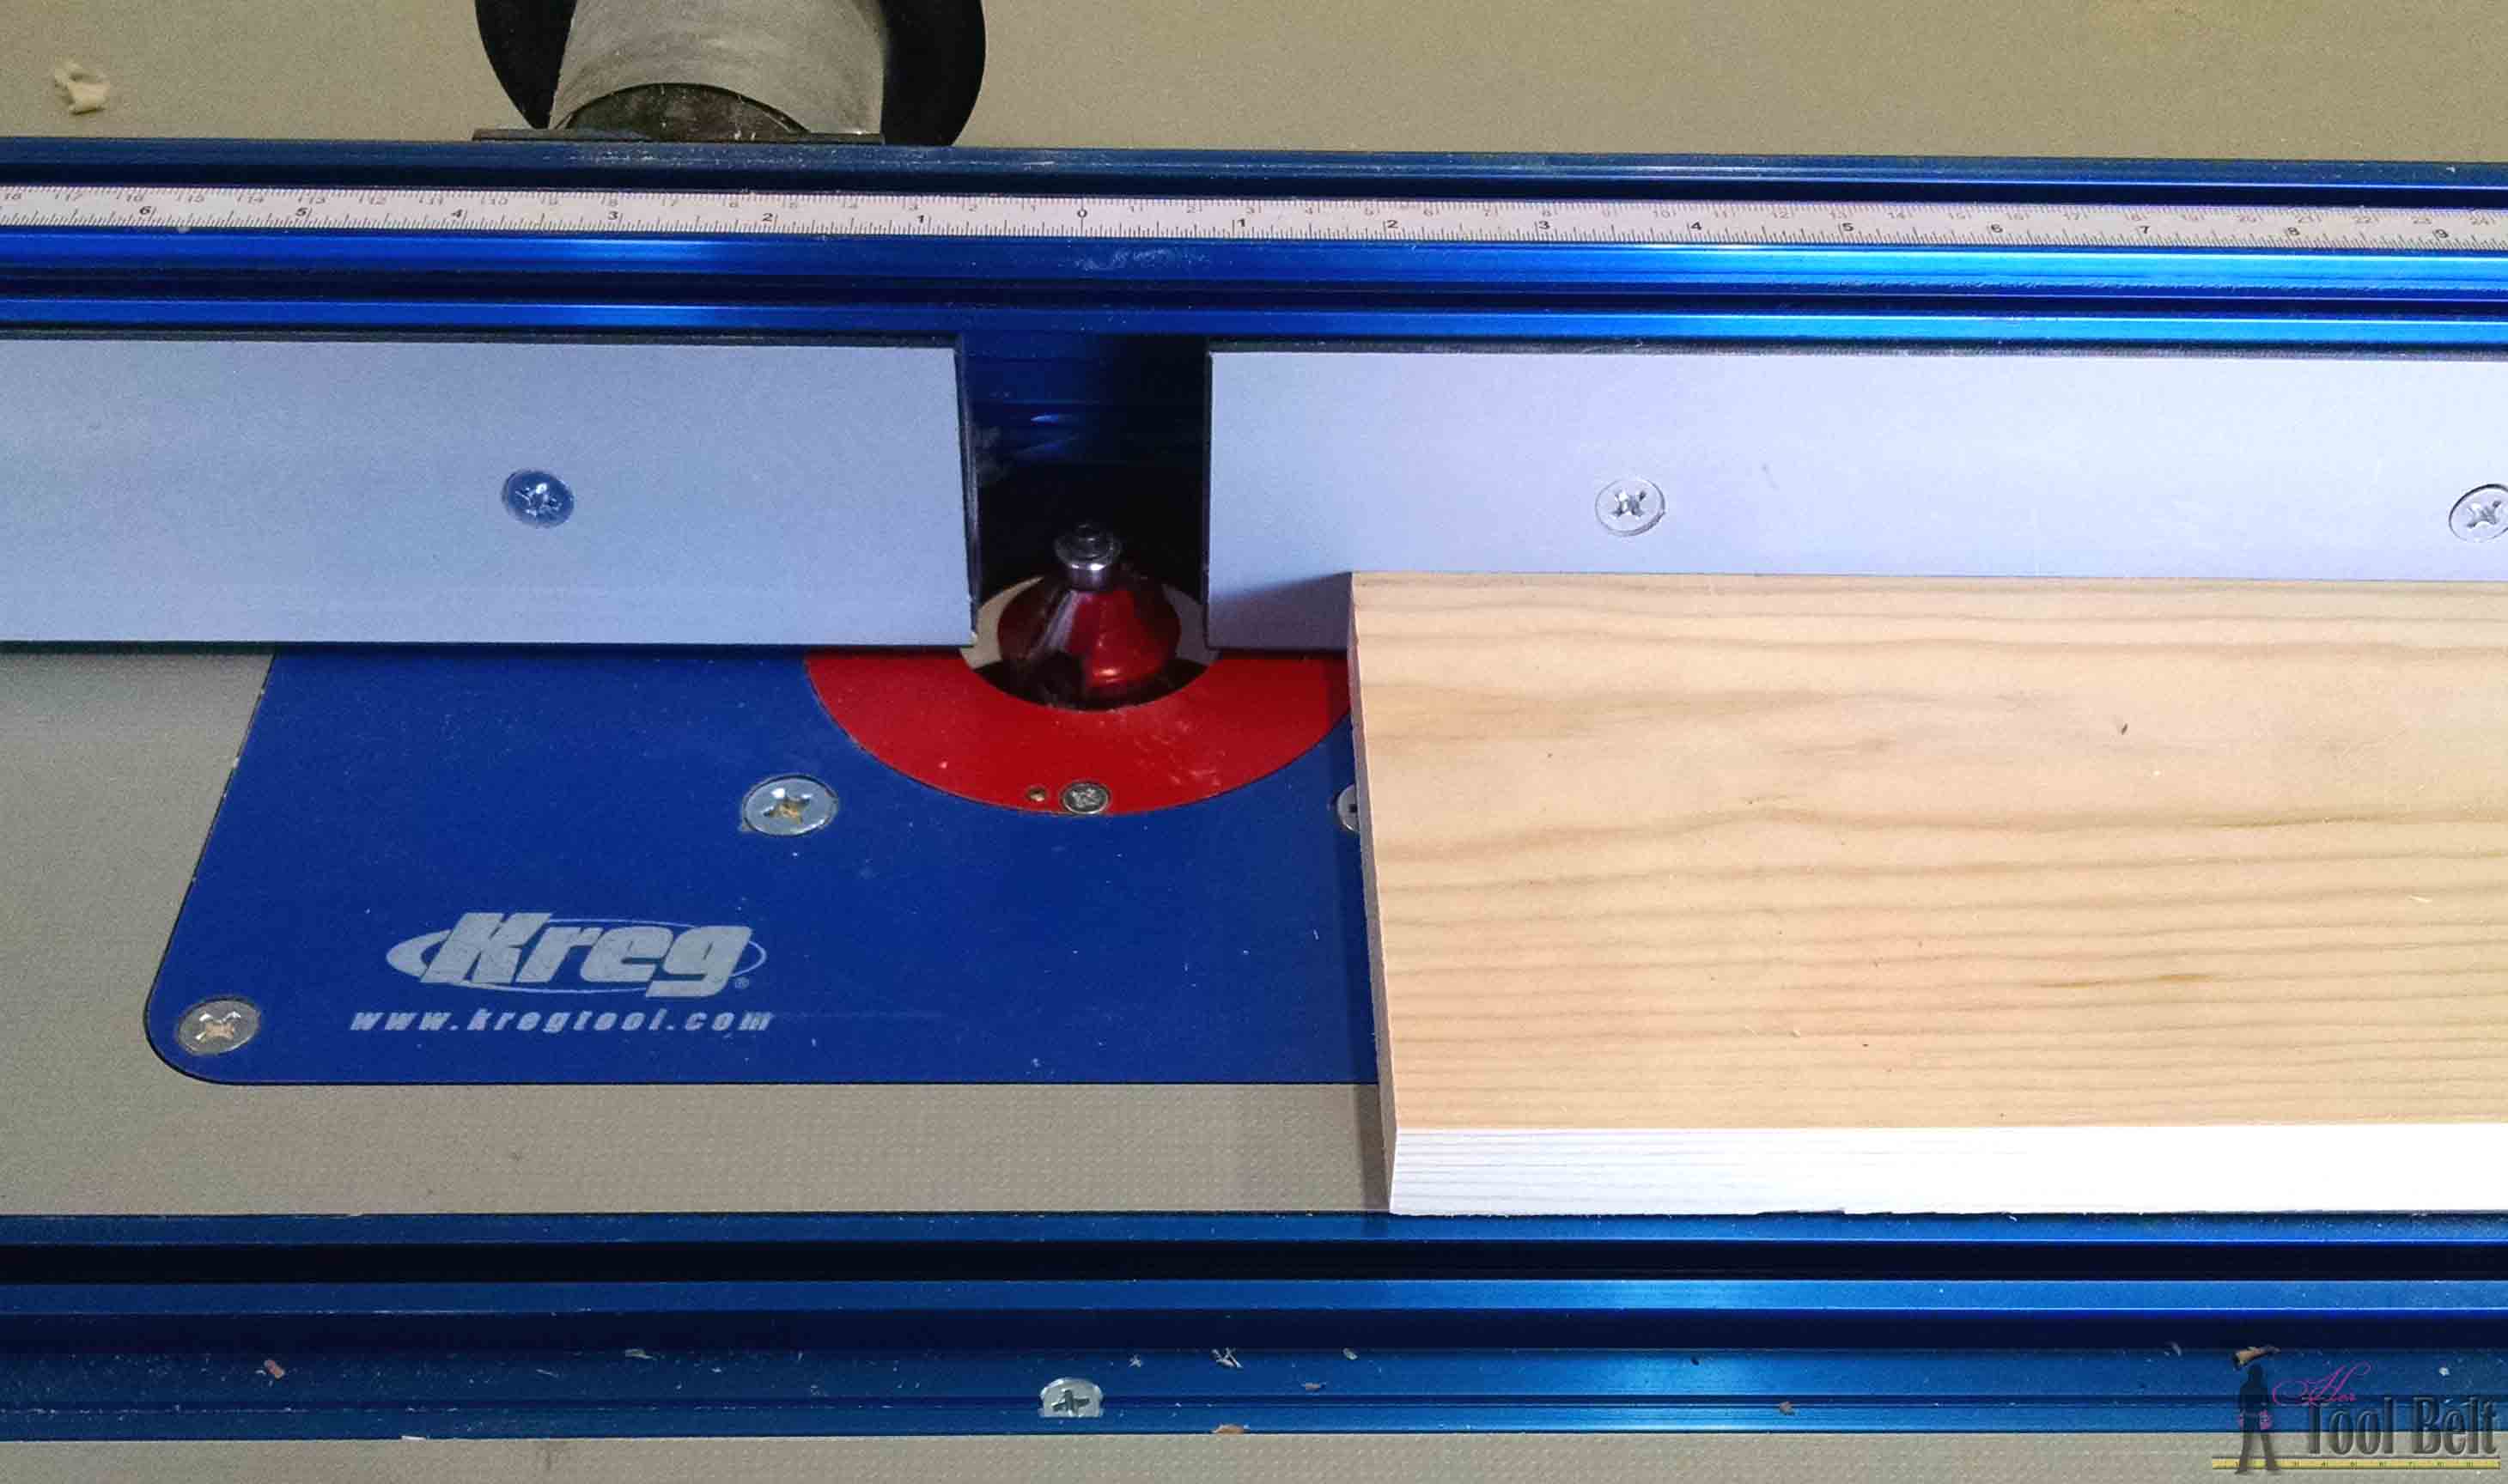
Cut the drawer fronts. I used my Kreg Precision Routing Table System (affiliate) to route a profile around the drawer fronts. (Tip for routing: route the end grain edge first, then the side. The end grain is more likely to tear out, then when routing the side, it’ll clean up most tear out.)
Attach the drawer fronts to the drawers by using 1 1/4″ screws through the drawer into the drawer front.
Step 6
To cover up the plywood edges that show, you can use edge banding, molding or make your own molding. A cheap way to do this is route a profile on the edges of a 1×3, use a table saw to cut off the molding 1/4″ thick and repeat. Cut the molding to length and use wood glue and 3/4″ brad nails to secure in place.
Add molding or trim to the bottom.
Optional: Add a back to the cabinet from 3/16″ plywood.
Step 7
Apply wood filler to any cracks, blemishes and pocket holes as necessary, allow to dry. Sand the wood filler and the cabinet smooth, ending with 120-150 grit sand paper. If staining, start with wood conditioner, then stain according to the manufacturers directions and allow to dry. If painting, use paint primer and allow to dry, then paint with your favorite paint. Once the paint is dry add drawer pulls, magnet catches, mirror, lid support and 1″ cup hooks to the cabinet.
Download the Jewelry Cabinet plans
Pin it!
Now for the giveaway fun. Enter to win this jewelry cabinet as a gift for your Mom (or any special Mom in your life). Follow the Rafflecopter instructions below. The giveaway will end at midnight MST on April 30, 2015. This giveaway is open to residents of the USA, void in Alaska and Hawaii. The winner will be notified by email and will have 48 hours to respond to claim the prize.
DISCLOSURE: This giveaway is sponsored by Kreg Tool Company. I received compensation and/or product for this post and giveaway. All opinions and ideas are 100% my own.
Check out the rest of the Mother’s Day projects here.
Linked to: Link Parties, Savvy Southern Style, HomestoriesAtoZ, Remodelaholic
I looooooove this jewelry chest !! :O
Love your stuff! You’re very talented! I’ve subscribed! And I’d love to win this jewelry chest! : )
Love it!!
Love it
This is an amazing piece. You did a fantastic job!
Amazing work!
Awesome! You’re work is amazing!
It’s absolutely stunning, Amy!
Beautiful work! I’ve subscribed!
Great project, simple plans!
I subscribed! Hope I win, it’s stunning!!
Exactly what my wife has been after me to build for her. Can’t wait to get started. Thanks for the plans.
What a beautiful piece; it will make some lucky gal very happy!
This is gorgeous! Subscribed!
Beautiful !!!
!!! – Thank you for the opportunity and God Bless You
I subscribed
Beautiful!
It’s beautiful!
Amazing and absolutely stunning. Great job Amy!
Awesome work! Absolutely love this cabinet. It’s a must give for Mom’s day
and SUBSCRIBED!!
I LOVE this, Amy! I can’t believe I wasn’t already subscribed to your newsletter. I am now!
This is beautiful & thanks for sharing this with us!
ooolala ~ I am in LOVE with this jewelry box…………. i subscribed and hope to learn lots of great things from you guys!!! <3
Beautiful! Great job!
I hope I win
Looks like a great project,!
This is lovely!
I subscribed to your e-mail!
Love this giveaway! I subscribed
What a AMAZING build, love the wood design on the side..beautiful. Subscrided to e-mail
I only have one necklace, my wedding rings & a pair of earrings. Maybe if hubby made me this, I could finally get some more jewelry!
Now that sounds like a great plan!
subscribed and love this. the Kreg jig is so awesome. I LOVE it use it all the time.
Amy you are my hero! This is stunning! Beautiful job!
i subscribed to your emails! pryfamily5@gmail.com
Thanks for the chance to win
Absolutely love the Jewelry Cabinet….you are very talented. I subscribed and can’t wait to see your upcoming plans.
Love it!
subscribed. I love this it is so beautiful.
subscribed. Love the jewelry chest!
SO perfect for my closet that I just finished DIYing!
My jewelry is still all over the place, though. ;\ I need this cabinet!!
I subscribed! Love this!
What a beautiful place to store jewelry!
Beautiful – I subscribed – wish I was handy with saws and drills and building plans – cause I could never make it but it is awesome
Lovely! I’d gift this to my DIL, actually!
I subscribed. Thanks!
What a beautiful job. The cabinet is beautiful. Would love to win it.
I subscribed.
I’m so envious that you designed and built this by hand! It looks gorgeous!
I love the jewelry cabinet and would love to make it for my mom, but winning it would be so much better
So pretty…i love the work you do
This is a beautiful cabinet! I love it!
This would be perfect for my mom.
You have some wonderful projects on your blog, and thanks for the free plans also. My wife would really love this jewelry cabinet for mothers day.
Fabulous job! Love this!!
That cabinet is stylish storage. Hope I win!!
This is beautiful! I subscribed and am looking forward to more great projects!
I really love this!
Amy this is AMAZING!! I LOVE how ALL of your projects are done ABOVE and BEYOND the normal basic woodworking!! You are super inspirational!!! Keep it up girl!!! I look forward to new projects from you and I am going to have to spend awhile here on your blog checking out old ones I may have missed!!
Thanks Cara!
I love this! Beautiful work! I’ve subscribed do I don’t miss other fabulous projects!
I subscribed to your newsletter!
Great design. Thanks
Simply delightful!!!
Tami wants one
LOVE * LOVE * LOVE
So adorable and I would give it a GREAT home!!!
As always….you are amazing, Amy!
so awesome! i’ve subscribed
Beautiful! Looks so good. Pinned and tweeted. I hope to see you on Monday at 7, we can’t wait to party with you! Lou Lou Girls
You have got such talent!! I am amazed at all you do as I go through each of your posts!! YOU AMAZE ME!! Not only am I going to be following you closely but my 17 yr old son will be as well. He just begs for these kind of projects to do.
Awesome, thanks Meg! I’m so glad we got the chance to hang out at BYBC.
I am so making this. My daughter asked me today if we could build something out of wood. I said sure what? She said a jewelry box and your fits the bill perfectly for what she wants in it. Going to go out and buy the wood this weekend.