This post is sponsored by The Home Depot. I have been compensated for my time and provided with product. All ideas and opinions are my own. This post contains some affiliate links for your convenience. Click here to read my full disclosure policy.
Woodworking has been my favorite hobby for many years. My Dad had a little shop in the basement and when I was young I used to sneak down there while he was at work and tinker around with the scrap wood. My kitty was the recipient of my first project at 6 years old, it was a lovely 3 legged scrap wood table. 🙂 Lucky cat! I quickly began to realize you get a lot of personal satisfaction from building with your hands and creating something useful and beautiful.
I have heard so many people say “I wish I could do that” or “I wish I could build…”, the great thing is that YOU CAN! With every hobby, you need to START somewhere and the more you learn and try the more confident and better you’ll become. To get you going, I’ve put together a few tips for
Getting Started in Woodworking – a beginners guide
1 – Safety First
Safety should always be #1, make sure you protect yourself. Wear your PPE – Personal Protective Equipment.
Eyes
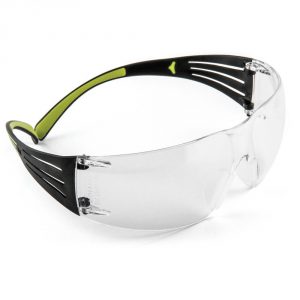
Always protect your eyes! You never know when something will fly back, most likely it won’t be big chunks, but little fine particles. You don’t want to lose sight of things when your working with power tools. It’s important to grab some safety glasses that are comfortable or else you may be tempted not to wear them. An overall great pair of safety glasses are these SecureFit 400 series glasses. They are lightweight and very flexible. The nose piece is adjustable and they are just snug enough above the ear that they won’t fall off when you’re bending down to work.
Another favorite are these Clear Frame Glasses, they aren’t quite as flexible as the SecureFit but they fit really well on my head and I don’t get tired of wearing them.
Ears
Unless you want to be saying ‘What’ for the rest of your life, protect those ears. Loud noises for prolonged periods of time can cause permanent hearing loss, and power tools make loud noises. Grab a pair of earmuffs that are comfortable for you. These Pro-Grade Earmuffs lower the noise level to 30 dB, have a nice adjustable headband and super soft ear cushioning. If you don’t like wearing the earmuff, at least grab some ear plugs.
Nose/Lungs
Grab a mask when you are doing things that create small particles like sanding and painting. Let’s just say you can avoid some unpleasant colored boogers with this easy step. Don’t ask, I’ll spare you the details, just grab a mask 🙂
The Eyes, Ears and Lungs are the 3 main areas that you want to make sure you protect. Depending on the job you’re doing also consider wearing gloves and heavy duty shoes. I’ve had a few friends really get hurt from dropping a piece of wood/furniture on their foot. And I don’t know how many slivers that I’ve pulled out of my fingers.
2 – Shopping for Wood
Next up is shopping for wood. Trying to use crooked wood during a project can be very frustrating and produce sub-par results. You can say, ‘It’s not me, it’s the wood’ 🙂 and that ‘wood’ be a truth. Plain and simple, wood has a lot of stresses in it, which is good and bad. But these stresses can cause warping and splitting in the board. Also wood will expand and contract with humidity. It doesn’t move much down the length of the board, most of the movement will be through the width of the board. Just something to be aware of.
Picking your Wood Type/Species
There are a lot of different types or species of wood, the most common types used for woodworking include Pine (including douglas fir and whitewood), Maple, Alder, Walnut, Cherry, Poplar, Oak, Hickory, Mahogany and Cedar. Most of these types of wood you can tell apart by the wood grain and coloring. Some wood have unique characteristics that make it more desirable for certain projects. Cedar is resistant to rot, so it is often used in outdoor projects. Generally the cheapest wood is pine (common board and furring strips) and it makes a good option to start with for woodworking. One downside of pine is that it can be splotchy when stained. Although my favorite wood is cherry, I choose to use pine because I have young kids and they seem to damage everything. I feel a lot better about them dinging and ‘antiquing’ cheap pine vs pricey cherry.
Board Surface
When you are picking out the wood for a project check out the overall look of the wood and make sure that is what you want. Watch out for unwanted knots, splits and blemishes. Knots are generally a circular area that is caused by a tree branch coming out of the trunk. In my experience, knots can look cool in your project but they are a weak spot in the board and a lot of times that’s where you’ll see the board bending.
Is the Board Straight?
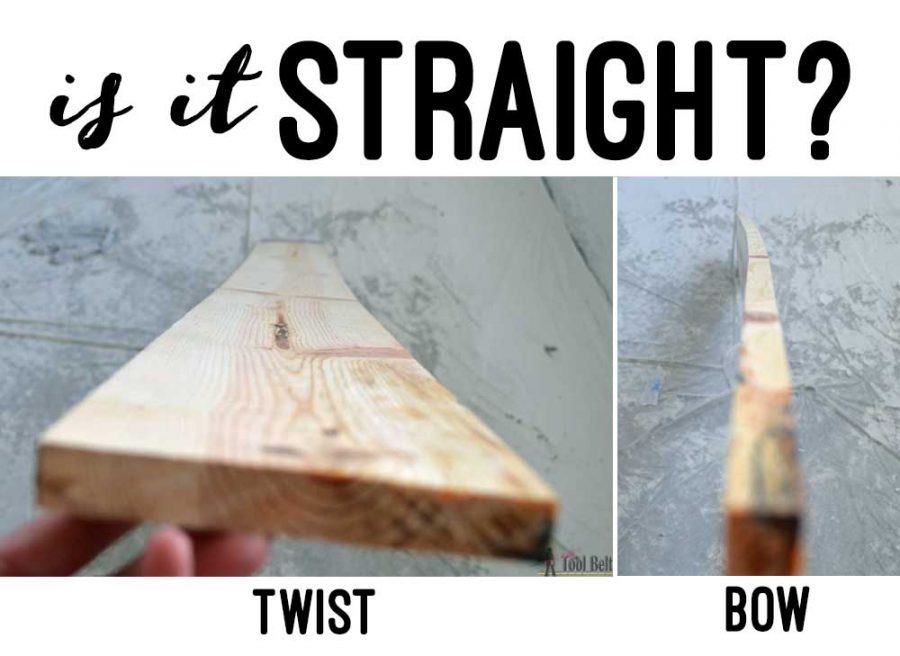
The quickest way to check if a board is straight, is by placing one end on the ground and putting the other end up to your eye and looking down the board. Check with the board width flat on the ground and turn it 90 deg and check with the board thickness on the ground. You are checking to see how crooked the board is and deciding whether you can work with it or not. There’s not a perfect board, that’s the beauty of wood, but look for as straight as possible.
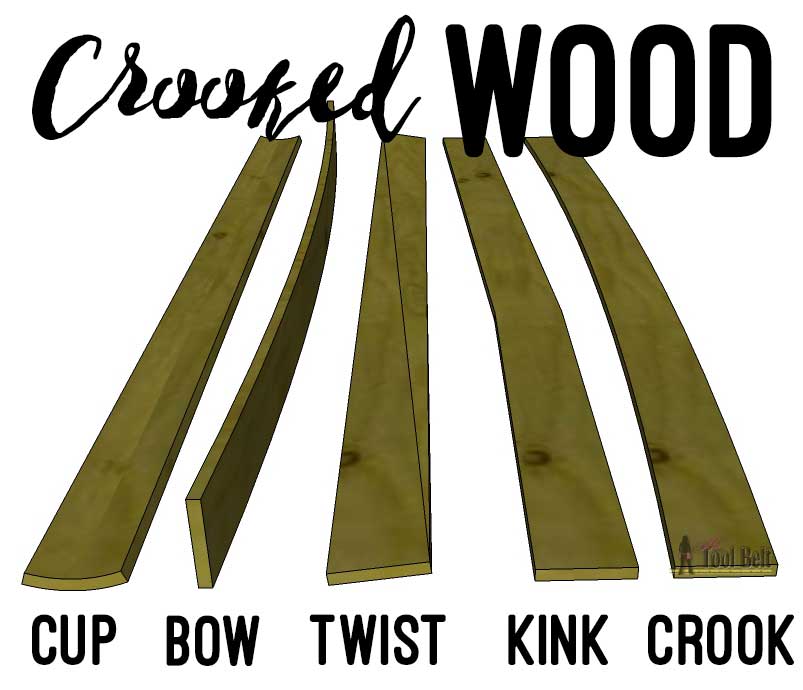
Here are the 5 types of crooked wood: cup, bow, twist, kink, and crook. I typically will avoid using a cupped or twisted board if possible. If you’re cutting the board into smaller pieces, sometimes the crooked boards won’t bother you. You’ll just have to evaluate what you can deal with for each project.
Be considerate, if you look through the wood pile, make sure to stack the boards back in place nicely. 🙂
Wood Dimensions
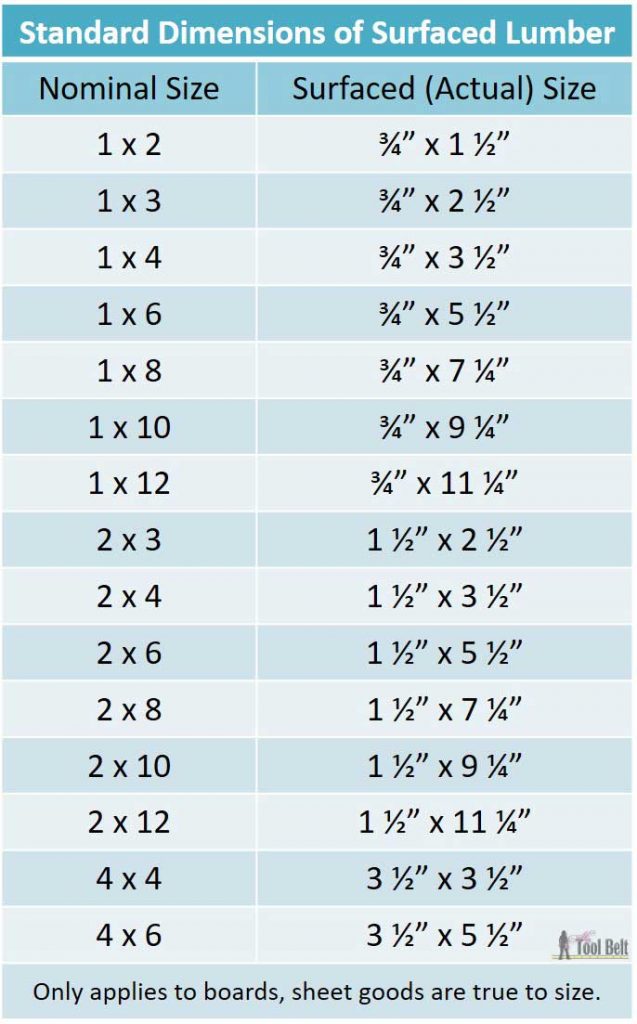
I bought a 2×4 and it isn’t 2″ x 4″, what the what??? Here’s the scoop: A 2×4 is ROUGH cut to it’s NOMINAL Size of 2” x 4” at the mill; it’s planed down or SURFACED to it’s actual size of 1 ½” x 3 ½” and that is what you are buying at the home centers like Home Depot. Buying from a hardwood lumberyard is a different ballgame that we’ll cover in a different post, but you are buying the rough cut boards there.
Here is a quick table of the actual size of surfaced boards. After a while, you’ll have these dimensions memorized.
3 – Making Measurements
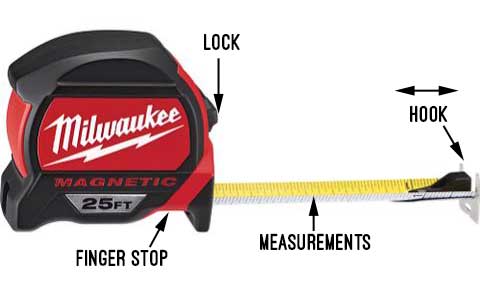
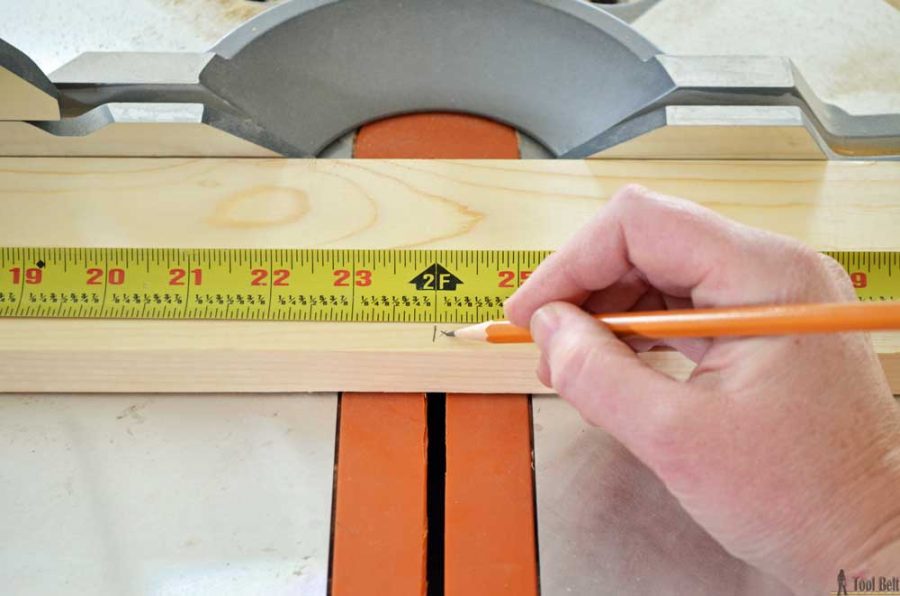
You’ll need a good tape measure to make measurements, and a sharp pencil to make marks. Pull the hook out from the tape measure case to reveal the measurements, use the lock switch if you want the tape to ‘lock’ out to a certain distance.
Tape Measure Hook
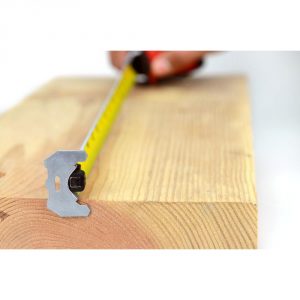
First thing you’ll notice on a tape measure hook is that it wiggles back and forth, don’t worry it is suppose to! It moves enough to compensate for it’s own thickness. So when you use the hook to butt up against something for your measurement it will push in to start on 0, if you are pulling with the hook it moves out to start at 0…make sense? It works automatically, but good to know. This Milwaukee version has a handy magnet on the hook, if you work in areas with metal then you’ll love that feature.
Measurements
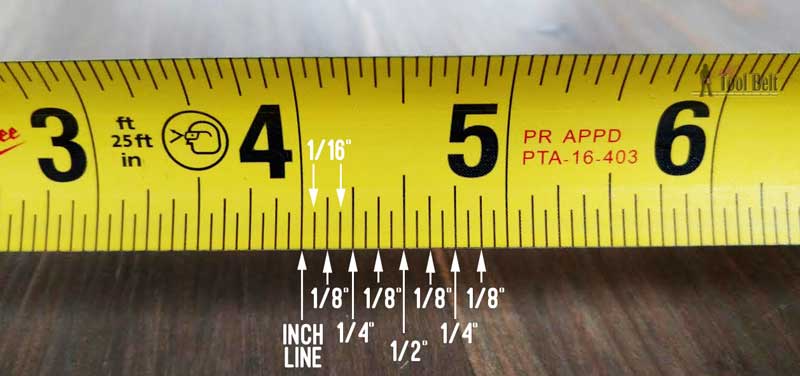
Here in the US our tape measures usually have marks as small as 1/16″. The thru line is the whole inch marks, next smallest is 1/2″ mark, followed by 1/4″, 1/8″ and 1/16″ marks are the smallest.
Marking
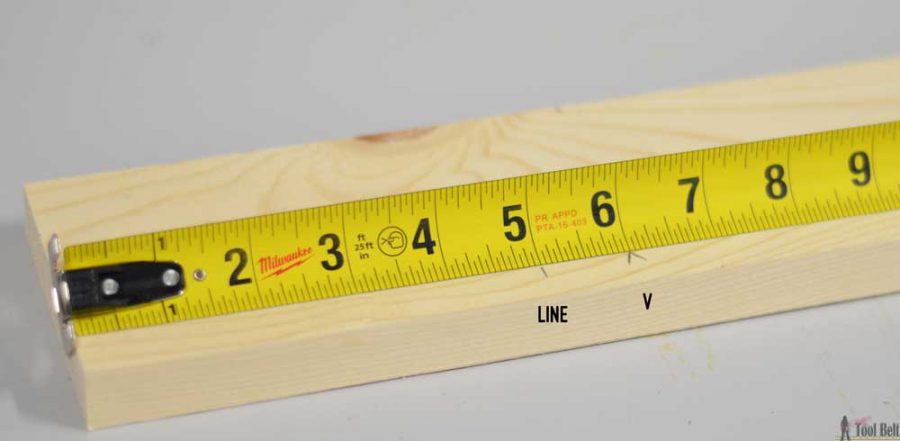
There are two conventional ways to mark your measurement on wood, the straight line or the V. The problem with the straight line is you may not draw it straight, so if you use the backside of the line instead of the front your cut might be off…I use it anyway with a little X to the side for the cut side of the line. With the V method, the V point is the mark where the cut should be made. Arguments can be made for either method, pick your favorite.
4 – Cutting the Wood
Now that we’ve bought our wood for the project, it’s now time to cut the boards. There are a number of different tools to cut wood, which ever one you choose make sure you follow the manufacturers directions and follow their safety precautions. Always respect the power tools, be alert and focused when using them.
Start with a Straight End
Cut the store ends off to get a clean straight end to work from. Often the ends on the board are not straight and not in the best condition. If the end is crooked, it could throw the rest of your measurements and cuts off.
Measure & Mark
Mark a line where you need the cut, place an X on the side of the line that is to be cut. This little X saves me from making mistakes over and over, just do it.
Make the Cut
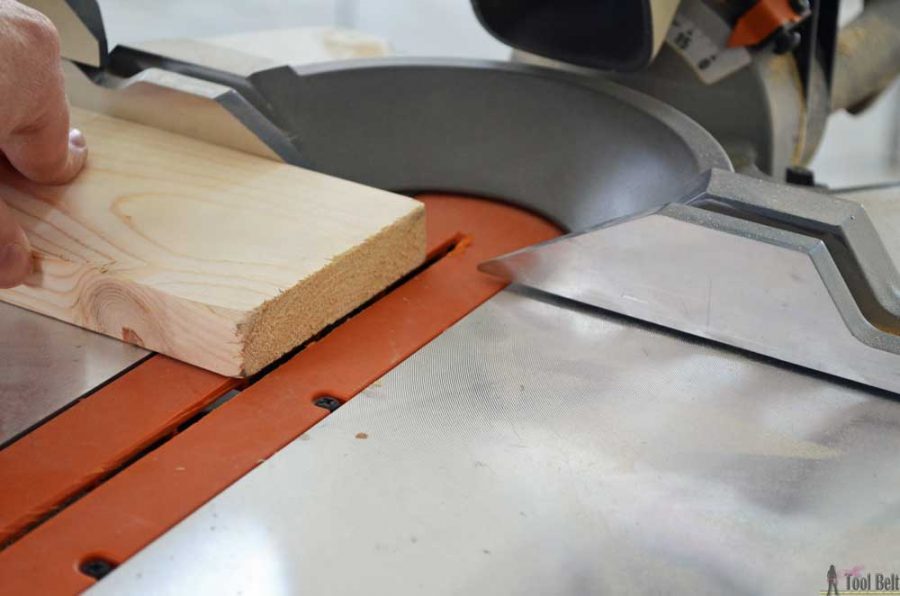
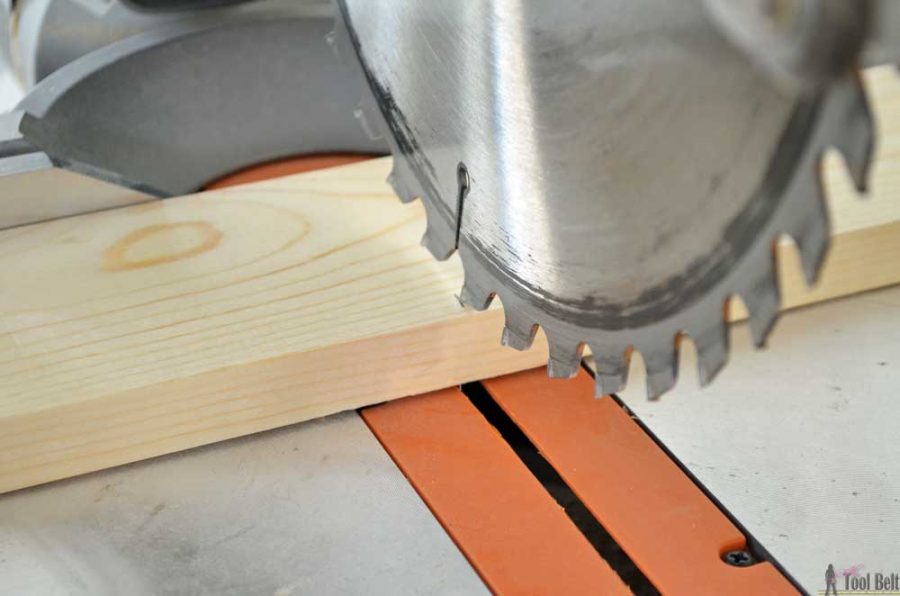
Place the saw blade NEXT to the line on the side where the X is. I usually have half of the pencil line left after I cut. I line up every cut like this before I turn the saw on. You’ve probably heard the saying “Measure twice cut once”, that is good advice. I’d also add to err on the long side, you can always cut again, but can’t add wood back on. 🙂
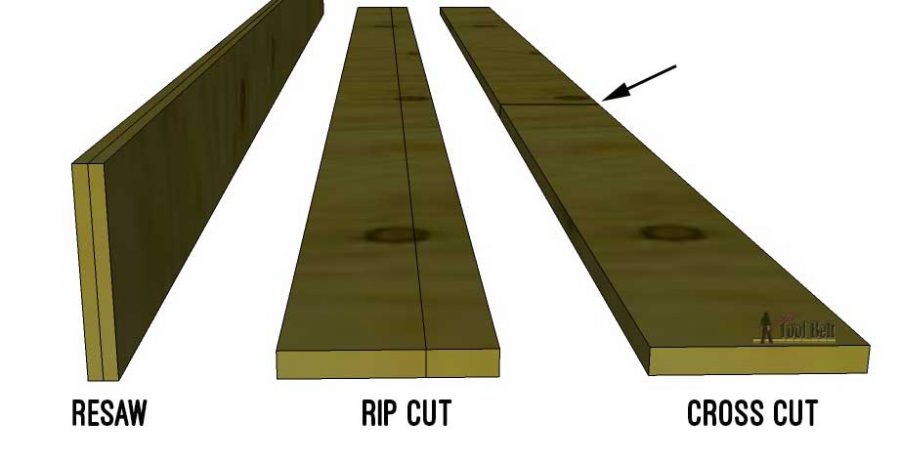
Cutting Terminology
- Resaw – cut the thickness, down the length of the board (make the board thinner)
- Rip Cut – cut down the length of the board (make the board less wide)
- Cross Cut – cut a cross the width of the board (make the board shorter)
There are also angle cuts:
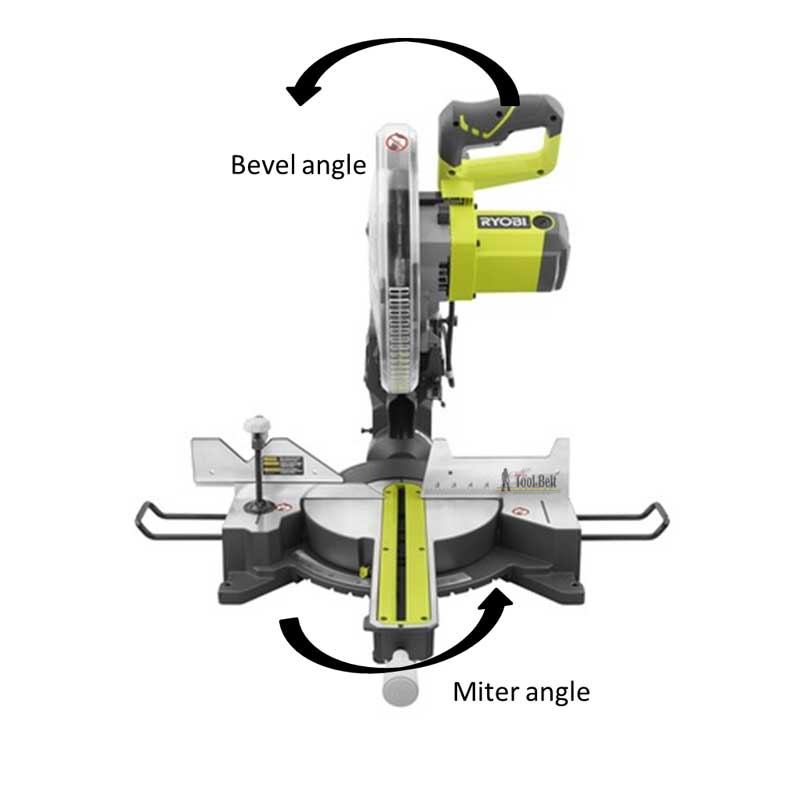
- Miter angle is rotating the table of your miter saw to an angle.
- Bevel angle is rotating the head of your miter saw to an angle.
- Compound angle is doing both for one cut. (Common with crown molding)
Basic Tools
In woodworking there are a number of tools that can accomplish the same task, some are easier than others, but sometimes you have to improvise if you don’t have ‘that’ tool. Here are a few basic tools that are helpful when woodworking. When choosing brands for tools I separate them into two categories, battery operated and corded. For battery operated tools I would suggest picking a favorite brand and stick to their line of battery tools so they are all compatible to one kind of battery. My corded tools I choose the brand based off of reviews.
- Miter Saw – for cross cuts, miter cuts and bevel cuts.
- Circular Saw – for cutting sheet goods, also can be used for ripping, cross cuts, miters and bevels.
- Rip cut – is a helpful attachment for a circular saw to cut large sheet goods.
- Drill – for drilling holes and driving screws.
- Brad Nailer – for nailing 18 gauge nails (brad nails). Great for adding trim or nailing boards together and leaving a small nail hole.
- Sander – to sand your project smooth before finishing or to remove previous finishes.
- Pocket Hole Jig – to join boards together. This is a great tool for beginners wanting to start woodworking. If you find that you’re making a lot of pocket holes, the K5 is a great upgrade.
Make sure to pick up a tool bag to organize your tools in. The Husky tool bags are super high quality and are reinforced so they won’t split by the zipper!
The Journey
As you continue in your woodworking journey you may find parts of it that you love and parts that you despise. My sisters are now getting into building things too. I love figuring out the plan and building the project, I loath sanding and feel like I’m an inferior finisher (stain/painting). One sister doesn’t want to think through a plan but loves building according to other peoples plans. Another sister doesn’t like the building part, but enjoys sanding and loves finishing. Everyone is different and that’s OK!
I hope to make this a series and show how to use the various tools and what they are used for, stay tuned.
If you have any favorite woodworking tips to help a beginner, please share in the comments below – Thank you!
Until then Happy Building!
“I acknowledge that The Home Depot is partnering with me to participate in the Tool Review Program. As a part of the Program, I am receiving compensation in the form of products and services, for the purpose of promoting The Home Depot. All expressed opinions and experiences are my own words. My post complies with the Word Of Mouth Marketing Association (WOMMA) Ethics Code and applicable Federal Trade Commission guidelines.”


That was very helpful! Thank you.
Hi Amy- visiting from Tatertots & Jello BFF. I love this post. I’ve purchased a few power tools over the past year but am still a little intimidated to move past the basics. Heading to Pinterest to follow you, can’t wait to check out more of your posts and try something new! Erin