• Home
  • Project Gallery
  • About me
    • Disclosure
    • Disclaimer
  • Blog

Her Tool Belt

DIY furniture plans, crafts, and home improvement tutorials to empower you!

  • Free Woodworking Plans
    • Bathroom Furniture
    • Bedroom Furniture
    • Entry
    • Family Room Furniture
    • Garage
    • Kitchen furniture
    • Laundry Room
    • Mudroom Furniture
    • Organization
    • Outdoor Furniture
  • Home Decor
    • Upcycle
  • Crafts
    • Holiday
  • Home Improvement
    • Cleaning
    • Fix IT
    • Paint
    • Tile
  • Tool Reviews
  • Tool Time Videos

Double X Bench Plans

August 27, 2016 by Amy 22 Comments

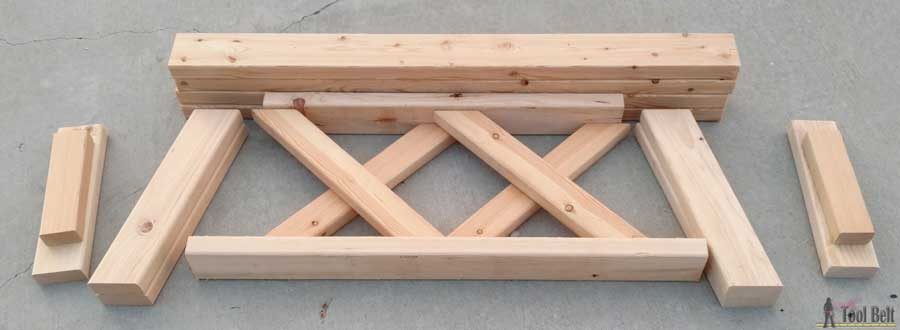
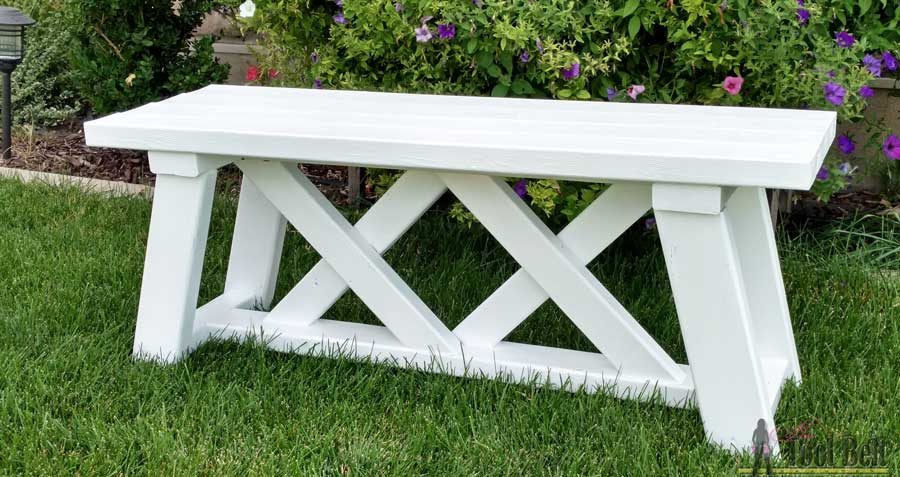
I’ve been searching for the perfect bench for my front porch.  It’s a narrow and smallish space.  Then I spotted a super cute bench from Simply Jenna’s instagram feed, I love her style.  (I’m sorry I’m not sure where here instagram feed went.) I modified the look a bit to make it longer and added an extra X.

Build a cute little DIY outdoor bench for your porch or entry. Use 2x4's (and 2x3's) to build it for only about $13!!! Free plans

So far I’m really liking it on the porch.  The bench is 42″ long x 18″ high and 14″ deep.

I have an updated version of this bench.  It’s easier to assemble and doesn’t require a Kreg pocket hole jig. See it here.

This post contains some affiliate links for your convenience. Click here to read my full disclosure policy.

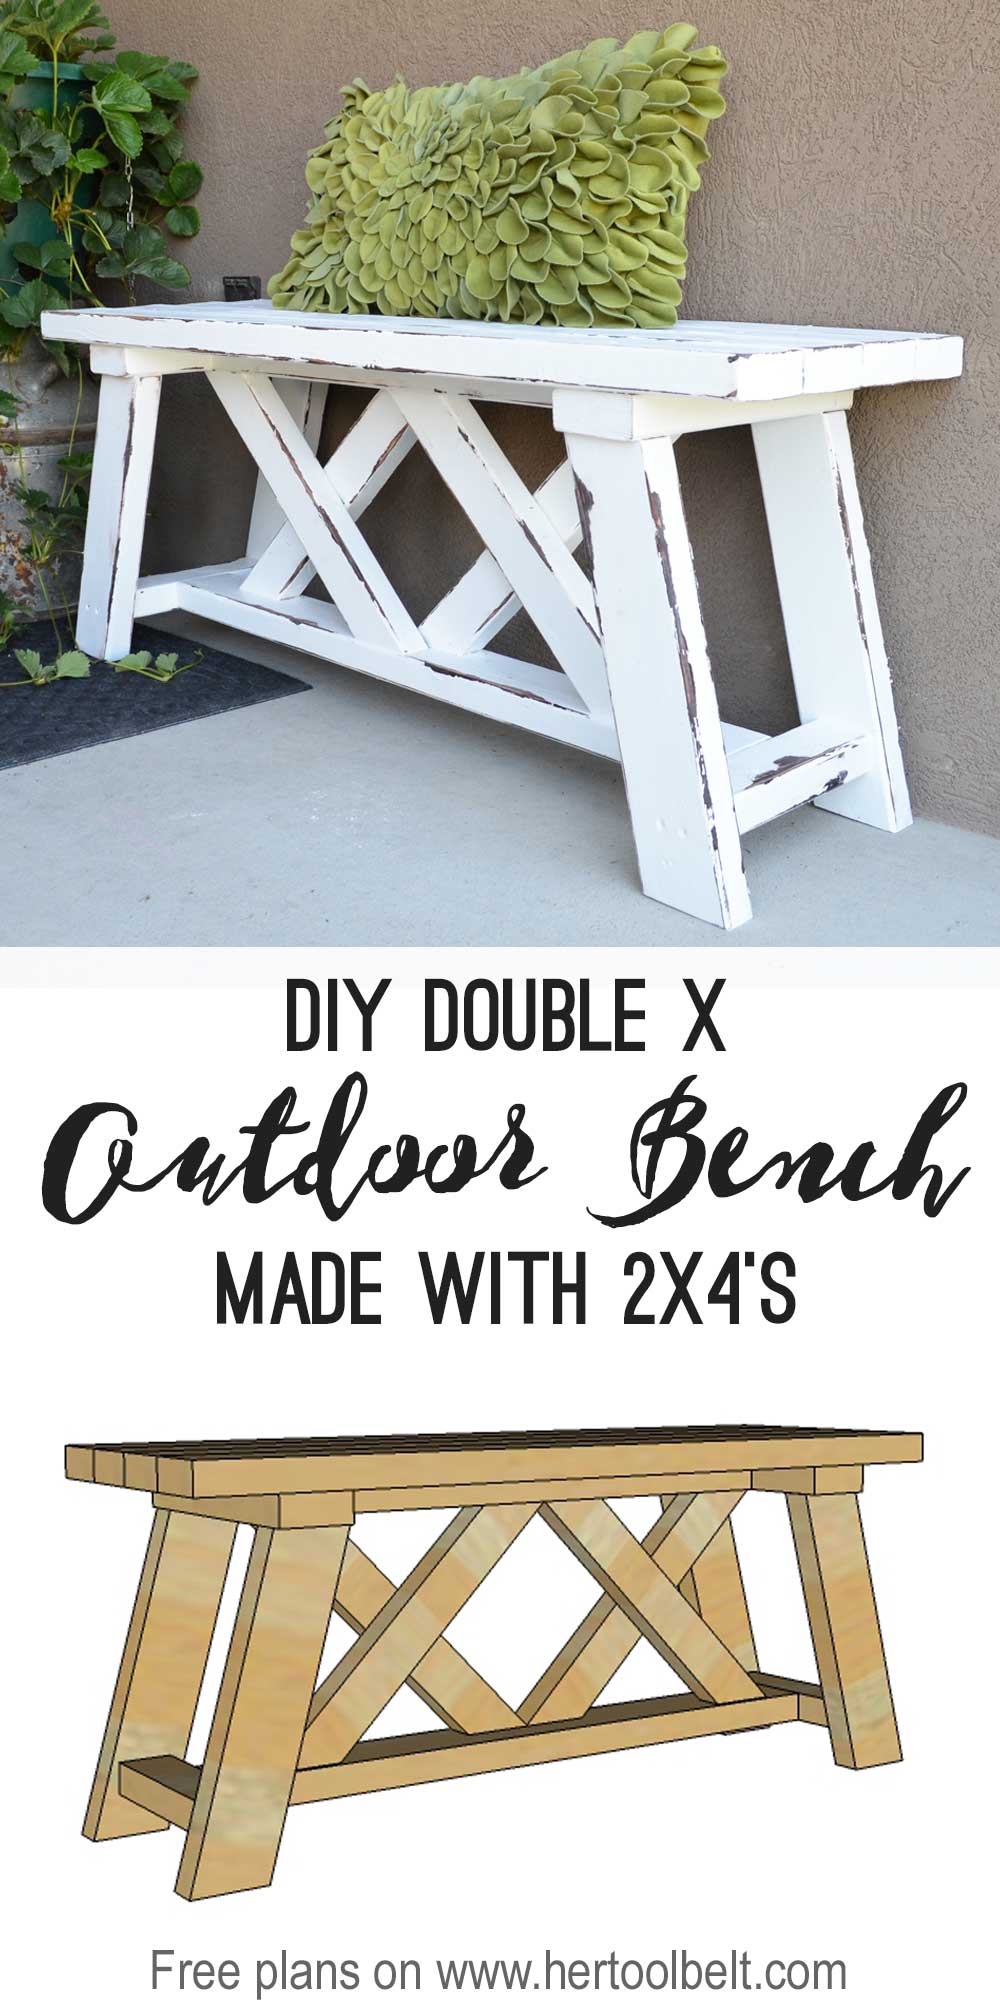
How to Build a DIY Double X Bench

Build a cute little DIY bench for your porch or entry. Use 2x4's to build it for only about $13!!! Free plans

Materials

  • 4 – 2″ x 4″ x 8′ boards (actual lumber dimensions 1 1/2″ x 3 1/2″)
  • 1 – 2″ x 3″ x 8′ board (actual lumber dimension 1 1/2″ x 2 1/2″)
  • 8 – 2 1/2″ pocket hole screws
  • 32 – 2 1/2″ screws or 2 1/2″ pocket hole screws if you like the rounded heads showing
  • wood glue
  • sandpaper
  • stain/paint
  • vaseline – optional
  • paint brush

Tools

  • miter saw
  • drill
  • countersink bit
  • corner cat sander
  • measuring tape
  • Kreg pocket hole jig
    • These are the tools that I used, you can substitute for what you have.
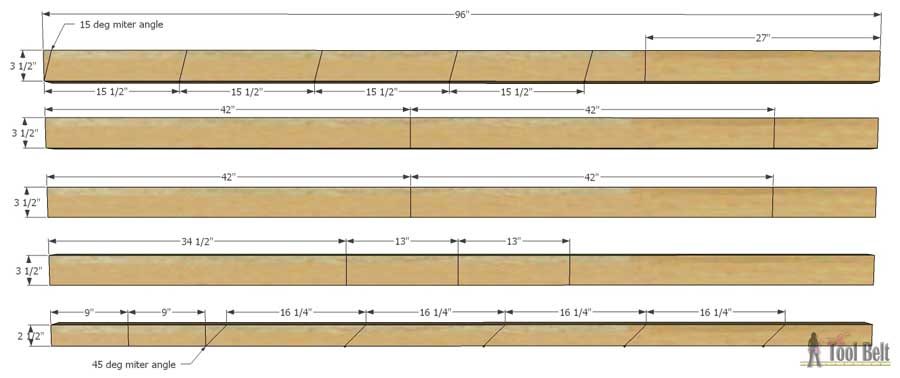
Cut List

  • 4 – 1 1/2″ x 3 1/2″ x 15 1/2″ with 15 deg miter cut on both ends
  • 1 – 1 1/2″ x 3 1/2″ x 27″
  • 4 – 1 1/2″ x 3 1/2″ x 42″
  • 1 – 1 1/2″ x 3 1/2″ x 34 1/2″
  • 2 – 1 1/2″ x 3 1/2″ x 13″
  • 2 – 1 1/2″ x 2 1/2″ x 9″
  • 4 – 1 1/2″ x 2 1/2″ x 16 1/4″ with 45 deg miter cut on both ends

Cut all of the pieces for the bench, see the cut diagram for visual reference.

Build a cute little DIY outdoor bench for your porch or entry. Use 2x4's (and 2x3's) to build it for only about $13!!! Free plans

Cut Diagram

Build a cute little DIY outdoor bench for your porch or entry. Use 2x4's (and 2x3's) to build it for only about $13!!! Free plans

Step 1

If your boards are rough, you may want to lightly sand them before assembling the bench.

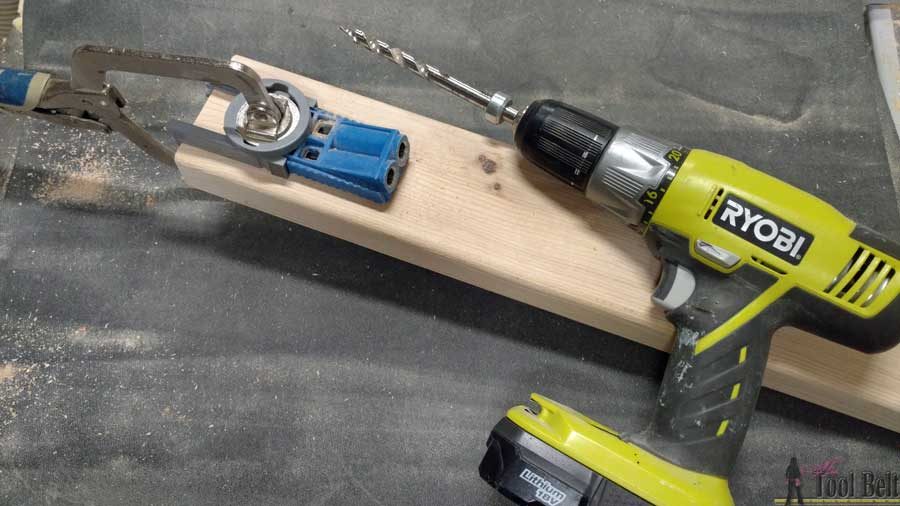
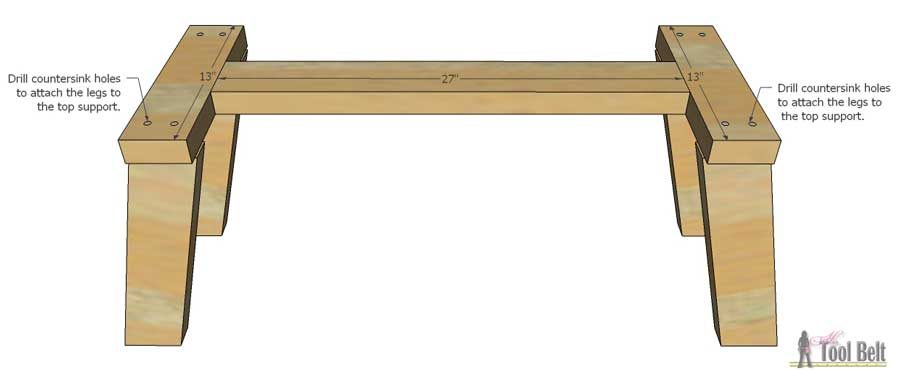
Drill pocket holes for 1 1/2″ material in both ends of the 34 1/2″ and 27″ boards.

Build a cute little DIY outdoor bench for your porch or entry. Use 2x4's (and 2x3's) to build it for only about $13!!! Free plans

Measure and mark the center of the 13″ and 9″ pieces, also mark the center of both ends of the 34 1/2″ and 27″ pieces.  Using wood glue and 2 1/2″ pocket hole screws, attach the center of the 9″ pieces to the ends of the 34 1/2″ piece.  Repeat for the center of the 13″ pieces and the 27″ piece.

Build a cute little DIY outdoor bench for your porch or entry. Use 2x4's (and 2x3's) to build it for only about $13!!! Free plans

Build a cute little DIY outdoor bench for your porch or entry. Use 2x4's (and 2x3's) to build it for only about $13!!! Free plans

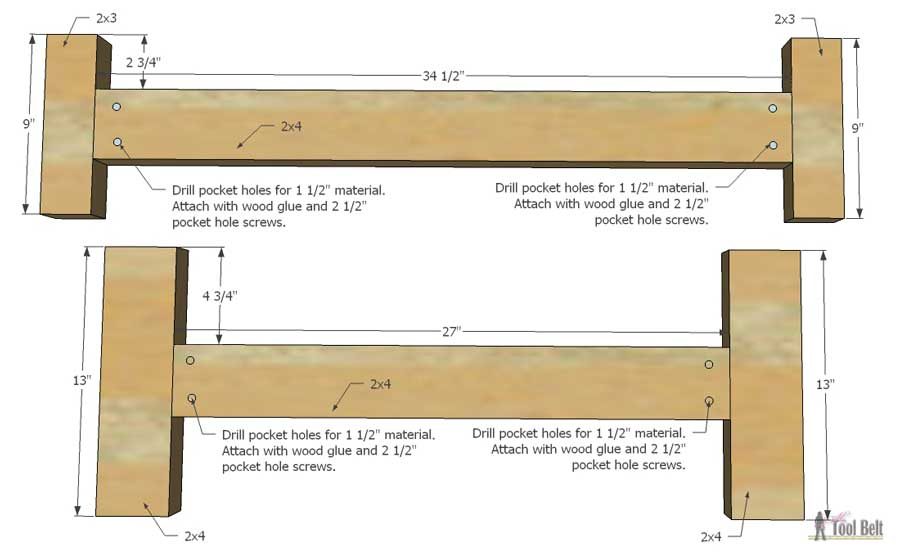
(If you don’t have a Kreg pocket hole jig, you can toenail the screws in.)

Step 2

Measure and mark 1/2″ in from each 13″ piece end. The legs will inset 1/2″ in from each 13″ piece end.

Build a cute little DIY outdoor bench for your porch or entry. Use 2x4's (and 2x3's) to build it for only about $13!!! Free plans

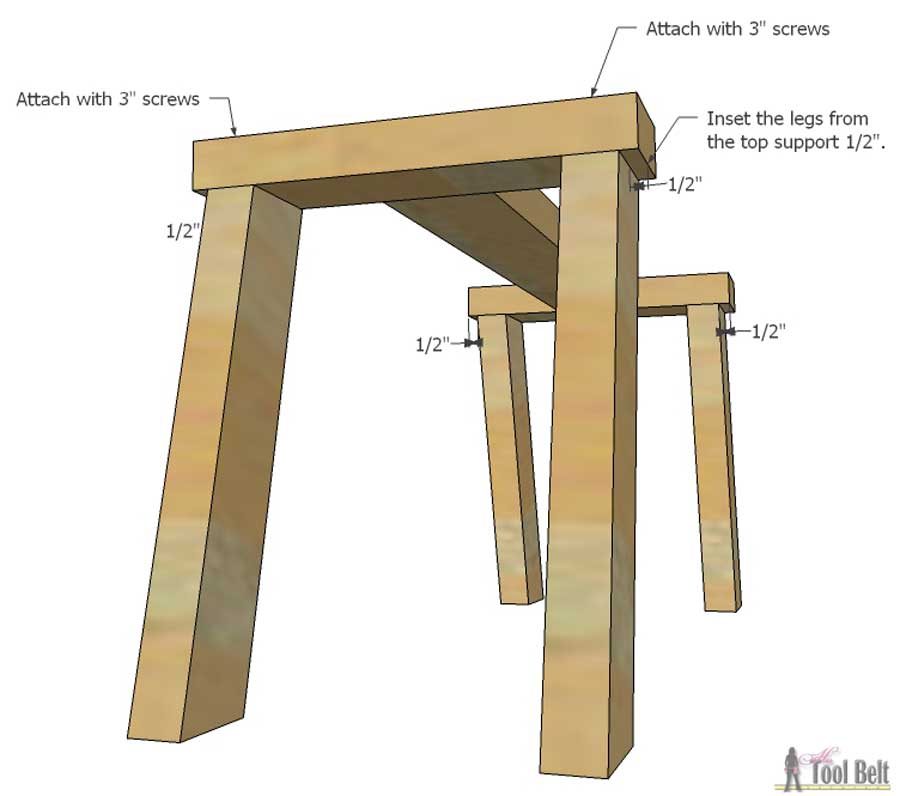
Use the countersink bit and pre-drill countersink holes for screws to attach the legs to the 13″ pieces.  Use either 2 1/2″ or 3″ screws to attach the legs to the 13″ pieces.  (Note: the legs won’t fit perfectly onto the 13″ pieces, overhang the same amount on each leg.)

Build a cute little DIY outdoor bench for your porch or entry. Use 2x4's (and 2x3's) to build it for only about $13!!! Free plans

Turn the leg assembly upside down and mark 2″ down on each leg end.  Pre-drill countersink holes in the outsides of the legs (I drilled the holes about 3″ down from the leg ends).  Attach the 9″ pieces between the legs using 2 1/2″ or 3″ screws.

Build a cute little DIY outdoor bench for your porch or entry. Use 2x4's (and 2x3's) to build it for only about $13!!! Free plans

Step 3

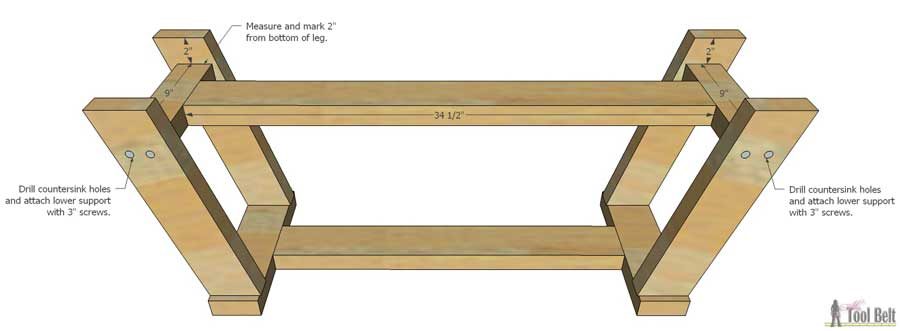
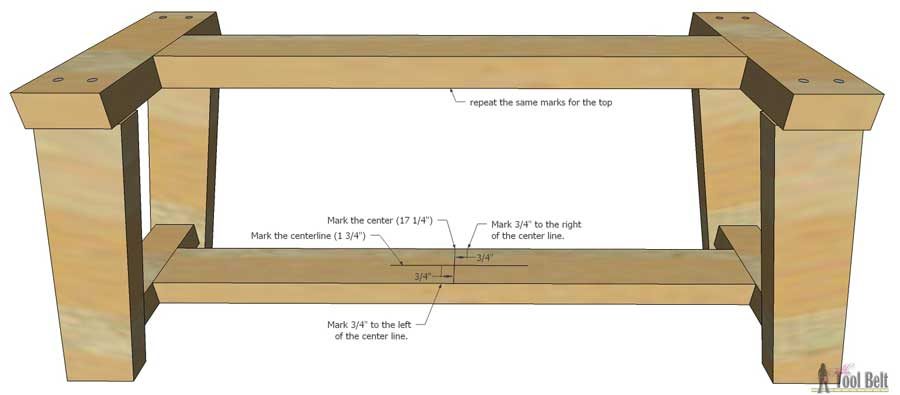
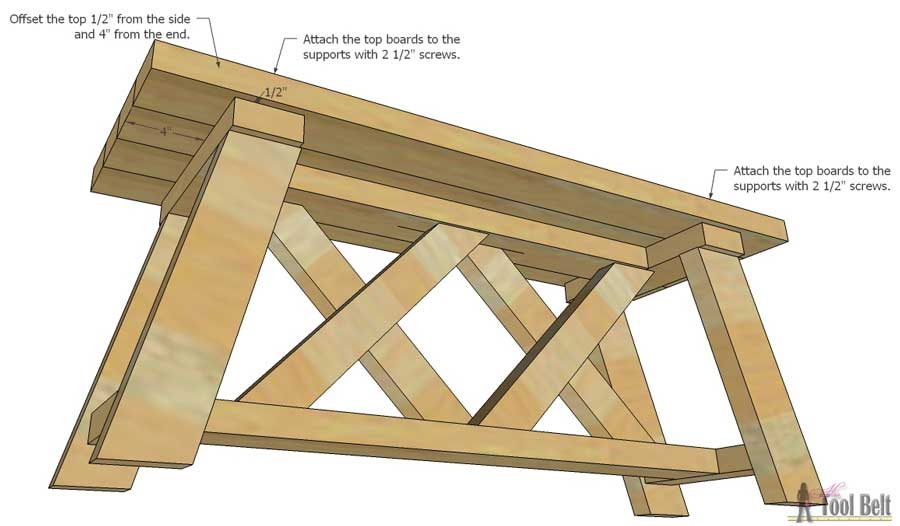
Measure and mark the center line for the length and width on the 34 1/2″ piece.  Mark 3/4″ on both sides of the length center line mark.  Repeat the same marks on the 27″ piece.

Build a cute little DIY outdoor bench for your porch or entry. Use 2x4's (and 2x3's) to build it for only about $13!!! Free plans

Slide 2 of the 16 1/4″ X pieces in between the top and bottom supports, trim the 16 1/4″ pieces if necessary.  Line up the ends of the X pieces with the 3/4″ marks and the center line mark between them.  Drill countersink holes in the 34 1/2″ and 27″ pieces, attach each X piece with a 2 1/2″ or 3″ screw.

Build a cute little DIY outdoor bench for your porch or entry. Use 2x4's (and 2x3's) to build it for only about $13!!! Free plans

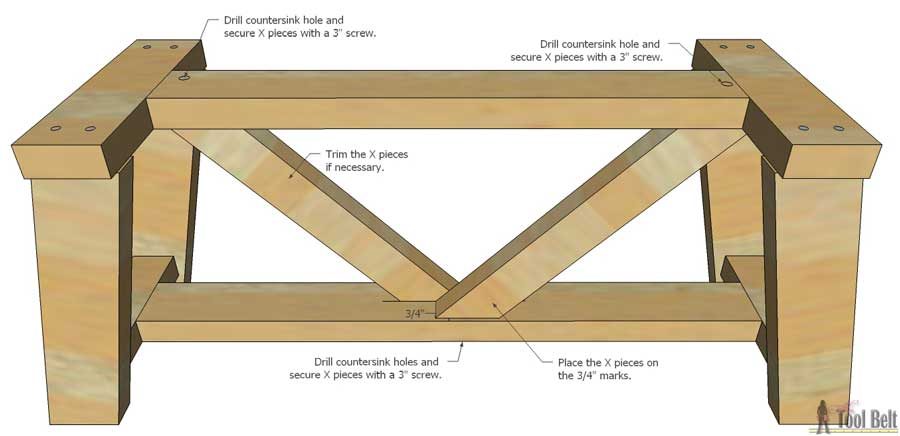
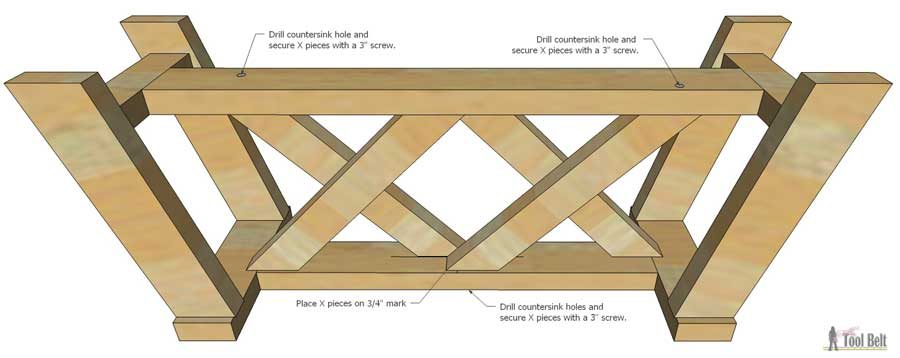
Flip the bench over, slide the other 2 – 16 1/4″ X pieces in between the top and bottom supports, trim the 16 1/4″ pieces if necessary.  Line up the ends of the X pieces with the 3/4″ marks and the center line mark between them.  Drill countersink holes in the 34 1/2″ and 27″ pieces, attach each X piece with a 2 1/2″ or 3″ screw.

Build a cute little DIY outdoor bench for your porch or entry. Use 2x4's (and 2x3's) to build it for only about $13!!! Free plans

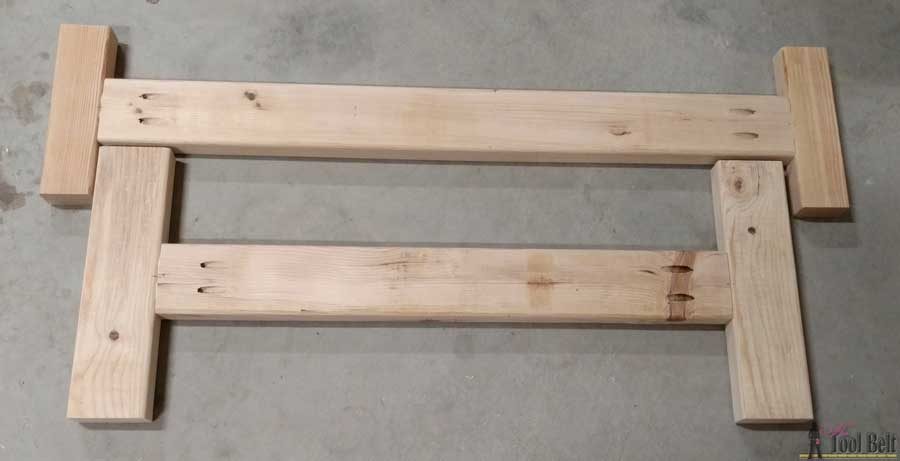
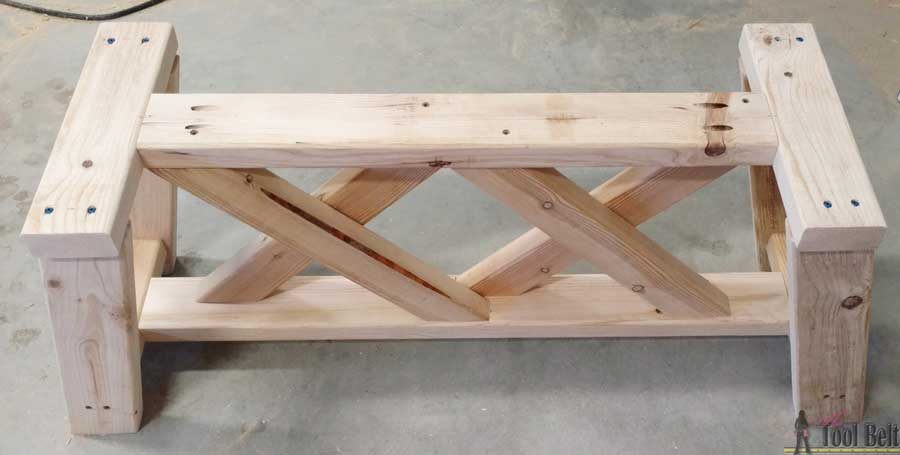
Yay, now the base is done.

Build a cute little DIY outdoor bench for your porch or entry. Use 2x4's (and 2x3's) to build it for only about $13!!! Free plans

Step 4

Measure over about 6″ from the 42″ board ends, pre-drill countersink holes to attach the top pieces to the base.

Build a cute little DIY outdoor bench for your porch or entry. Use 2x4's (and 2x3's) to build it for only about $13!!! Free plans

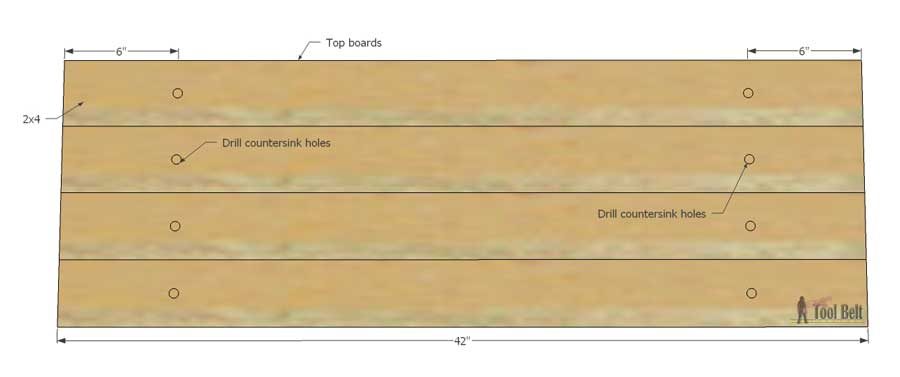
The top will overhang 1/2″ from the 13″ pieces on the side and about 4″ from the ends.  Attach the top boards to the base with 2 1/2″ screws.

Build a cute little DIY outdoor bench for your porch or entry. Use 2x4's (and 2x3's) to build it for only about $13!!! Free plans

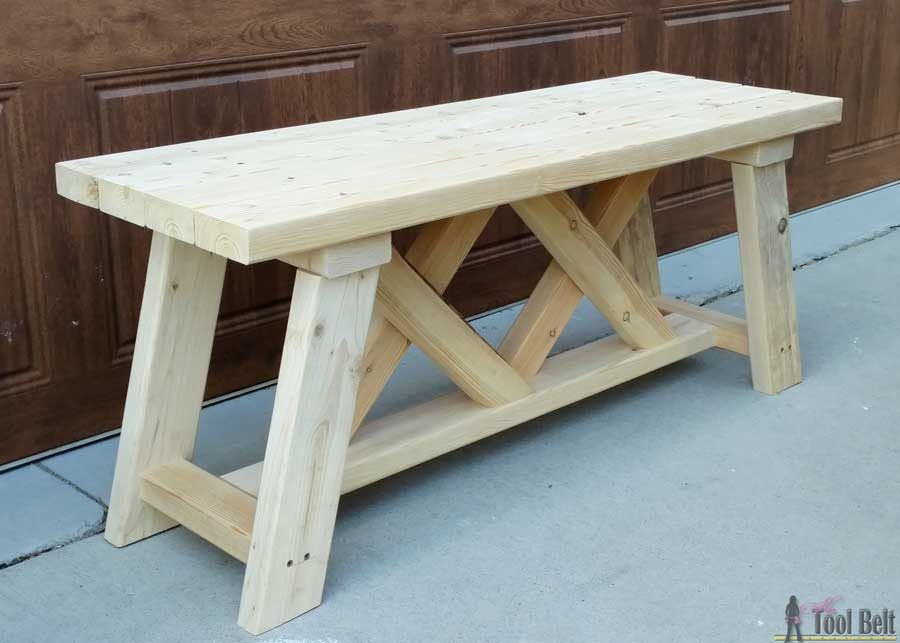
The double X bench assembled and ready for finish.
Build a cute little DIY outdoor bench for your porch or entry. Use 2x4's (and 2x3's) to build it for only about $13!!! Free plans

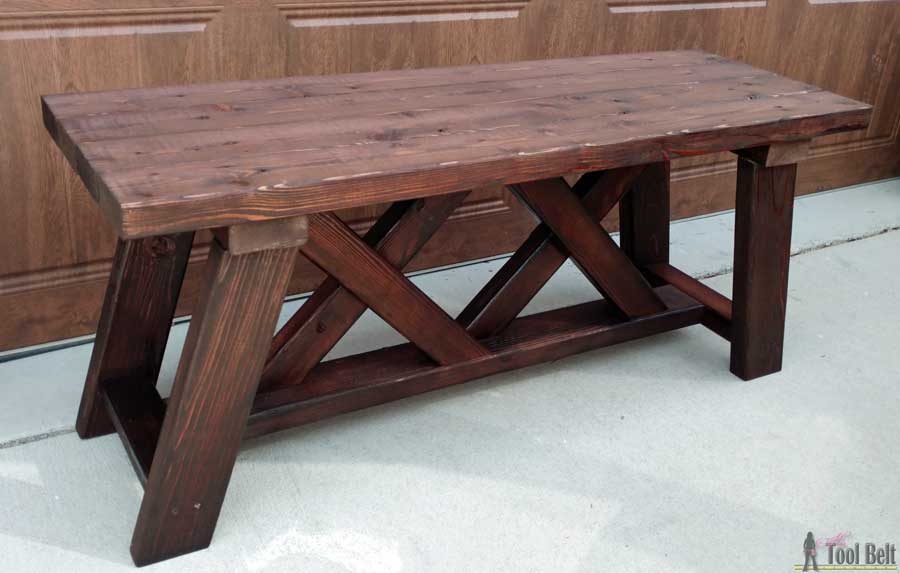
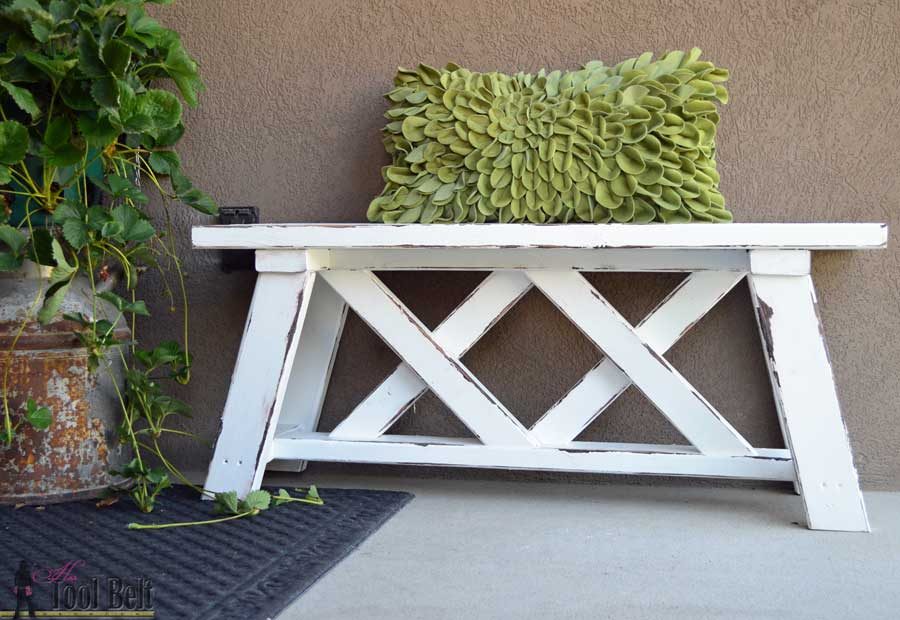
I decided to go for a highly distressed (chippy paint) look.  First I stained the bench a dark brown color.

Build a cute little DIY outdoor bench for your porch or entry. Use 2x4's (and 2x3's) to build it for only about $13!!! Free plans

Once the stain dried fully, I used a little petroleum jelly (Vaseline) and applied a small amount on the corners and edges where I didn’t want the paint to stick.

I used a white latex paint and painted the whole bench white and let the paint dry.

Build a cute little DIY outdoor bench for your porch or entry. Use 2x4's (and 2x3's) to build it for only about $13!!! Free plans

Anywhere I put the Vaseline, the paint kind of cracked and didn’t stick.  I used a corner cat sander to distress the paint and rough it up.

Build a cute little DIY outdoor bench for your porch or entry. Use 2x4's (and 2x3's) to build it for only about $13!!! Free plans

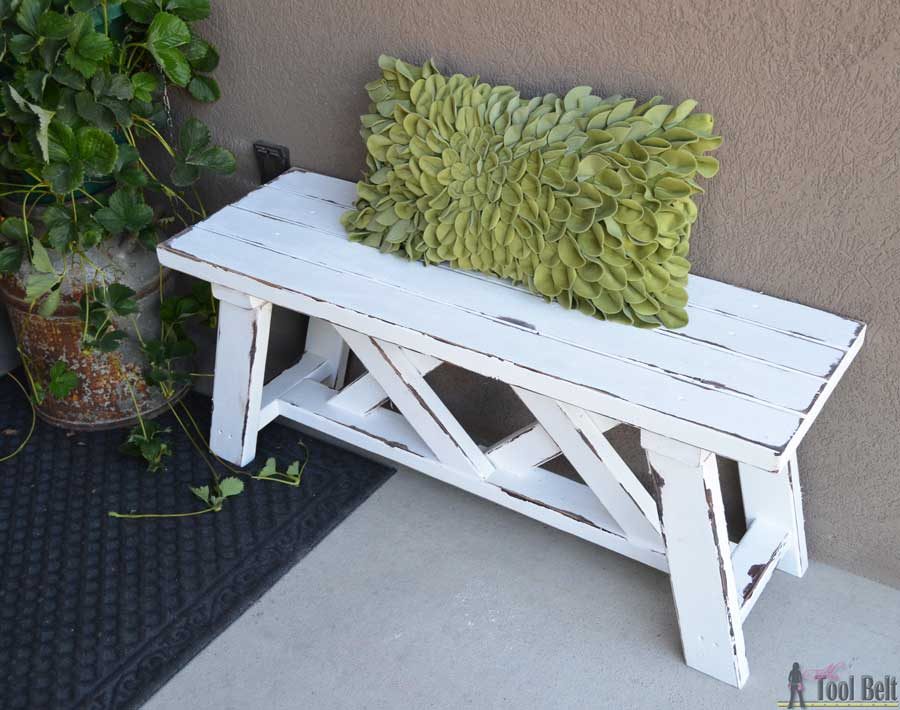
I’m excited how the bench turned out, it’s looking at home on my front porch!

Build a cute little DIY outdoor bench for your porch or entry. Use 2x4's (and 2x3's) to build it for only about $13!!! Free plans

If you would like the printable plans, you can grab them here.

Double X Bench plans-hertoolbelt

Build a cute little DIY outdoor bench for your porch or entry. Use 2x4's (and 2x3's) to build it for only about $13!!! Free plans

Related

Filed Under: Built From Scratch, Free Woodworking Plans, Outdoor Furniture Tagged With: 2x4, bench, DIY furniture, outdoor seating

Attention: Any do-it-yourself project involves risk of some sort. Your tools, materials, and skills will vary, as will the conditions at your work site. Hertoolbelt LLC will not assume any responsibility or liability for damages or losses sustained or incurred in the course of your project or in the use of the item you create. Always follow the manufacturer's operating instructions in the use of tools, check and follow your local building codes, and observe all commonly accepted safety precautions.

Comments

  1. Denise Barkel says

    August 28, 2016 at 5:56 pm

    I am in Love with this Bench, thanks for sharing the plans

    Reply
    • Amy says

      August 29, 2016 at 4:31 pm

      Thanks Denise!

      Reply
  2. Mindi says

    September 12, 2016 at 12:21 pm

    I love this design Amy and the finish is perfect!!

    Reply
    • Amy says

      September 15, 2016 at 9:43 am

      Thanks Mindi!

      Reply
  3. Alysa says

    October 12, 2016 at 11:13 pm

    Where are the plans? I can’t seem to find anything to click on

    Reply
    • Amy says

      October 13, 2016 at 9:23 am

      Here’s the link to the printable pdf https://www.hertoolbelt.com/wp-content/uploads/2016/08/Double-X-Bench-plans-hertoolbelt.pdf

      The ‘Double X Bench Plans’ is the link to the pdf. Enjoy.

      Reply
  4. DeeAnne says

    November 25, 2016 at 11:09 am

    I love this bench! Thank you for sharing the plans! Ours is almost complete. I do have a question for you! I have stained it and painted it. I used Vaseline, which worked great! Just this morning, I lightly sanded the areas where the Vaseline was placed. I do have shine in spots that I’m not sure how I should remove and then also, I’m thinking it should be sealed, especially if we place it outside. Do you have any ideas for me?

    Reply
    • Amy says

      November 25, 2016 at 12:13 pm

      Hi DeeAnne,
      Is the shine from the vaseline? I would try and use a degreaser type cleaner to get rid of the shine.
      You can put a clear topcoat to protect the paint. If your paint is a light color you’ll want to use a water based top coat like polyacrylic because it dries clear. If the paint is darker then you can use polyurethane (oil based) which is better for outside but dries slightly yellow.

      Reply
      • DeeAnne says

        November 25, 2016 at 12:38 pm

        Thank you so much! I will use the cleaner and get the topcoat. I painted it red. It looks great with the brown stain coming through!! What a great project! Thanks again!!

        Reply
  5. Lindsay @ The DIY Mommy says

    June 2, 2017 at 10:00 am

    What a beautiful addition!! But seriously, your tutorial is aaaamazing. So easy to follow. Beautiful job!

    Reply
  6. Emmy Melchior says

    June 15, 2017 at 5:22 pm

    Do you remember how much it cost to make this? Love it so much!

    Reply
    • Amy says

      June 15, 2017 at 5:25 pm

      The wood cost $13-$14, I had left over screws, stain, paint and wood glue.

      Reply
  7. Sue fiddes says

    July 8, 2017 at 3:07 pm

    Luv this bench !thank you!

    Reply
  8. DIY Home Sweet Home says

    February 1, 2018 at 4:53 pm

    Just what I was looking for for my front porch. Thank you

    Reply
  9. Alex says

    February 9, 2018 at 2:01 pm

    Perfect plans! Dimensions were spot on…THANK YOU!!!

    Reply
  10. Katie says

    May 29, 2018 at 10:39 am

    Hi! Where is that pillow from? Everything is perfect!

    Reply
    • Amy says

      June 10, 2018 at 8:40 pm

      Thank you. I got the pillow many years ago from Costco. The name of the pillow is: Brentwood Starburt Petals 16-Inch Pillow.

      Hope that helps!

      Reply
  11. Susan says

    June 15, 2018 at 7:18 am

    On your finished bench none of the places where screws were countersunk shows. The holes appear to have been filled to give the bench a more polished appearance. Am I correct? And what product was used to fill holes?

    Reply
    • Amy says

      June 19, 2018 at 7:09 am

      The holes do appear to be filled, However it was just a really thick coat of paint. 🙂 If you do want to cover up your screws, I usually use ‘wood filler’. It is generally by other stain products in the store. HTH

      Reply
  12. Deborah Johnson says

    June 18, 2020 at 4:12 pm

    My hubby and I are retired and were looking for a project to do. Searched Pinterest and found your bench. So glad we did. We”ve made 7 so far for family and friends. Great project and easy to follow printable instructions!

    Reply
    • Amy says

      June 19, 2020 at 11:33 pm

      That’s awesome! Lucky family and friends!!!

      Reply
  13. CARI says

    June 19, 2020 at 8:37 pm

    I love this plan!! It was relatively easy to make with your AMAZING detailed instructions! I’ve made two and am working on the double X console! Would love to share pictures.

    Reply

Leave a Reply Cancel reply

Your email address will not be published. Required fields are marked *

This site uses Akismet to reduce spam. Learn how your comment data is processed.

Search Her Tool Belt

Follow Me!

  • Bloglovin
  • Email
  • Facebook
  • Instagram
  • Pinterest
  • RSS
  • Twitter
  • YouTube

Top Posts & Pages

Left Offset Bathroom Vanity

Check out more projects

Copyright

Thank you for wanting to share my work! No need for my permission to pin my work or to feature 1 or 2 pictures with full watermarks intact that link back to the original project. Please do NOT copy tutorials.

Disclosure & Privacy Policy

Disclaimer

Copyright © 2025 · Magazine Pro Theme on Genesis Framework · WordPress · Log in

This website uses cookies to improve your experience. We'll assume you're ok with this, but you can opt-out if you wish.Accept Read More
Privacy & Cookies Policy

Privacy Overview

This website uses cookies to improve your experience while you navigate through the website. Out of these, the cookies that are categorized as necessary are stored on your browser as they are essential for the working of basic functionalities of the website. We also use third-party cookies that help us analyze and understand how you use this website. These cookies will be stored in your browser only with your consent. You also have the option to opt-out of these cookies. But opting out of some of these cookies may affect your browsing experience.
Necessary
Always Enabled
Necessary cookies are absolutely essential for the website to function properly. This category only includes cookies that ensures basic functionalities and security features of the website. These cookies do not store any personal information.
Non-necessary
Any cookies that may not be particularly necessary for the website to function and is used specifically to collect user personal data via analytics, ads, other embedded contents are termed as non-necessary cookies. It is mandatory to procure user consent prior to running these cookies on your website.
SAVE & ACCEPT