Be Merry Christmas Sign

‘Tis the Season for magical decor, twinkling lights, bells, music in the air and snow.  Christmas time brings out the little kid giddiness in me.  I don’t have a ton of Christmas decorations, but each year I like to build a few more pieces to add to my collection.  I really like those big statement porch signs PEACE, JOY, BELIEVE, so I decided to do a gigantic Be Merry sign!  For the accent design, I thought it would be fun to use the Herringbone Shuffle stencil from Royal Design Studio. The chevron shape of the herringbone reminds me of pine boughs and the random colors seem like twinkling lights.  I’ve been wanting to try it ever since I saw the amazing herringbone shuffle wall designs floating around Pinterest.

How to build a Be Merry Christmas Sign

Materials

  • 2 – 6′ x 10″ boards (reclaimed lumber or new)
  • 1 – 2″ x 4″ x 8′ board
  • 1 – 4′ x 4′ x 1/2″ plywood
  • 2″ brad nails or screws
  • 1″ brad nails
  • paint
  • Herringbone Shuffle Christmas Stencil
Continue reading

Curvy Side Table

Hi!  I’d love for you to follow me on Pinterest Her Tool Belt  and if you love instagram, you can keep up with me there too!

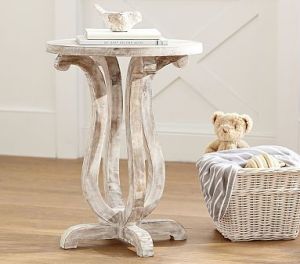
While flipping through the PBkids magazine, I saw the cutest little side table.  I’ve also seen similar shaped tables at Pier 1.

pbkids

It went on my long to-do list for my daughter’s room.  But then my Aunts decided to do an Extreme Room Makeover for my cousin – in glamorous and spicy style.  As luck would have it, they had everything but the side tables/night stands.  I showed them a pic of the PB side table and it was a hit.  So I made 2 sizes of these tables, a 23″ for kids and 27″ for big people.  One of my favorite things about this project is that it is constructed from a 2″ x 10″ board – so cheap about $12.

This post contains affiliate links noted by *
Continue reading

Gallery Style Command Center

I have a problem, a clutter problem.  The epi-center of this clutter problem is the kitchen counter.  It is the dumping zone for everything, mail, school papers, and a lot of random stuff.  What makes things worse, is that the counter is one of the first things that you see when you walk in my front door.  Ya I know, I have a weird layout.  I decided that I have got to do something to get organized, a command center.  The mudroom is the best location for my command center.  When I began this project, my mudroom was a blue aquarium, Continue reading

Giant Magnetic Bracket Frame

One of the elements that I wanted to add to my functional command center is a large magnet board.  My kids can stick up there latest coloring creations or school projects for all to see.  Also it’s a perfect place for a paper or slip needing to go back to school.  In the near future I plan on adding a family calendar to the top, leaving the lower area for the kids stuff.  This giant bracket frame is about 52 1/2″ tall x 31 1/2″ wide. Continue reading

Easy Personalized Mail Organizer

My #1 clutter problem on my counter is my MAIL.  In an effort to contain the clutter and piles I decided that it’s time to get a mail organizer.  I found these magazine bins at Ikea, they cost $15 for 5 bins.   The bins have a nesting feature, but I wanted the bins to be separated a little more, to fit more junk – ha ha.   I also wanted to add labels to aid in the organizing process.  My labeling process is super easy and only requires painters tape, an X-acto knife Continue reading