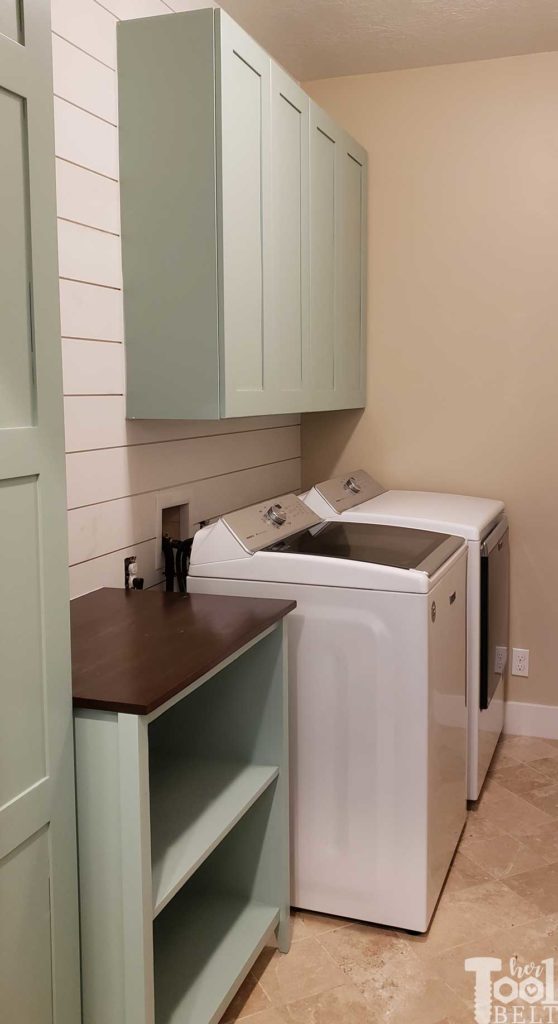
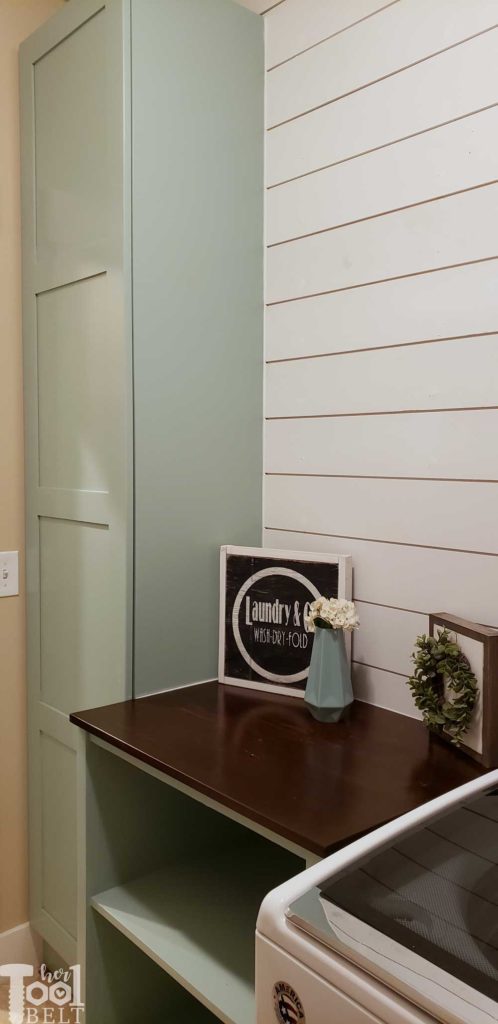
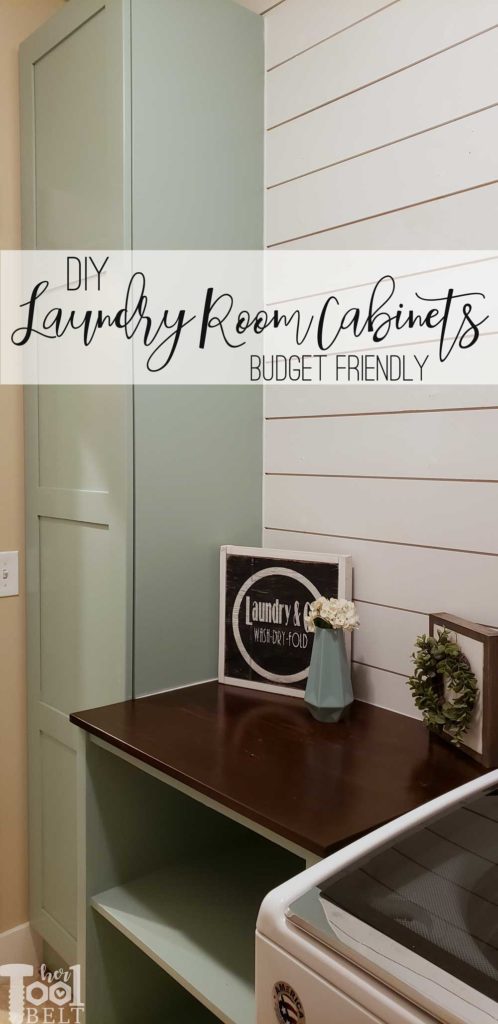
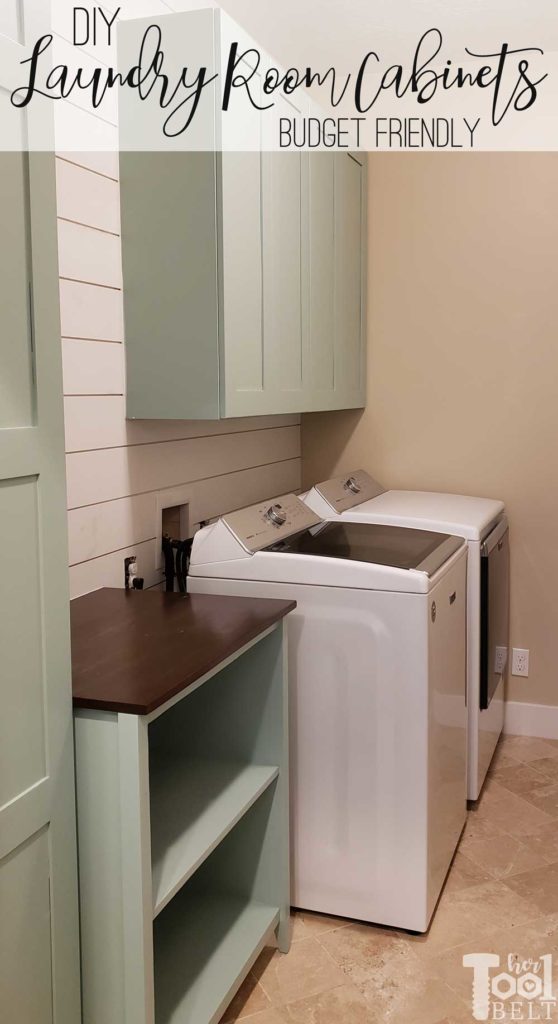
If you’ve been wanting to add storage to your laundry room, these laundry room cabinet plans are for very budget friendly cabinets. The tall cabinet is great for storing and organizing cleaning supplies and a vacuum. The small folding table gives space to fold laundry and fits 2 standard laundry baskets in the shelves. The 2 upper cabinets fit wonderfully above the washer and dryer. My sister in law has been wanting some cabinets to help organize her laundry room. She picked a fun paint color Zen for the cabinets. They completely transformed her room and added so much storage!
Please Subscribe
A look at the upper cabinets.
A view of the Tall cabinet and Folding table.
This post contains some affiliate links for your convenience. Click here to read my full disclosure policy.
How to Build Budget Laundry Room Cabinets
Materials
- 4 Sheets of 3/4″ plywood (4′ x 8′)
- 1 Sheet of 1/4″ plywood (4′ x 8′) door panels
- 8 – 1×4 x 8′ boards (ripped down to 3″)
- 2 – 2×2 x 8′ boards
- 1 – 1×2 x 8′ boards
- 1 – 1×8 x 8′ board
- 1 1/4″ pocket hole screws
- 2 1/2″ washer head cabinet screws
- 6 pairs of euro hinges for frameless cabinets
- 3/4″ edge banding
- sandpaper
- wood filler or putty
- paint primer
- paint (Cabinet and Trim)
- 5 door pulls
The tall cabinet, folding table and two upper cabinets cost me about $330.
Tools Used
- Miter Saw
- Drill
- Table Saw or router table/router
- Tape Measure
- Jig It concealed hinge drilling system or Concealed hinge jig
- Sander
- Kreg pocket hole jig
- Drill bits
- Clamps
- Paint Sprayer
- iron
- level
- laser level
- painters tape
- Stud finder
Cut List
Tall Cabinet
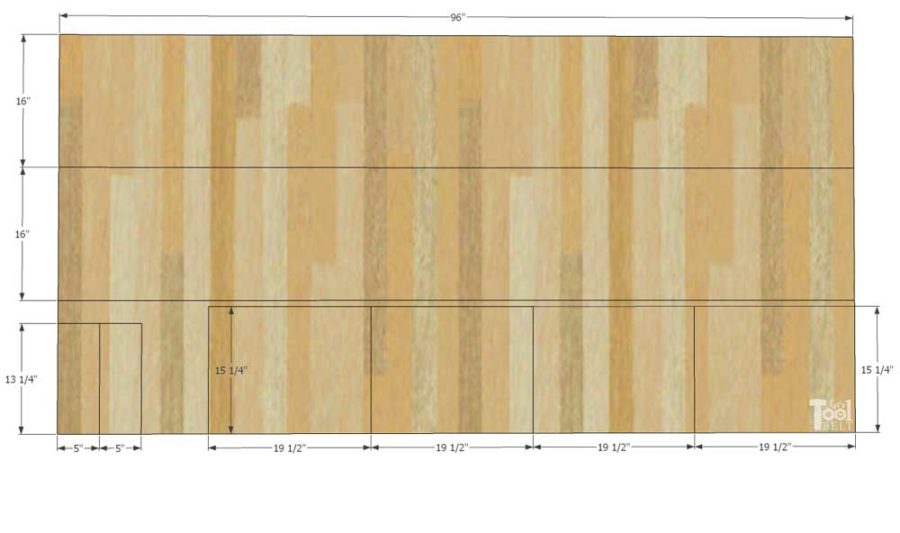
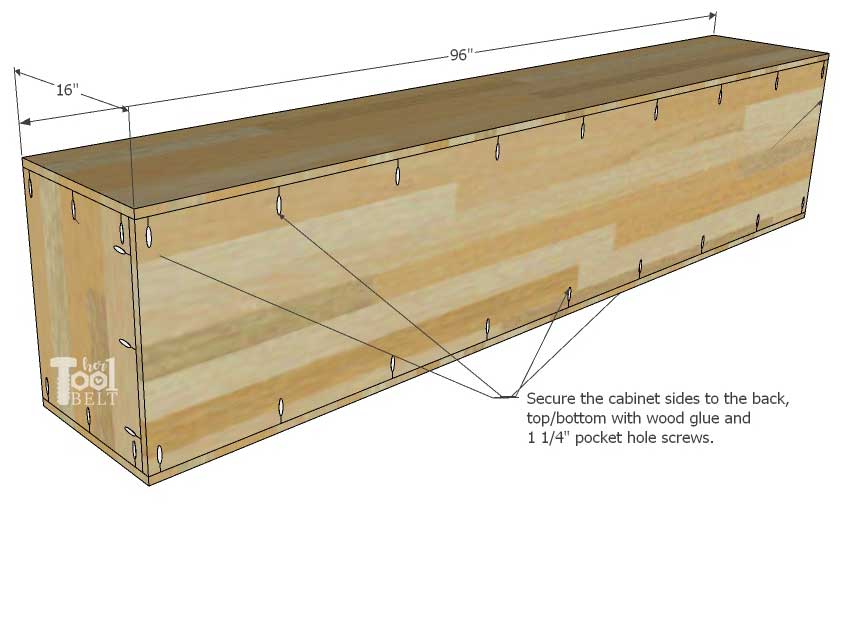
- 2 – 3/4″ x 16″ x 96″ tall cabinet sides (plywood) (This is for 9′ tall ceilings, consider 90″ or 84″ if your ceilings are 8′.)
- 1 – 3/4″ x 19 1/2″ x 96″ tall cabinet back (plywood) (This is for 9′ tall ceilings, consider 90″ or 84″ if your ceilings are 8′.)
- 4 or 5 – 3/4″ x 15 1/4″ x 19 1/2″ tall cabinet shelves (plywood)
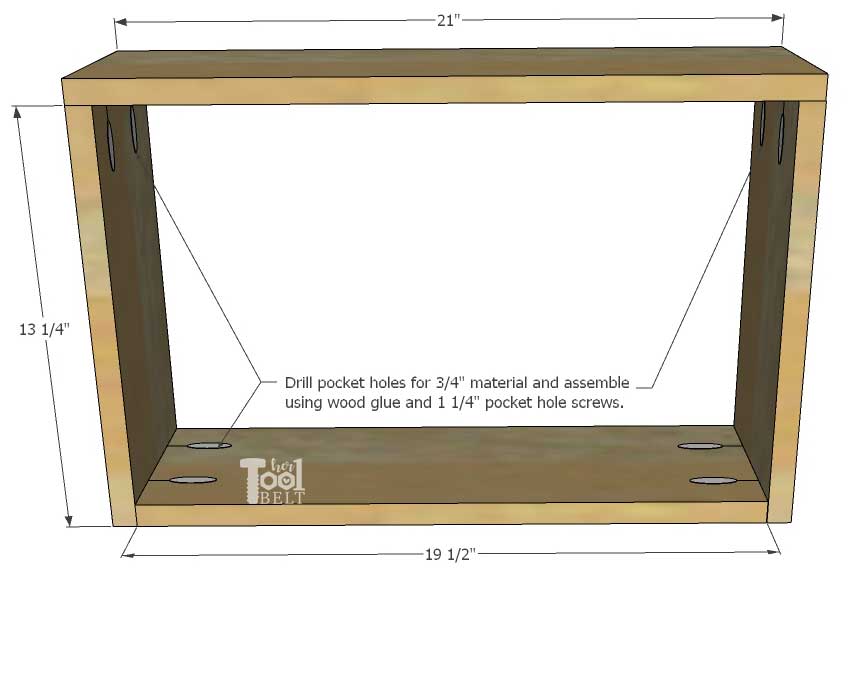
- 1 – 3/4″ x 5″ x 21″ tall cabinet base front (plywood) This is meant to raise the cabinet just above the baseboards, adjust for your baseboard height.
- 2 – 3/4″ x 5″ x 13 1/4″ tall cabinet base sides (plywood) This is meant to raise the cabinet just above the baseboards, adjust for your baseboard height.
- 1 – 3/4″ x 5″ x 19 1/2″ tall cabinet base back (plywood) This is meant to raise the cabinet just above the baseboards, adjust for your baseboard height.
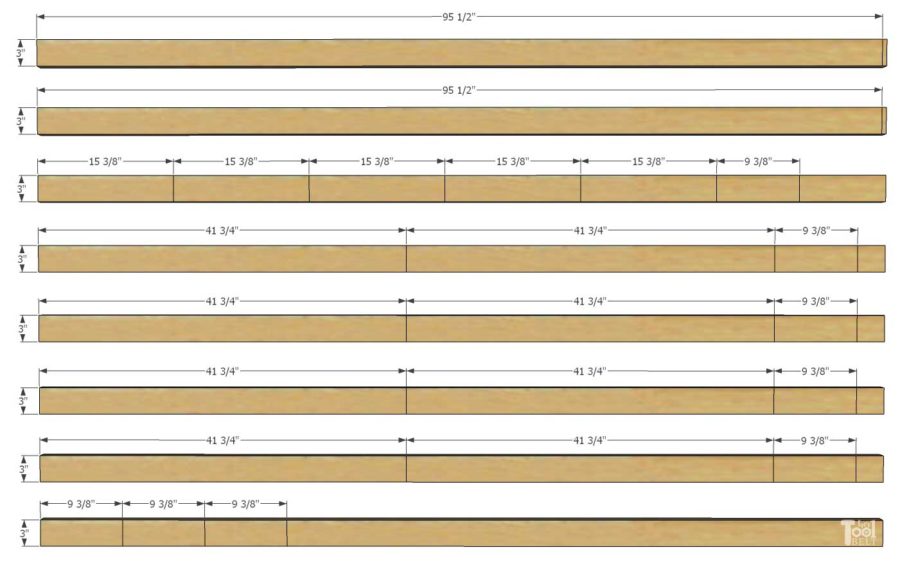
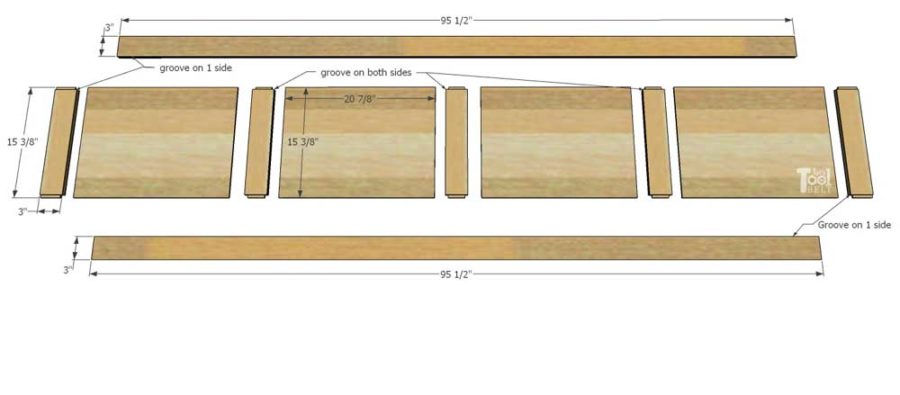
- 2 – 3/4″ x 3″ x 95 1/2″ tall cabinet door stiles
- 5 – 3/4″ x 3″ x 15 3/8″ tall cabinet door rails
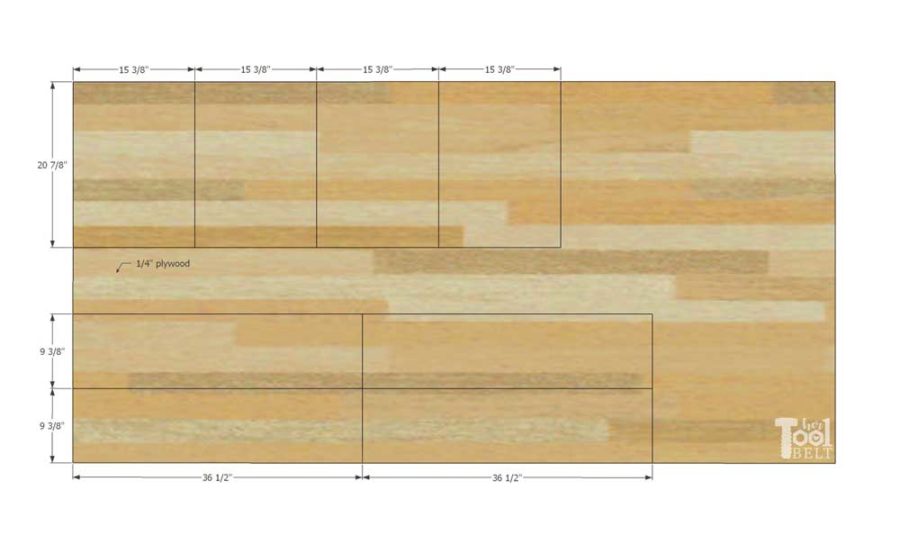
- 4 – 1/4″ x 15 3/8″ x 20 7/8″ tall cabinet door panels
Folding Table
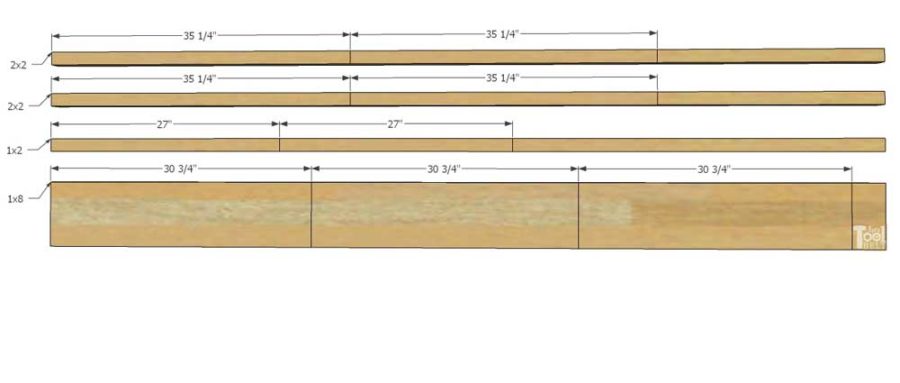
- 4 – 1 1/2″ x 1 1/2″ x 35 1/4″ folding table legs
- 2 – 3/4″ x 1 1/2″ x 27″ folding table rails
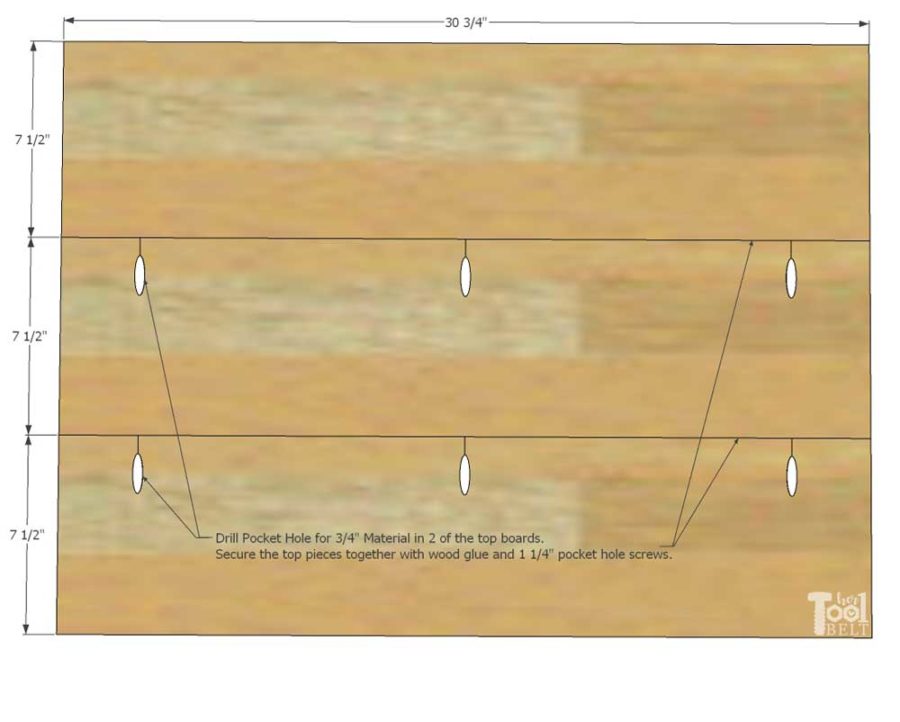
- 3 – 3/4″ x 7 1/2″ x 30 3/4″ folding table top
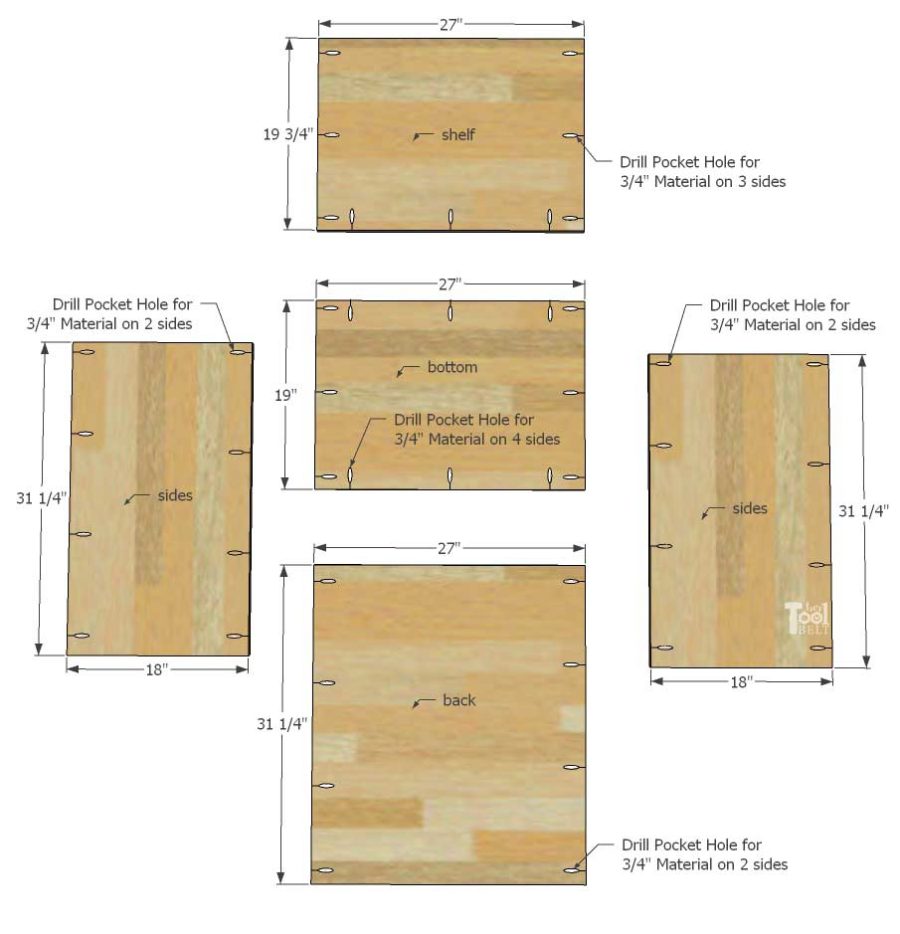
- 1 – 3/4″ x 27″ x 31 1/4″ folding table back
- 2 – 3/4″ x 18″ x 31 1/4″ folding table sides
- 1 – 3/4″ x 19″ x 27″ folding table bottom
- 1 – 3/4″ x 19 3/4″ x 27″ folding table shelf
Upper Cabinets
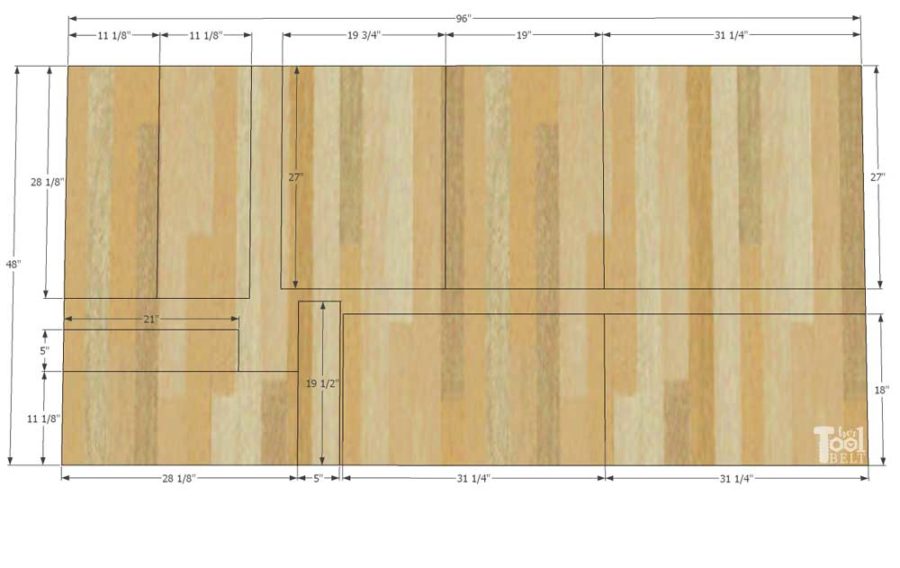
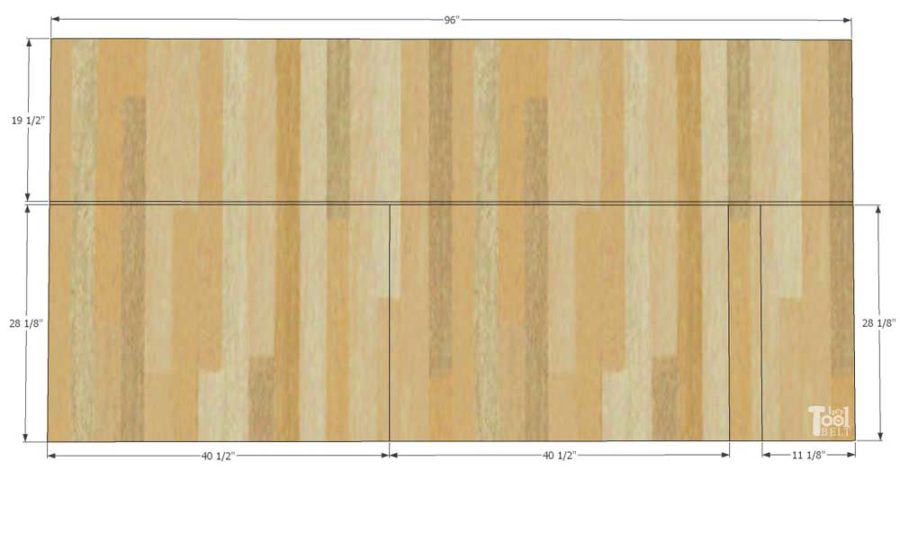
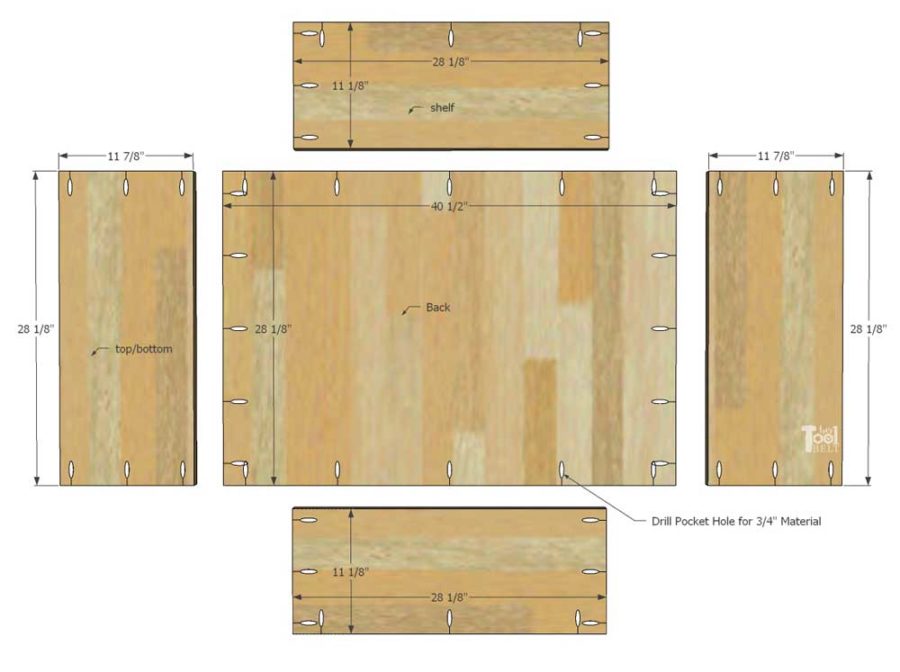
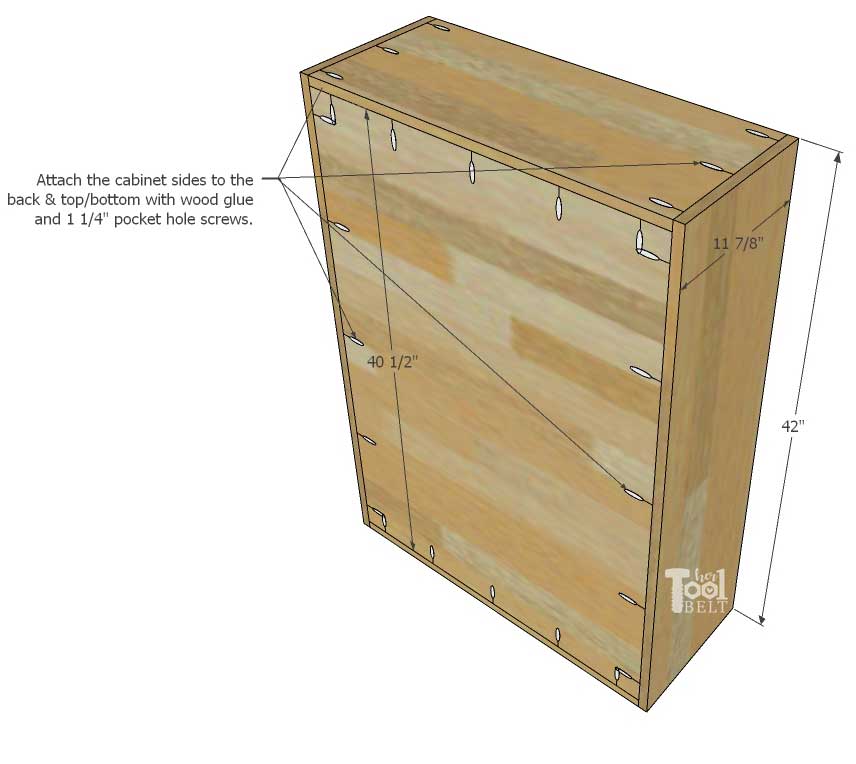
- 4 – 3/4″ x 11 7/8″ x 42″ upper cabinets sides
- 4 – 3/4″ x 11 7/8″ x 28 1/8″ upper cabinets top/bottom
- 4 – 3/4″ x 11 1/8″ x 28 1/8″ upper cabinets shelves
- 2 – 3/4″ x 28 1/8″ x 40 1/2″ upper cabinet backs
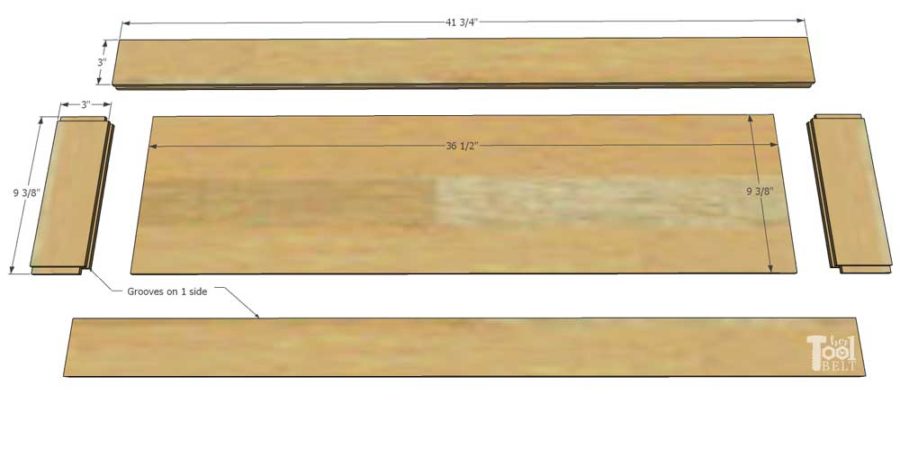
- 8 – 3/4″ x 3″ x 41 3/4″ upper cabinet door stiles
- 8 – 3/4″ x 3″ x 9 3/8″ upper cabinet door rails
- 4 – 1/4″ x 9 3/8″ x 36 1/2″ upper cabinet door panels
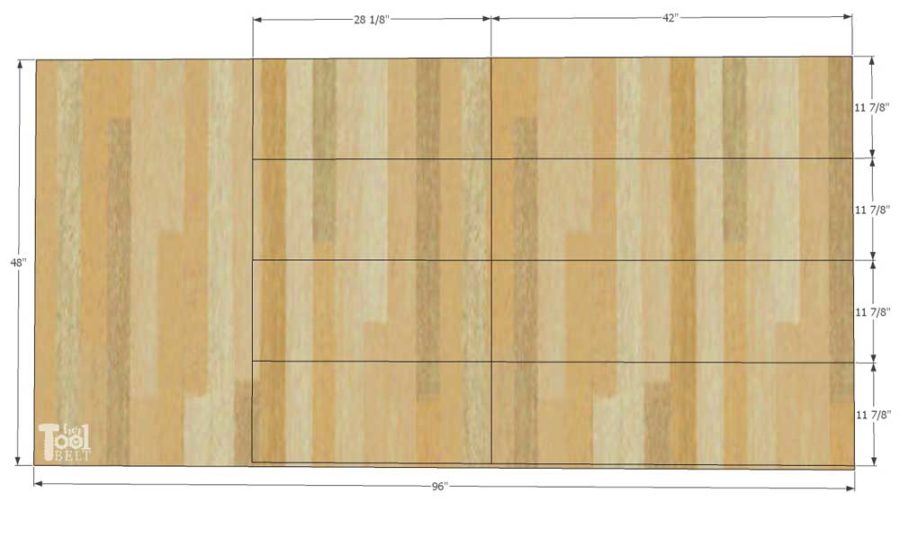
Cut Diagram
1/4″ Plywood
Boards – Doors
Building the Tall Cabinet
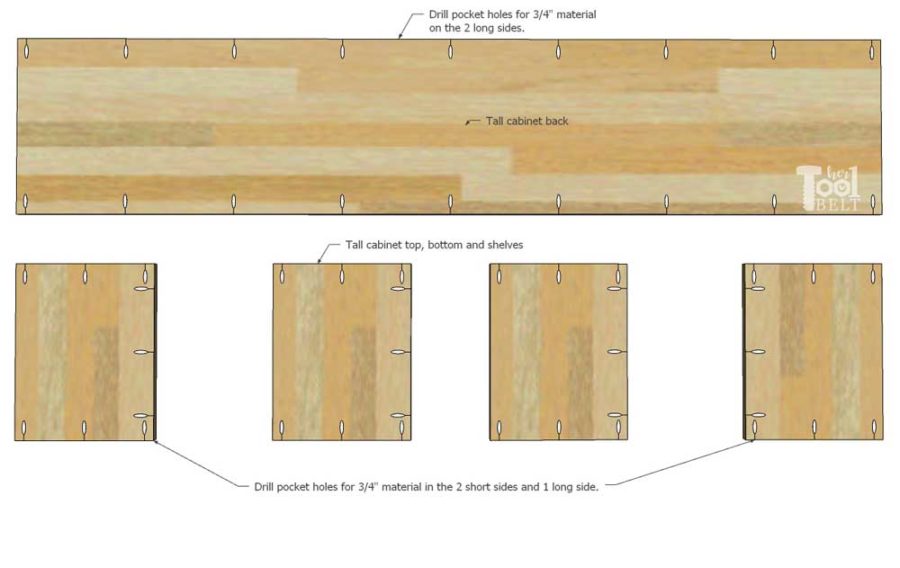
Cut the tall cabinet parts according to the cut list.
Drill pocket holes for 3/4″ material in the 2 long sides of the tall cabinet back piece. In the tall cabinet shelves, drill pocket holes for 3/4″ material in the 2 short sides and 1 of the long sides.
Shelf placement in the tall cabinet is totally up to you and your needs. The following instructions allow for vacuum storage in the cabinet.
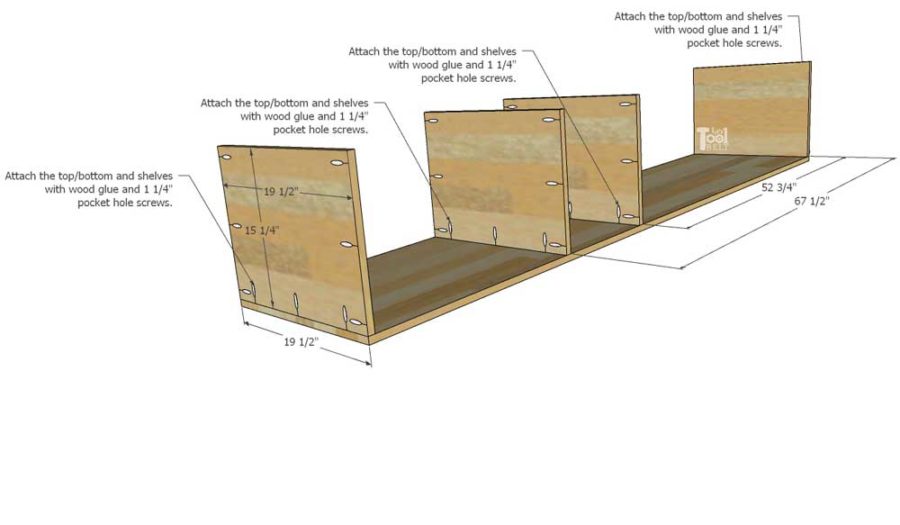
From the bottom of the back piece, measure and mark 52 3/4″ and 67 1/2″.
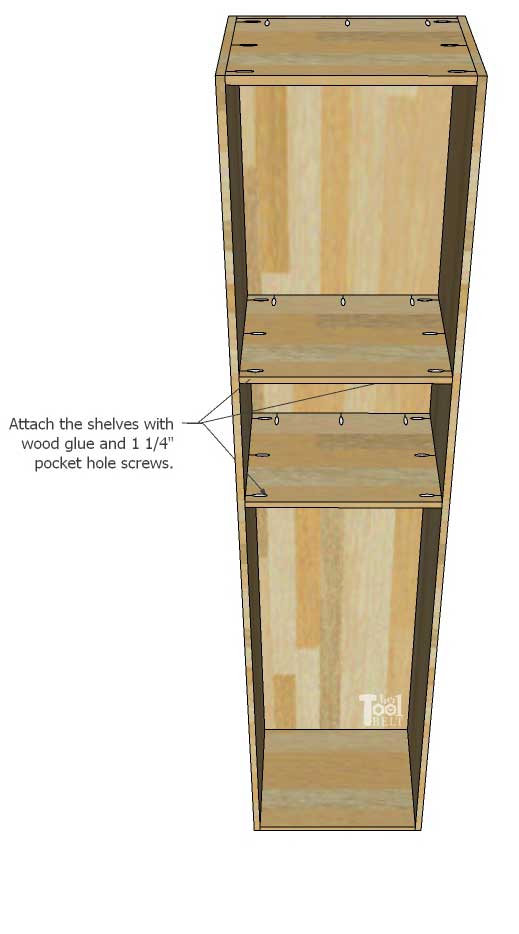
Attach the tall cabinet shelves with wood glue and 1 1/4″ pocket hole screws flush with the top and bottom of the tall cabinet back. Also attach shelves at 52 3/4″ and 67 1/2″.
Use wood glue and 1 1/4″ pocket hole screws to attach the tall cabinet sides to the bottom, top and back pieces.
Attach the tall cabinet shelves to the sides with 1 1/4″ pocket hole screws.
Tall Cabinet Base
Cut the base pieces according to the cut list. You can assemble the base with screws, brad nails or pocket holes/screws. Attach the back 19 1/2″ piece to the two 13 1/4″ side pieces. Then attach the sides to the 21″ front piece.
Building the Folding Table
Cut the folding table parts according to the cut list.
Drill pocket holes for 3/4″ material in the 2 long sides of the side and back pieces. Drill pocket holes for 3/4″ material in 3 sides of the shelf and 4 sides of the bottom piece.
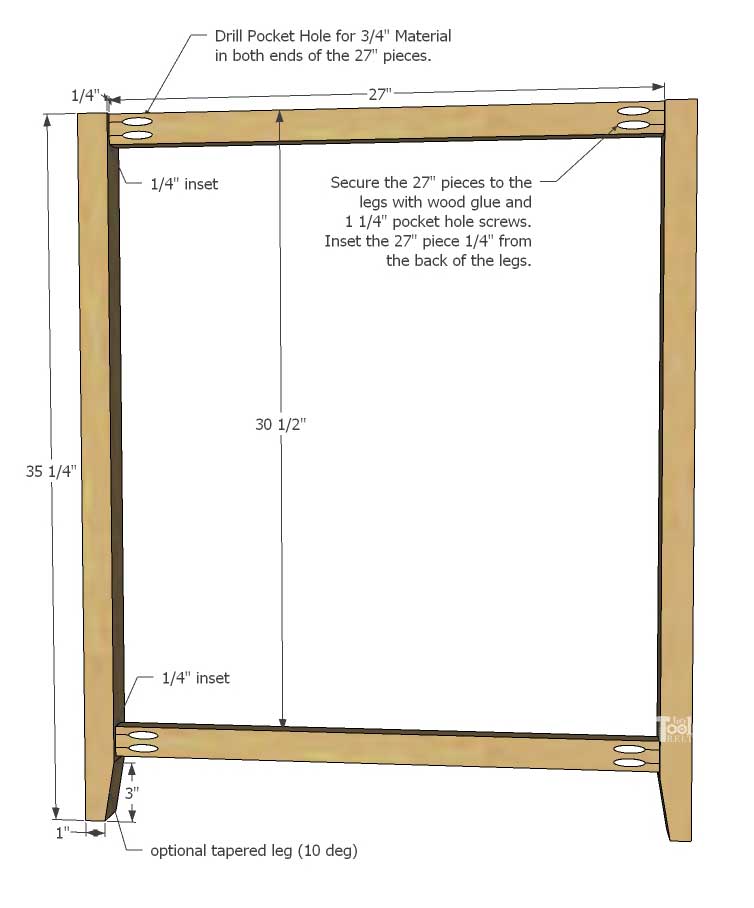
If desired, taper the folding table legs at the bottom with a 10 deg cut, no more than 3″ high. Drill pocket holes for 3/4″ material in both ends of the 27″ pieces.
Mark down 30 1/2″ from the top of the legs. Also mark in 1/4″ from the backside of the legs. Attach the 27″ pieces to the legs with wood glue and 1 1/4″pocket hole screws at the top and at 30 1/2″. Also inset the 27″ pieces 1/4″
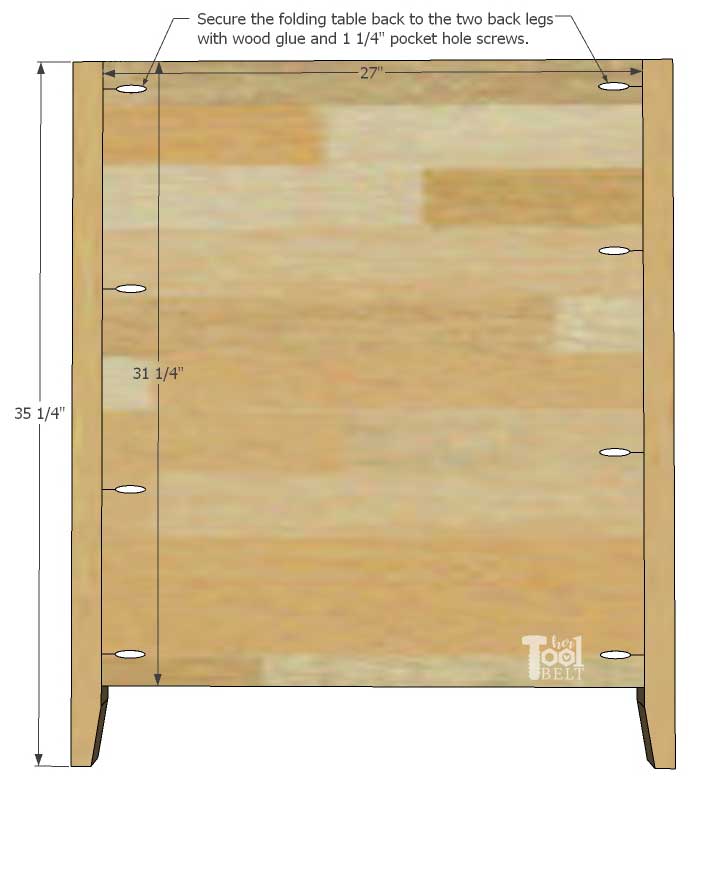
Attach the back piece to the back legs with wood glue and 1 1/4″ pocket hole screws. The tops should be flush.
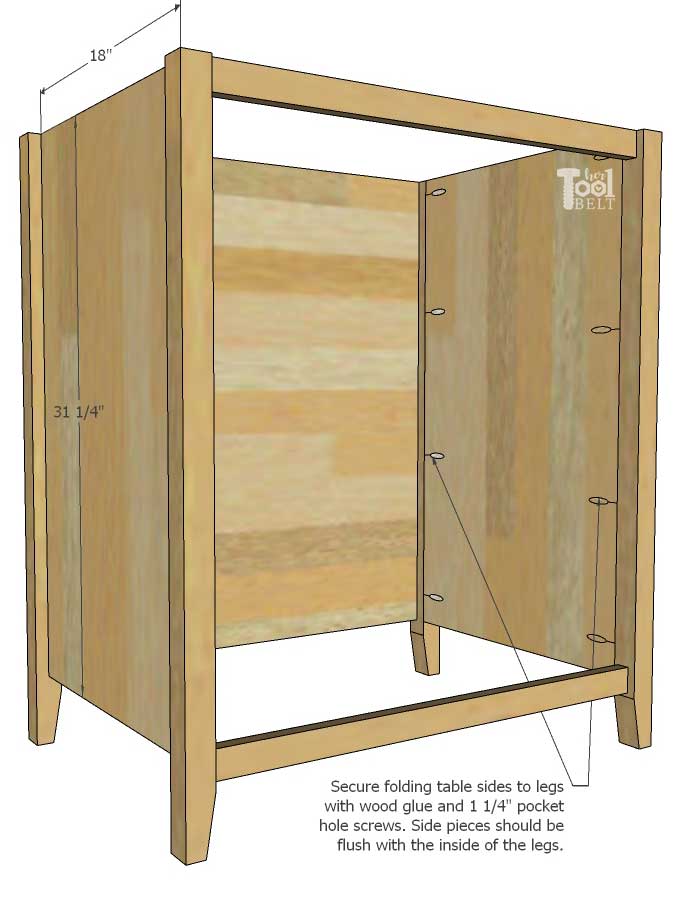
Secure the side pieces to the front and back legs with wood glue and 1 1/4″ pocket hole screws.
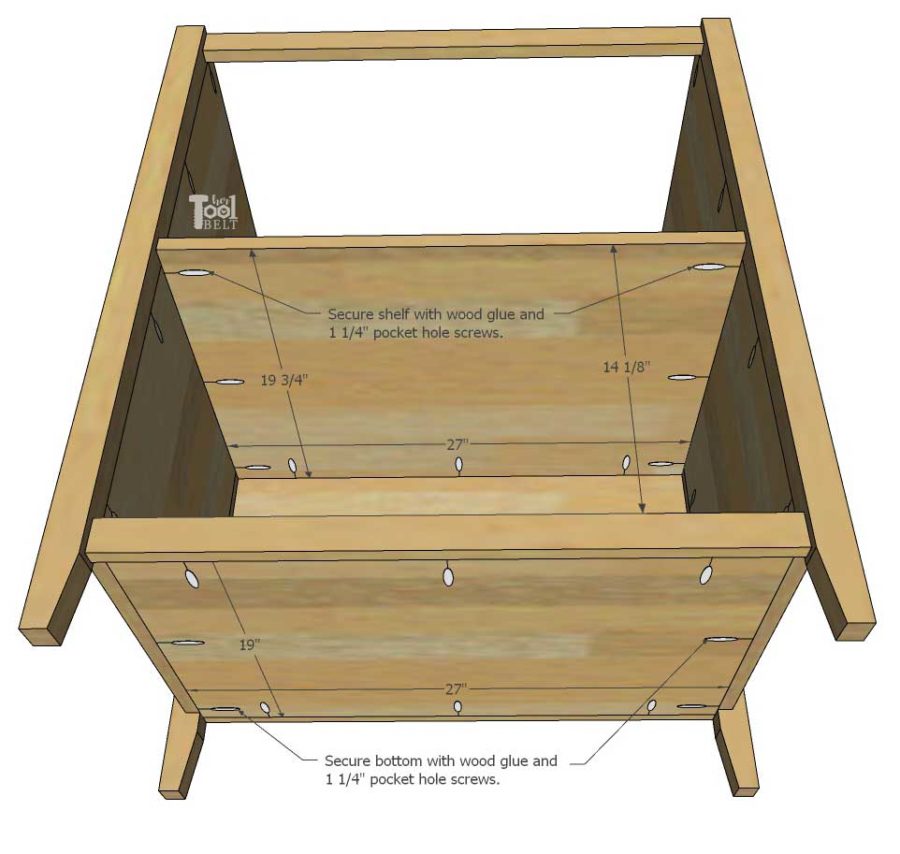
Then attach the bottom to the front, back and sides with wood glue and 1 1/4″ pocket hole screws, make sure the bottom is flush with the top of the lower rail. Mark up 14 1/8″ from the bottom. Secure the shelf to the sides and back with wood glue and 1 1/4″ pocket hole screws.
Drill pocket holes for 3/4″ material in one long side of 2 top boards. Secure the 3 top boards together with wood glue and 1 1/4″ pocket hole screws.
Attach top to folding table.
Building the Upper Cabinet
Cut the upper cabinet parts according to the cut list.
Drill pocket holes for 3/4″ material in 4 sides of the back, the 2 short sides of the top and bottom, and 3 sides of the shelf pieces.
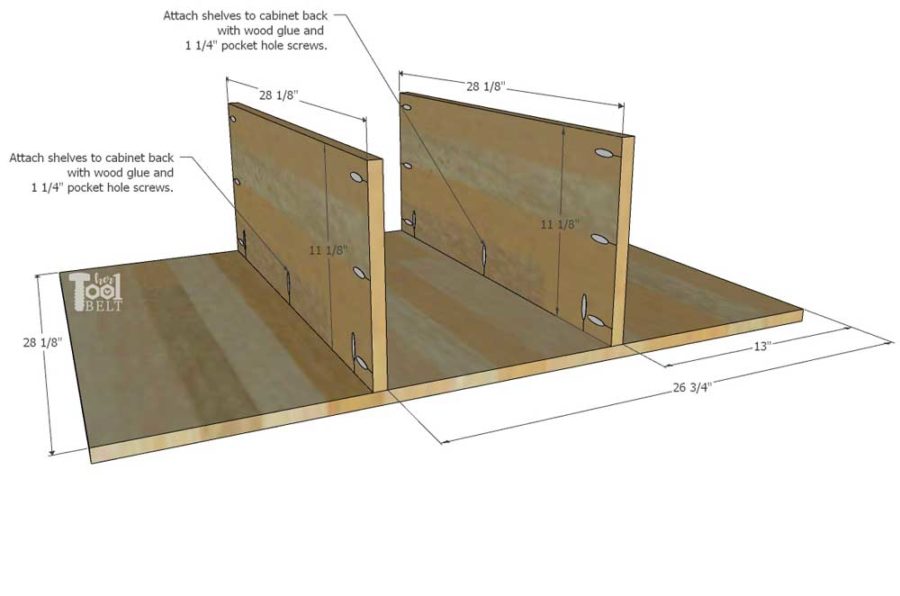
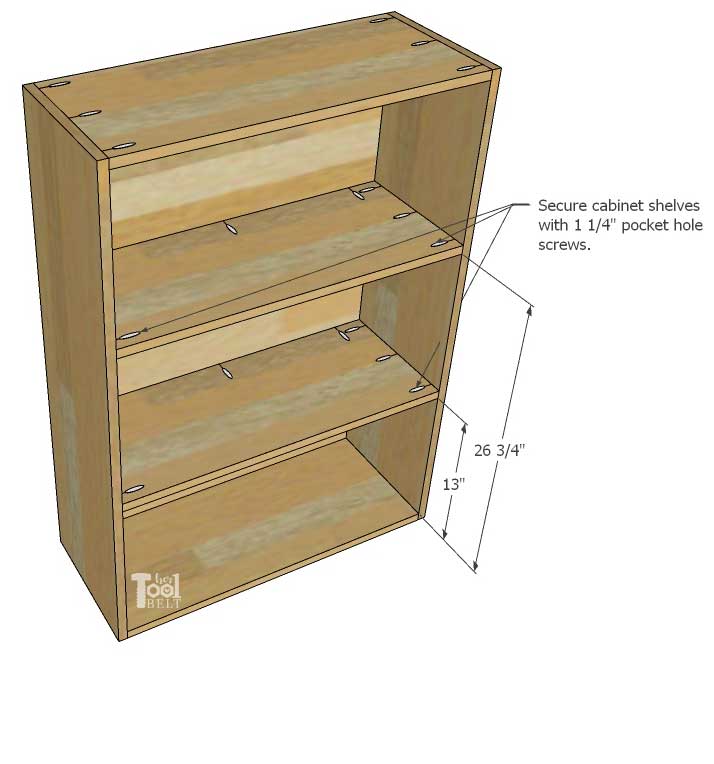
From the bottom of the back piece, measure and mark 13″ and 26 3/4″.
Attach the upper cabinet shelves with wood glue and 1 1/4″ pocket hole at the 13″ and 26 3/4″ marks.
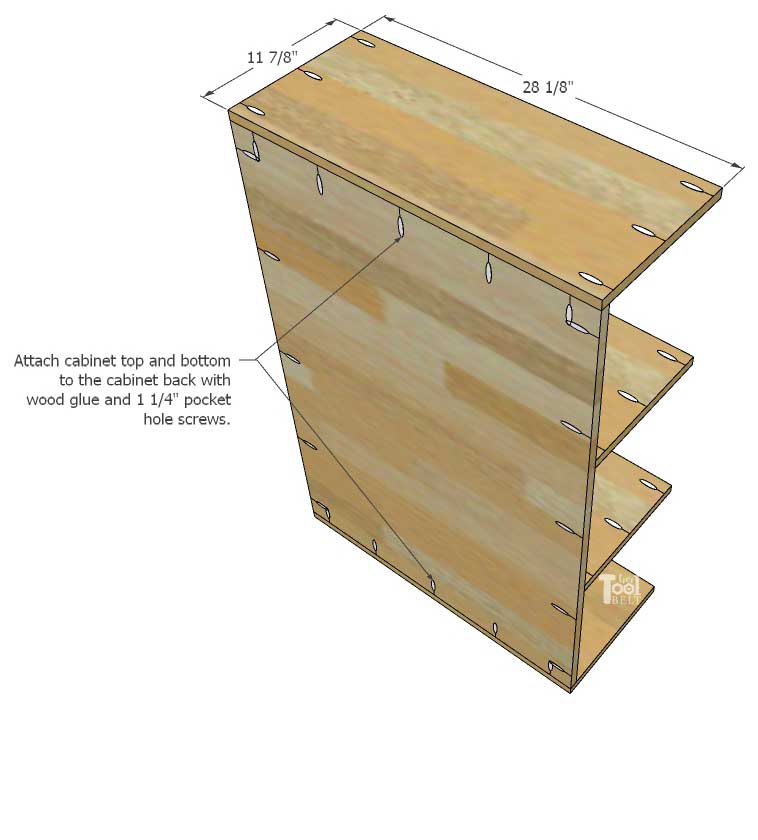
Attach the upper cabinet top and bottom with wood glue and 1 1/4″ pocket hole to the upper cabinet back.
Then attach the upper cabinet sides to the back and top/bottom with wood glue and 1 1/4″ pocket hole screws.
Attach the upper cabinet shelves to the sides with 1 1/4″ pocket hole screws.
Building the Cabinet Doors
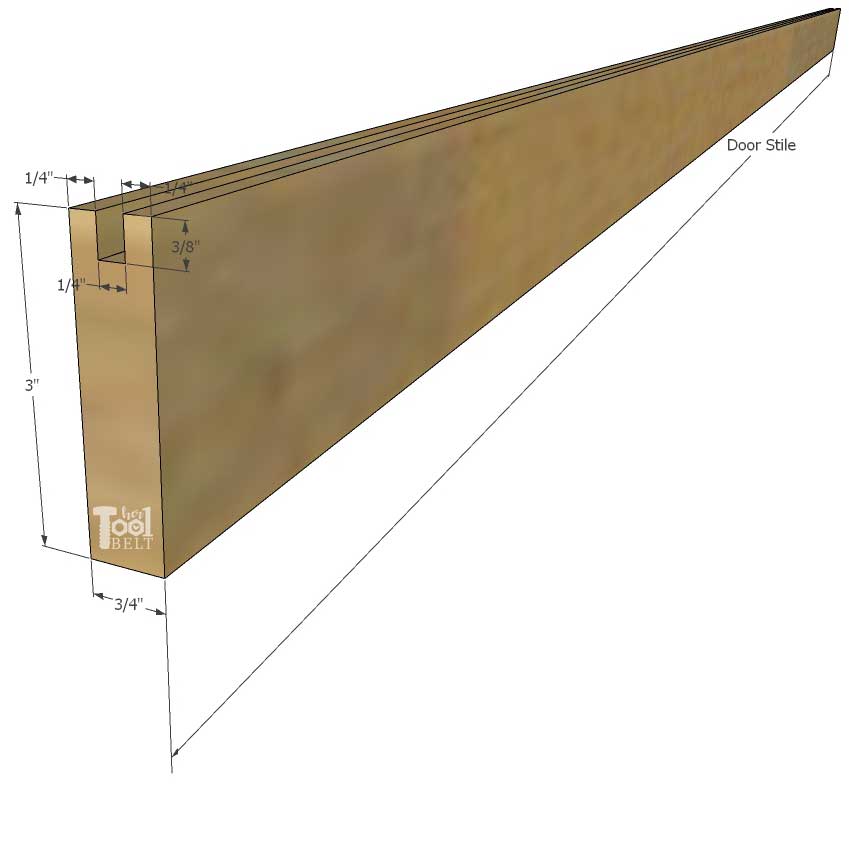
Cut all of the door stiles to length according to the cut lists, rip the boards to 3″ wide.
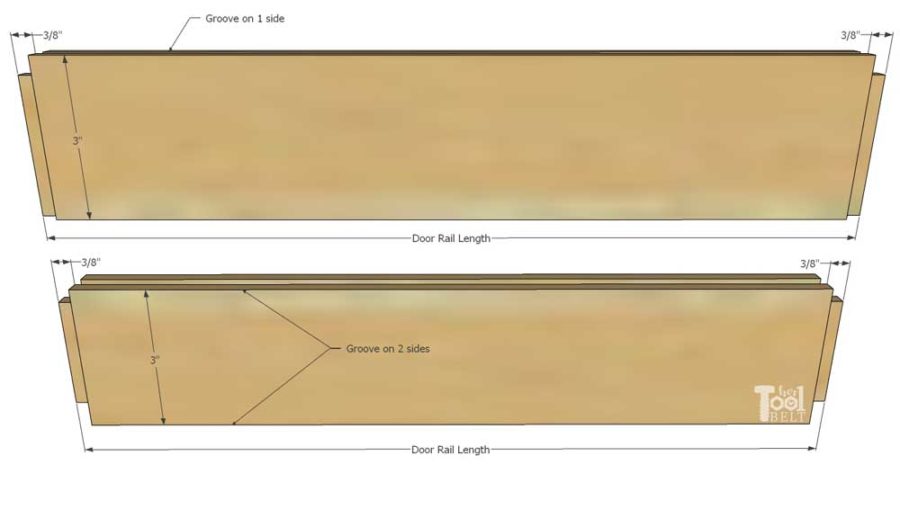
Each door stile will need a groove down the center of one long side that is 1/4″ wide (or the thickness of your door panel) and 3/8″ deep. The groove can be made using a table saw or a router table.
Cut all of the door rails to length according to the cut lists, rip the boards to 3″ wide.
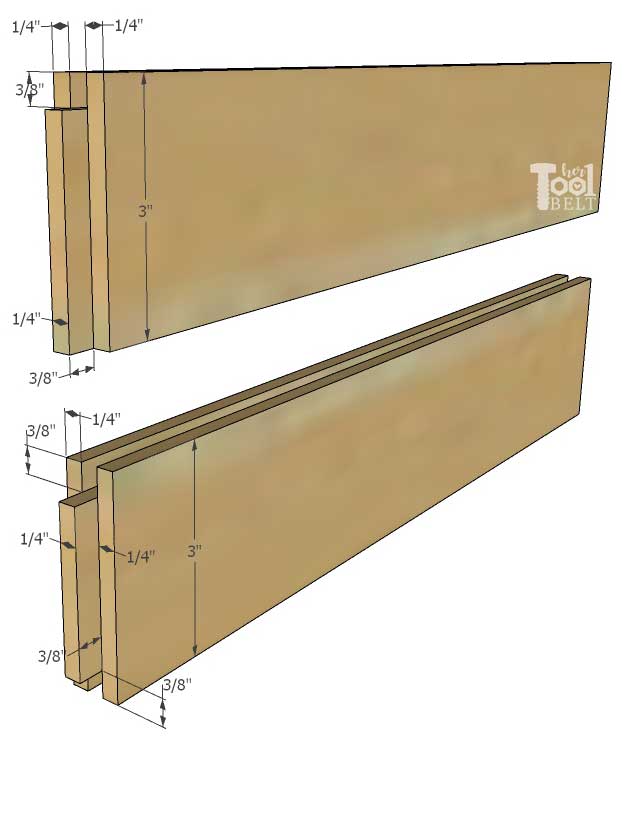
Each door rail will need a groove down the center of one long side that is 1/4″ wide (or the thickness of your door panel) and 3/8″ deep. 3 of the upper cabinet door rails will need the 1/4″x3/8″ groove on both sides. The groove can be made using a table saw or a router table.
Next we need to cut the tenons (tongue) in the ends of each door rail piece. The goal is to have the tenons fit snuggly in the stile groove, but not too tight. Make the cuts 1/4″ deep and 3/8″ back from the ends on both ends. See sketches below. Test the cuts and make sure they fit in the grooves.
The doors are glued where the tenons fit into the grooves. The panel isn’t glued in, it floats in place. The panel should also have room to float, trim the length/width of the panel as needed to allow it to fit easily within the rails/stiles of each door.
Tall Cabinet Door Assembly
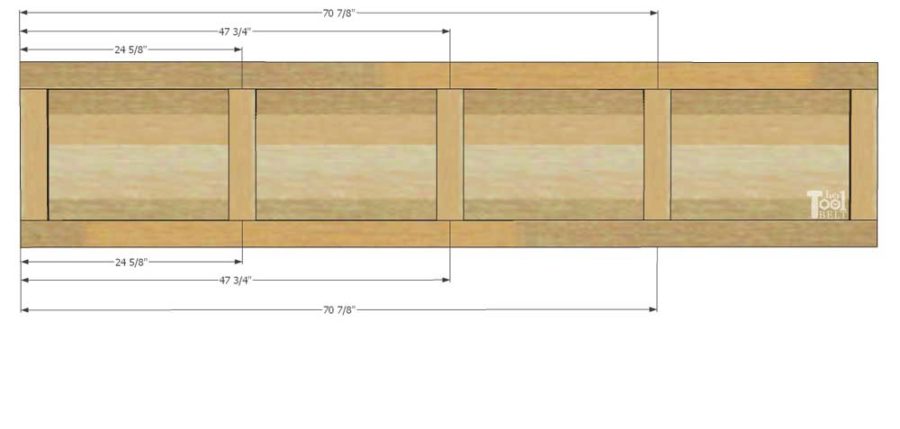
Measure and mark 24 5/8″, 47 3/4″ and 70 7/8″ on the two long stiles. Also mark the centers of the tall door rails.
Apply wood glue to each of the tall door rails and stiles (where the rails be placed). Assemble the tall door with a 1 groove rail on each end and 3 ea 2 groove rails in the center, with door panels in between. Use clamps to hold the door together while the wood glue dries. Make sure the door is square, and drying flat.
Upper Cabinet Door Assembly
Apply wood glue to each of the upper door rail ends and stiles (where the rails be placed). Assemble the upper doors together, see sketch. Use clamps to hold the door together while the wood glue dries. Make sure the door is square, and drying flat.
Once the doors have all dried, remove any excess glue and sand the wood smooth.
I prefer to use concealed hinges to hang doors on cabinets. Concealed hinges give you the ability to adjust the hinges once installed. It makes it easy to get the door gap just right. You do need a concealed hinge jig (forstner bit) to drill out the pocket for the hinge cup. For a long time I used this simple jig ($11-$13) to drill the pockets. It is easy to use a cheap.
However, I did get this Jig It concealed hinge drilling system and it is wonderful for repeated hinge placement and has a set depth collar.
Install 2 hinges on each upper cabinet door (about 4″ from the top and bottom), and 2-4 hinges on the tall cabinet door (avoid putting a hinges where you have shelves.
Finish
Iron on 3/4″ edge banding to the exposed plywood edges. Sand or trim the excess edge banding off the edges. Sometimes I don’t want to use edge banding, in those cases I’ll put a layer of spackle or putty on the exposed plywood edges and sand that smooth.
Fill any exposed pocket holes with pocket hole plugs or spackle. Fill any cracks or blemishes with spackle or putty.
Sand the cabinets smooth with a minimum of 120 grit sand paper.
I painted the cabinets with 2 coats on paint primer. It is critical to let the first coat of primer dry completely and sand it smooth. If the coverage is still good, then move onto paint, otherwise apply a 2nd coat of primer. I’ve been using Behr Cabinet and Trim for furniture projects lately and really like the durable finish.
Installing the Cabinets
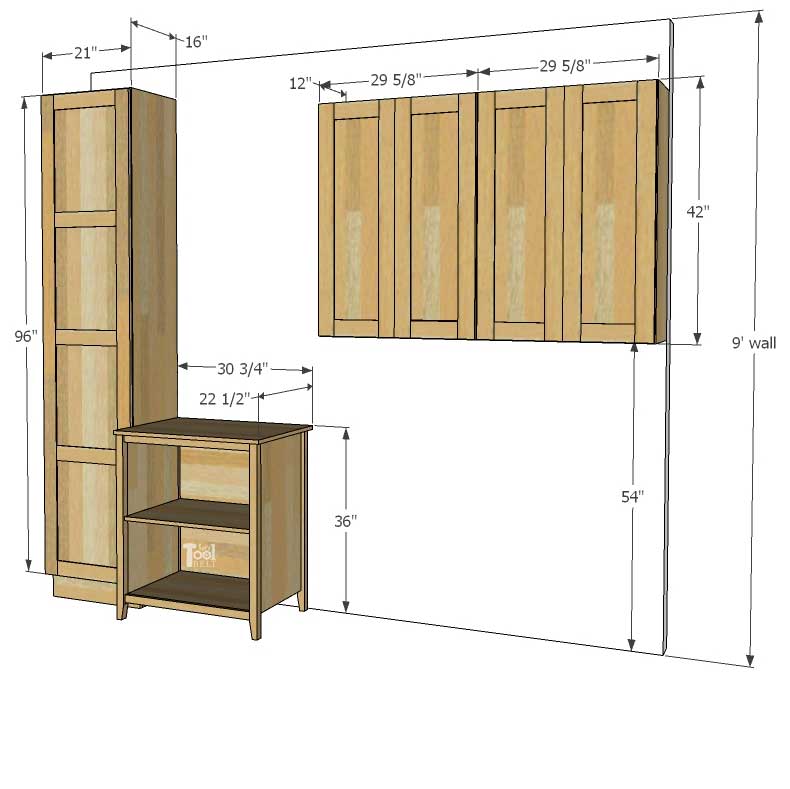
Find and mark the wall studs where the cabinets will be installed. Put the base where the upper cabinet will go, then place the upper cabinet on top of the base. Make sure the cabinet is level and secure the cabinet to the studs in the wall with washer head wood screws (2 1/2″ minimum length). For the upper cabinets, I marked 54″ up from the floor and marked a level line. Then I screwed a scrap piece of wood under the level line. I placed the upper cabinet on the scrap wood as a ledge, made sure it was level and plumb. Then secured the upper cabinets to the wall studs with washer head wood screws (2 1/2″ minimum length). I also attached the mating upper cabinet sides together with 1 1/4″ pan head screws (pocket hole screws).
After the upper cabinets were installed, I removed the scrap wood ‘ledge’. Install the cabinet doors and enjoy all of the storage space!
–> Download Laundry Room Cabinet Printable Plans – here <–
Thanks for pinning!

Leave a Reply