The 60 inch Round Table – French Farmhouse Style Build includes tool reviews that are sponsored by The Home Depot. I have been compensated for my time and provided with product. All ideas and opinions are my own. This post contains some affiliate links for your convenience. Click here to read my full disclosure policy.
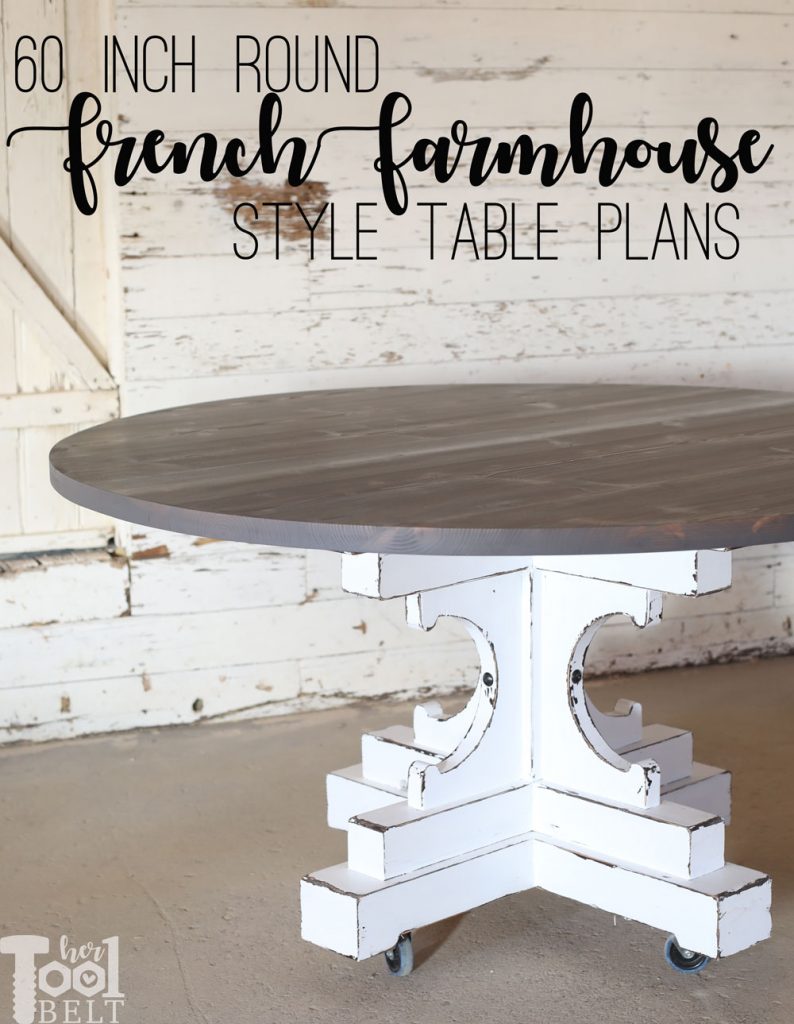
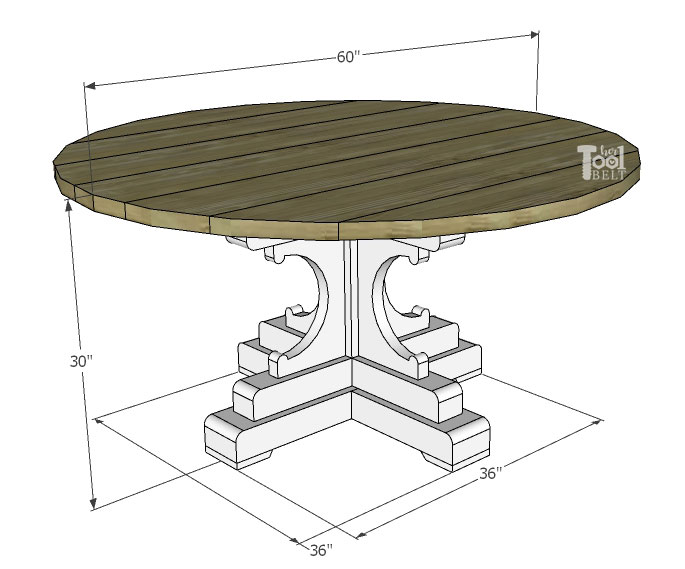
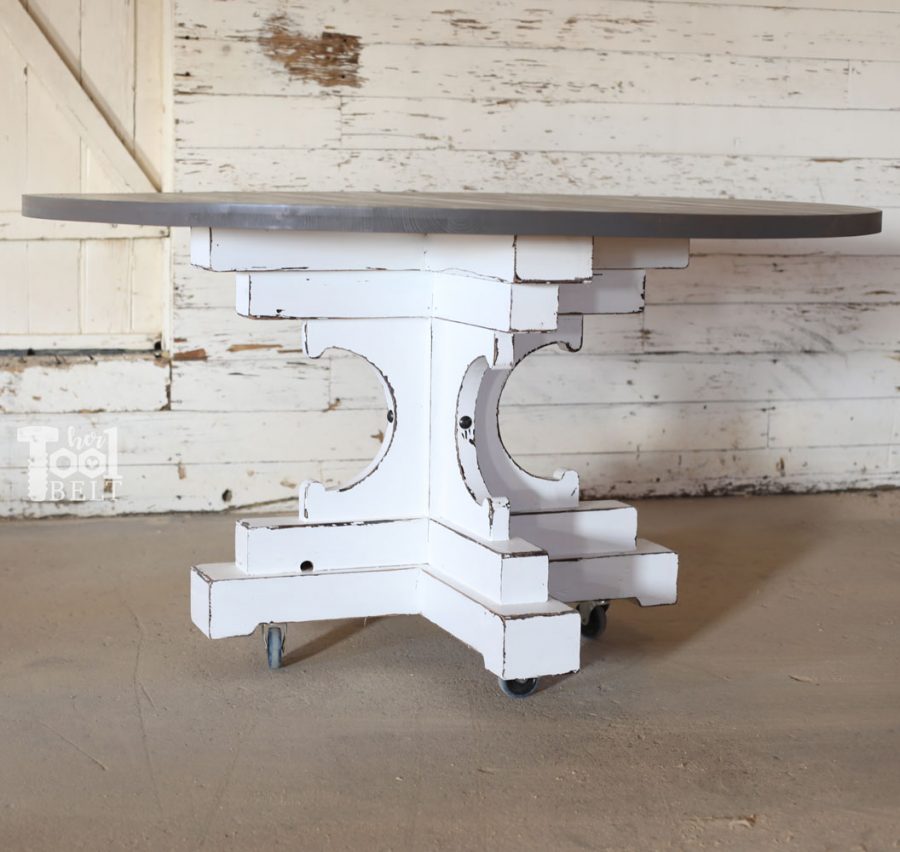
If you follow me on Instagram, you may have caught my stories of this dining table build, I was burning the midnight oil trying to finish it on time for Christmas. My siblings rotate who we give a present to each year. I had my sister just younger than me and she was in desperate need of a dining table. She really likes the 48″ round pedestal table that I built 2 years ago, however they are a family of 7 so that table is way to small for them. She measured the dining space in her house and we decided that a 60″ round table will work the best for her needs. I went ahead and modified the size of the base for a 60″ round table. This table is inspired by this gorgeous one at Restoration Hardware, but the look was modified for readily available lumber.
BTW just ignore the wheels, I put it on wheels to haul it around, and thought it would be easier for her to move too. Once in place the wheels will come off :-).
Lessons learned from previous table
Having built a similar table a few years ago, I was able to implement a few “I wish I would’ves” to make the build go smoother and faster.
- First off, I had a bunch of 4×4 and 4×6 posts left over from when I fixed my deck slope. I used these 4×4’s and 4×6’s with cross lap joints, instead of stacking 2×4’s and 2×6’s like I did on the 48″ table, it made assembly quite a bit faster and eliminated the need for wood filler.
- Planing the boards first makes a smoother top and makes the base fix together better, because some lumber has a little curve. Plus my belt sander bit the dust, so planing was a real necessity in this case.
With this build, I’m also reviewing a few tools as part of the #THDprospective program with Home Depot. I’ll be sharing my thoughts on these tools noted with *.
How to Build a 60 inch Round Table with French Farmhouse Style Pedestal Base
Materials (links included for convenience)
- 4 – 2″ x 10″ x 10′ boards (common name – actually measures 1 1/2″ x 9 1/4″)
- 1 – 4″ x 6″ x 12′ board (common name – actually measures 3 1/2″ x 5 1/2″)
- 1 – 4″ x 4″ x 12′ board (common name – actually measures 3 1/2″ x 3 1/2″)
- 1 – 1″ x 4″ x 8′ board or scraps if you have them.
- 2 1/2″ pocket hole screws
- 3″ construction screws
- Wood Glue
- Sandpaper
- 1 1/4″ brad nails
- Biscuits – optional
- 4 – 1″ decorative nail heads (also available at Hobby Lobby in small packs)
- Finish – I used
- Base: dark brown stain (dark walnut), vaseline (for the chippy look), Behr ultra pure white paint
- Top: Varathane Briarsmoke stain, Varathane polyurethane
- Approximate cost of lumber for the table – $85
Tools Used
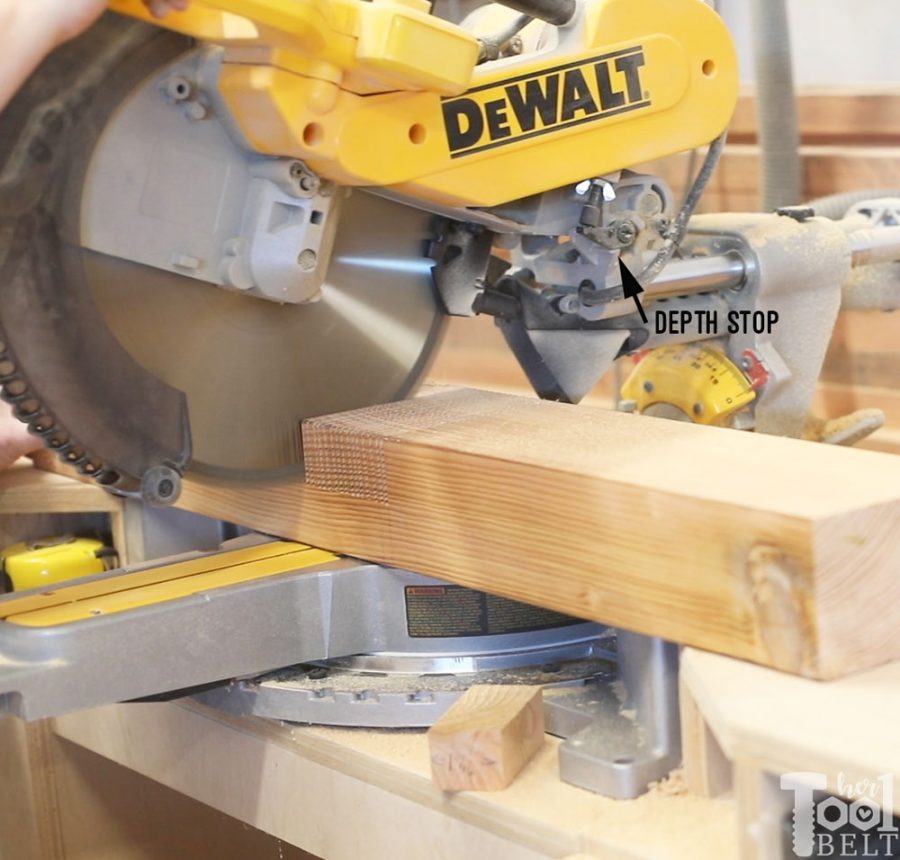
- DeWALT Miter Saw – it is helpful if the miter saw has a depth stop
- DeWALT Thickness Planer (not required, but reduces sanding)
- Dremel MightyMax 3.5 Oscillating Tool*
- DeWALT cordless sander* + batteries
- Milwaukee Drill/Impact Combo*
- Bosch Spade Bits*
- Plunge Router and straight bit – if you don’t have a router check out Ana White’s round table cut with a circular saw.
- Table saw or circular saw with a straight edge
- Kreg pocket hole jig
- Biscuit Joiner – optional
- Ryobi cordless Jig Saw* or bandsaw or scroll saw
- Clamps can be helpful
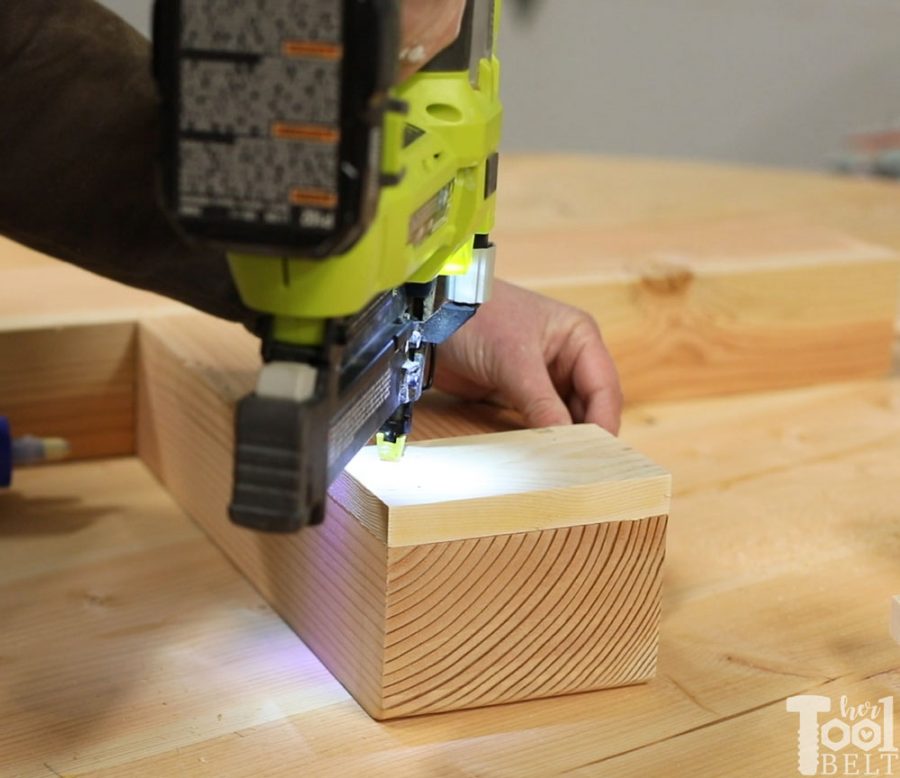
- Brad Nailer – optionals
- Measuring Tape
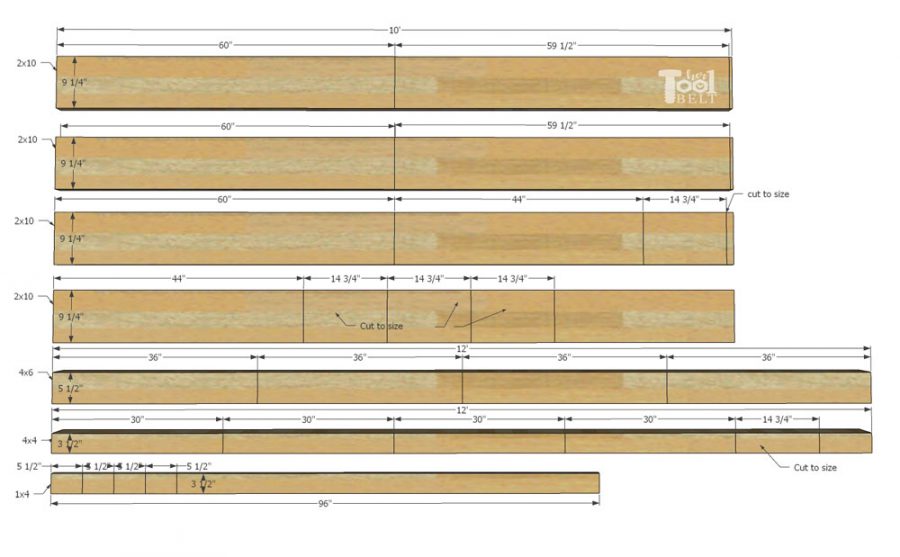
Cut List
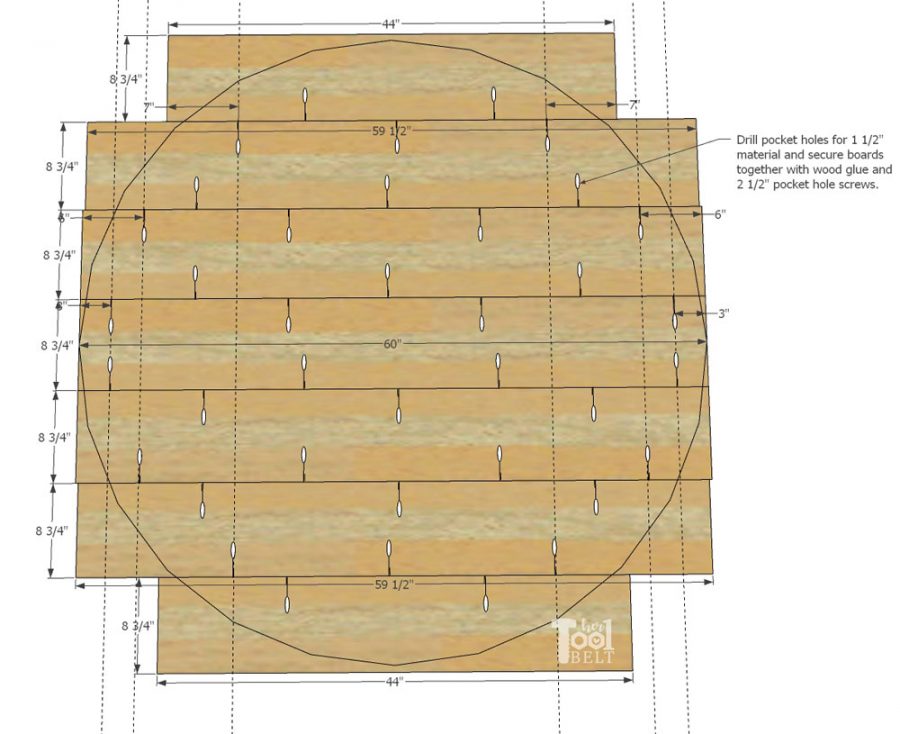
- 3 – 1 1/2″ x 9 1/4″ x 60″ (2×10)
- 2 – 1 1/2″ x 9 1/4″ x 59 1/2″ (2×10)
- 2 – 1 1/2″ x 9 1/4″ x 44″ (2×10)
- 4 – 1 1/2″ x 9 1/4″ x approximately 14 3/4″ (2×10) – don’t cut these until later in the build
- 4 – 3 1/2″ x 5 1/2″ x 36″ (4×6)
- 4 – 3 1/2″ x 3 1/2″ x 30″ (4×4)
- 1 – 3 1/2″ x 3 1/2″ x approximately 14 3/4″ (4×4) – don’t cut this until later in the build
- 3 – 3/4″ x 3 1/2″ x the width of your 4×6, approximately 5 1/2″. Cut a 30 deg miter on one of the 5 1/2″ sides. (1×4)
Cut Diagram
 Building the 60 inch Round Table Top
Cut the 60″, 59 1/2″ and 44″ cuts from the 2×10’s. Before table top assembly, I sent these boards thru the thickness planer to make them flat.
Joining the table together
For a seamless look with lumber on the table top, I like to cut the rounded edges off of the 2×10’s. Typically a 2×10 would have a width of 9 1/4″, so if I cut 1/4″ off each side, I end up with 8 3/4″ plank width. Once the boards were trimmed down to 8 3/4″, I drilled pocket holes for 1 1/2″ material in the boards. See the sketch below, this will give you an approximate location where I placed my pocket holes. One important thing is that you don’t want to have a pocket hole too close to the edge and hit it with the router. See the measurements on edge pocket holes to help avoid that fate.
Because I really really really wanted to avoid a lot of sanding, I decided to also put biscuits in the joints to help with alignment. This is totally overkill and optional, it just helped me this go around. Sometimes I have problems with my Kreg screws shifting one of the boards up. Gluing the top together with biscuits before adding screws was my hope to avoid that and more sanding. 🙂
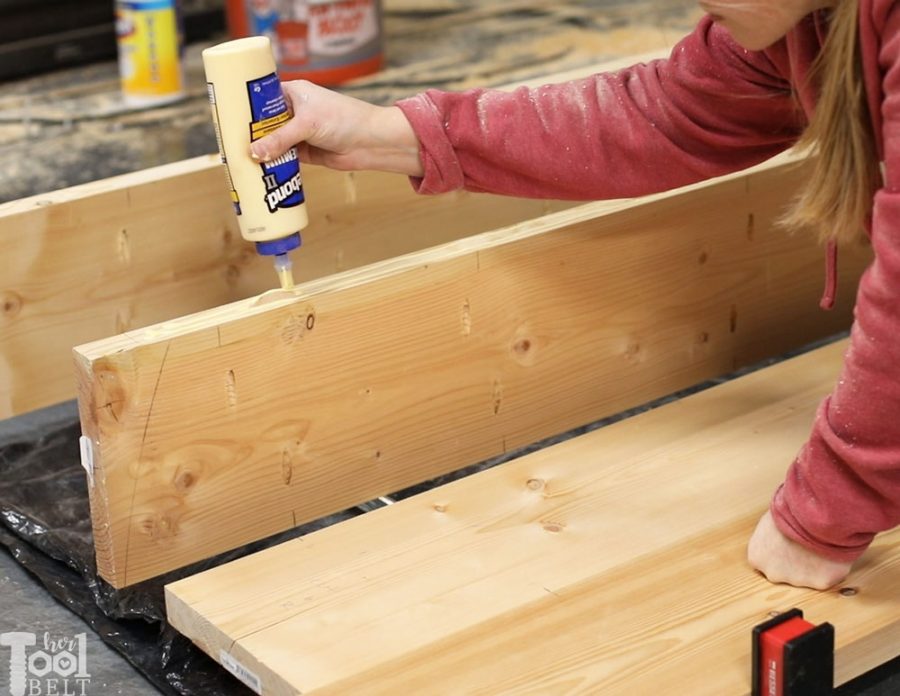
So I cut biscuits along the boards, added plenty of wood glue and clamped the table top together. To make this more manageable, I actually glued up the table in two halves, then later joined the halves together. After the wood glue dried, I went ahead and added the 2 1/2″ pocket holes.
Making the table top a circle
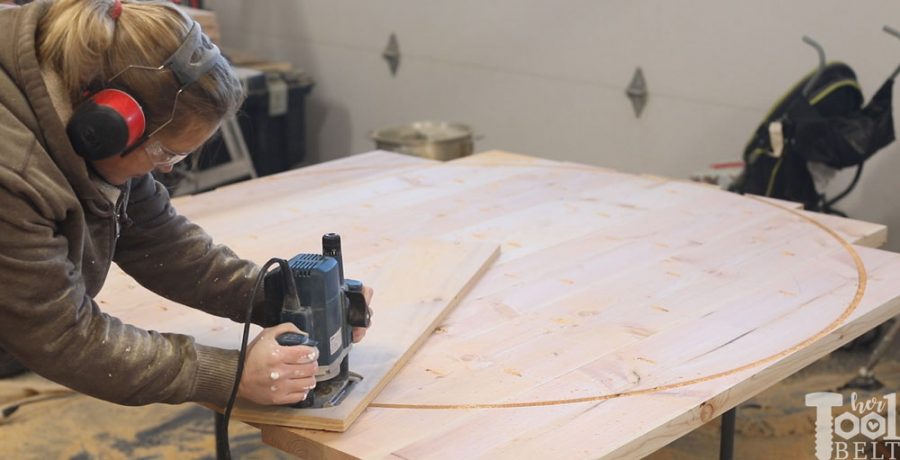
To make the table top into a circle I used a plunge router and straight bit. I routed about 1/4″ down with each pass so not to bog down the router motor. If you don’t have a jig to make a circles, you’ll need to make one really quick. You need a scrap piece of plywood or wood that is about 8″ x 40″. Near the end of the scrap plywood, trace the shape of your router base on the plywood, and use a jig saw to cut out the shape. Place your router base in the newly cut hole and measure from the inside edge of your straight bit 30″ and drill a small hole for a screw to freely spin. Make sure your table top is bottom side up, find the center of the table top and put a screw thru the router circle jig hole into the center mark of the table top. Place the router in the base hole and you’re ready to go to town.
Round and round we go, after 6 or so passes lowering the bit 1/4″ at a time, I had a nice 60″ diameter circle.
Building the Table Base
Leg Layers
To make the base, I used cross half laps for each leg layer. There are a number of ways to cut out the half lap. I used the miter saw and Dremel oscillating tool to do it quickly.
First I set my miter saw depth stop at exactly half of the thickness of the boards (about 1 5/8″ – 1 3/4″ depending on if you planed the boards). Then I measured the width of the mating board, which should be about 5 1/2″ for the 4×6’s and 3 1/2″ for the 4×4’s. I found the center of the board and put a line 2 3/4″ on either side of the center line (or 1 3/4″ for the 4×4’s).
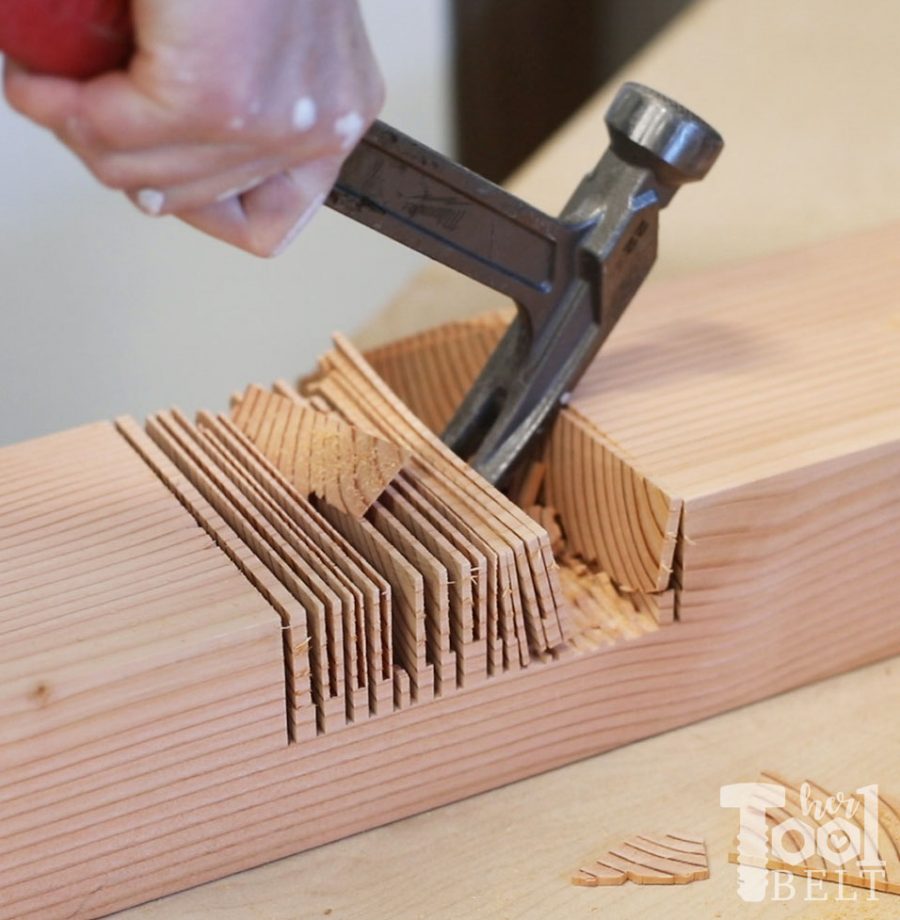
Then I cut fins with the miter saw. One thing I noticed is that on the back side of the cut, it had the round shape of the saw blade, so I flipped the board around, cut fins again so it would be flat all of the way a cross.
After the fins are cut break them off.
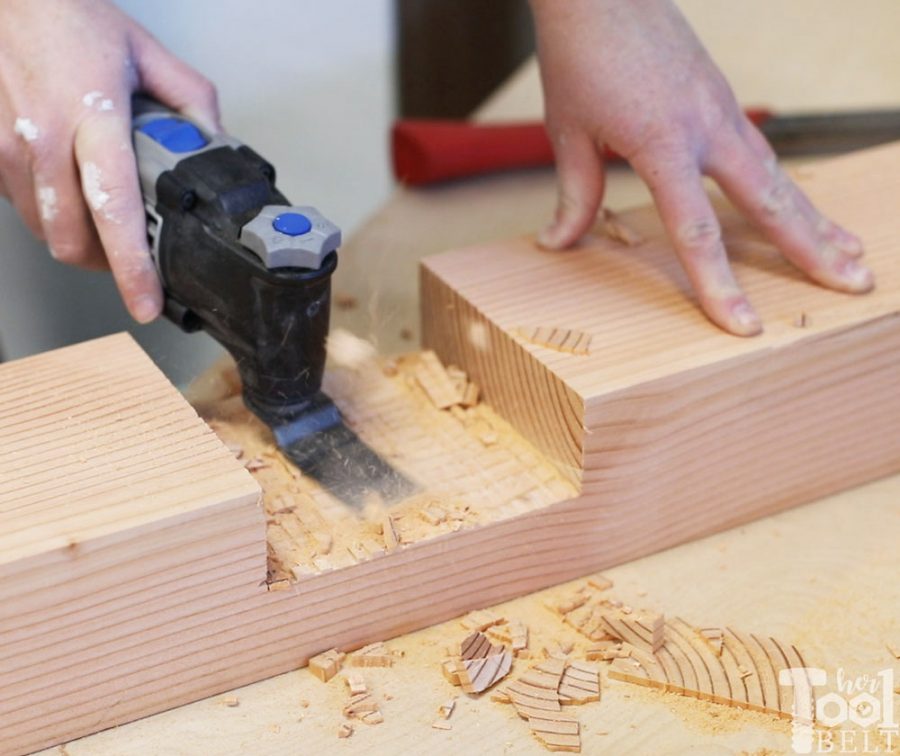
Clean up the bottom of the lap joint with the oscillating tool.
*This is the Dremel MightyMax 3.5 amp oscillating tool. I have tested quite a few mightymax models with varying amperage. The 3.5 has plenty of power for the DIY’er and home projects. It has a simple rotating knob to lock/remove blade accessories, no external tool needed which is awesome! I liked the lever to change out accessories on other models, but it was sometimes awkward and you wished you had a 3rd hand. This model fixes that dilemma. Loosen that gray nut on top, and push down on the blue ‘button’ with one hand and place the accessory with the other, super easy! It is also variable speed, so you can change your oscillating speed depending on your task (varies between 10K – 21K oscillations/minute.)
The oscillating tool made it really quick and easy to get a pretty flat surface.
Once the half laps are all cut, dry fit the boards together and trim as necessary.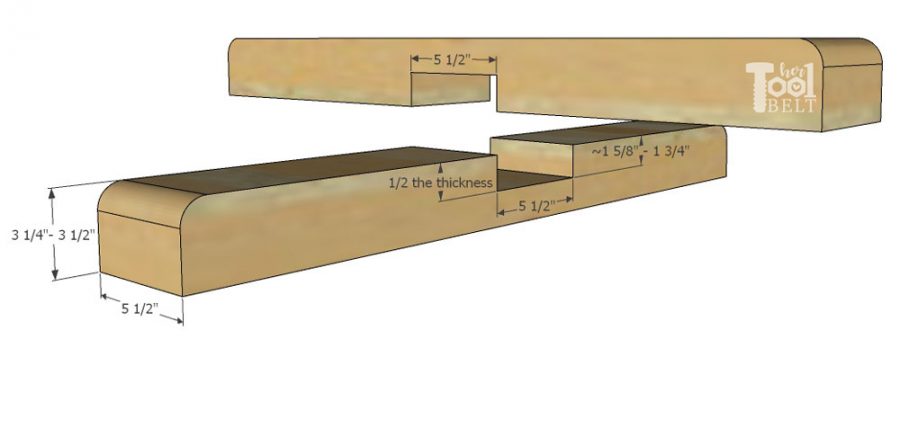
Then apply plenty of glue where the boards will mate, and mate them together and let them dry on a flat surface.
Repeat to make 2 – 4×6 leg layers and 2 – 4×4 leg layers.
Add the Feet
Grab the 1×4 or some scrap wood. Measure the width of the 4×6 boards, should be about 5 1/2″. Cut 4 pieces of 1×4 to the 4×6 width. Then along one of the 5 1/2″ sides, cut a 30 deg angle. This is purely for style and is not necessary.
When a 4×6 leg is dry, use brad nails or screws to attach a foot on the bottom of each leg on one of the 4×6 layers.
Cut Post and Brackets
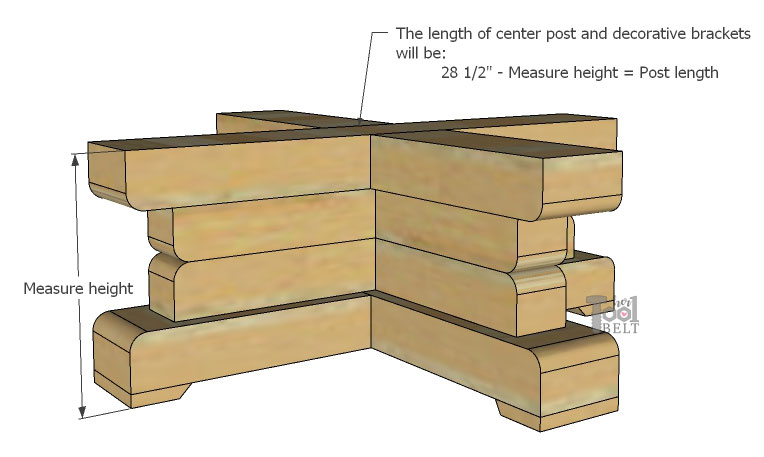
Next we need to measure the leg layers to make sure we get the table height right, since boards vary in thickness.
Stack all of the leg layers and measure the height. Take 28 1/2″ – Measure height and this will be the post and brackets length. Mine was around 15″
Cut the 4×4 center post to the ‘Post Length’. Also cut 4 pieces of 2×10 to the ‘Post Length’ measurement.
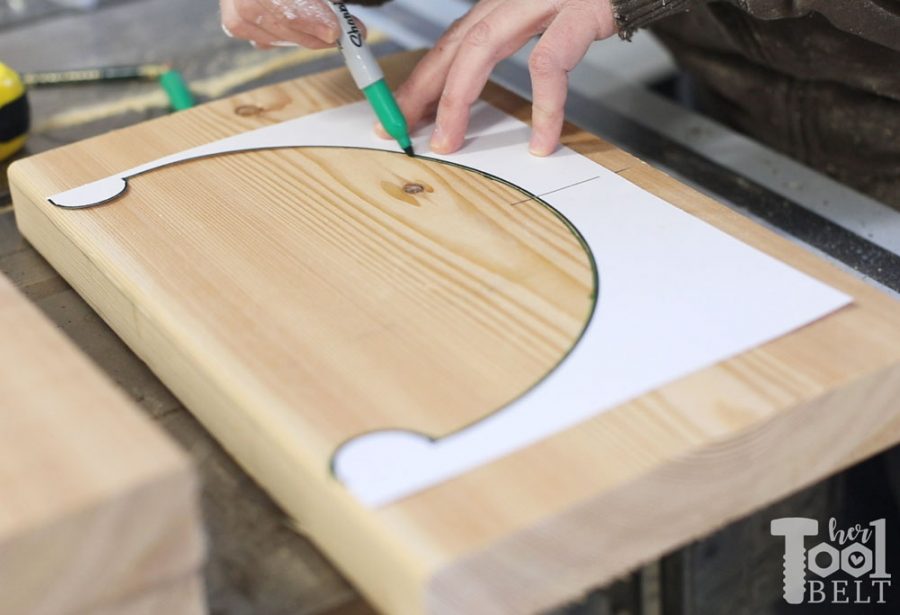
For the brackets, you’ll need the download and print –> bracket template <– Make sure to print it at 100%. The template will not fit the whole 2×10 board, Just line up the left edge and centerline with your board. Then trace the pattern onto your bracket boards, I like to use a sharpie because it’s easy to see while I’m cutting.
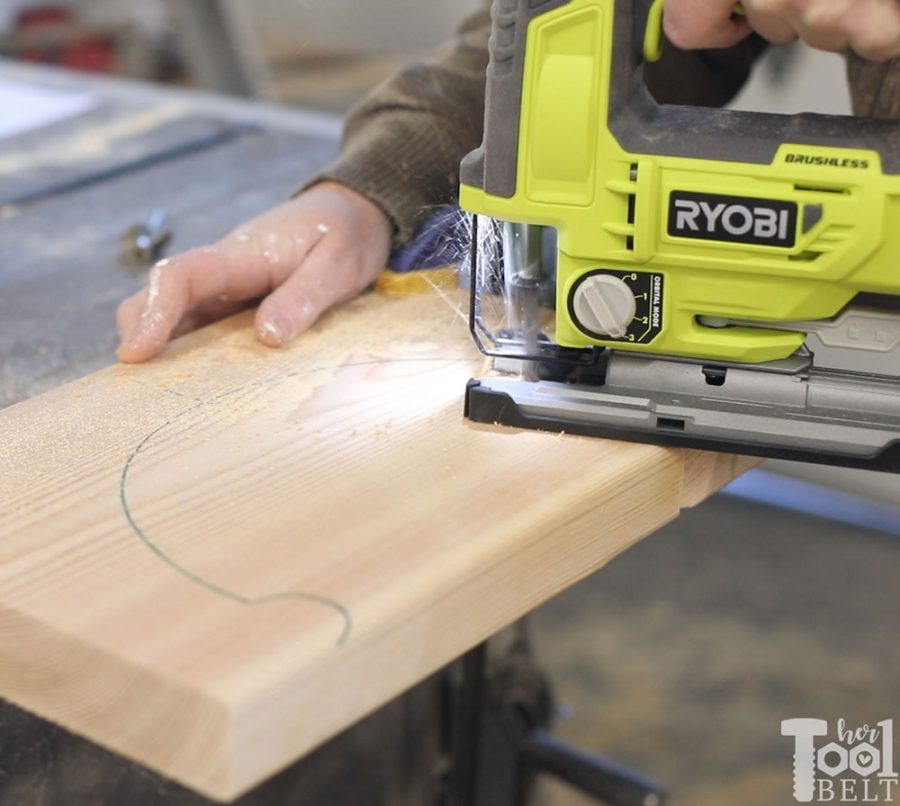
Then cut out the bracket shape. You can use a jigsaw, scroll saw or band saw. I cut the bulk of the material with the jigsaw and did some fine cutting with the bandsaw. I’m still working on my jig saw proficiency. 🙂
*This jigsaw is the new and revamped Ryobi Brushless 18V Jigsaw. The jigsaw body actually bevels to the side or angle cuts, which is new. It has 3 modes and variable speed for different cutting applications. One noticeable difference is the brushless motor that gives you more run time because it’s motor is more efficient, and of course it will run with all Ryobi 18V batteries!!!
Assembling the Base
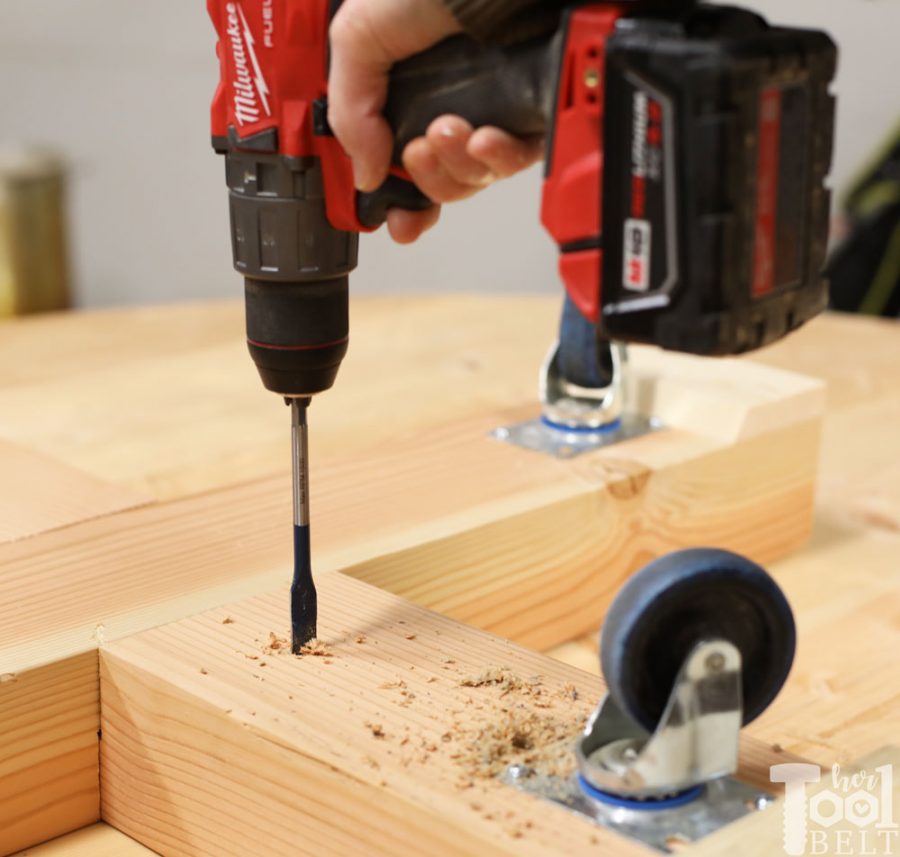
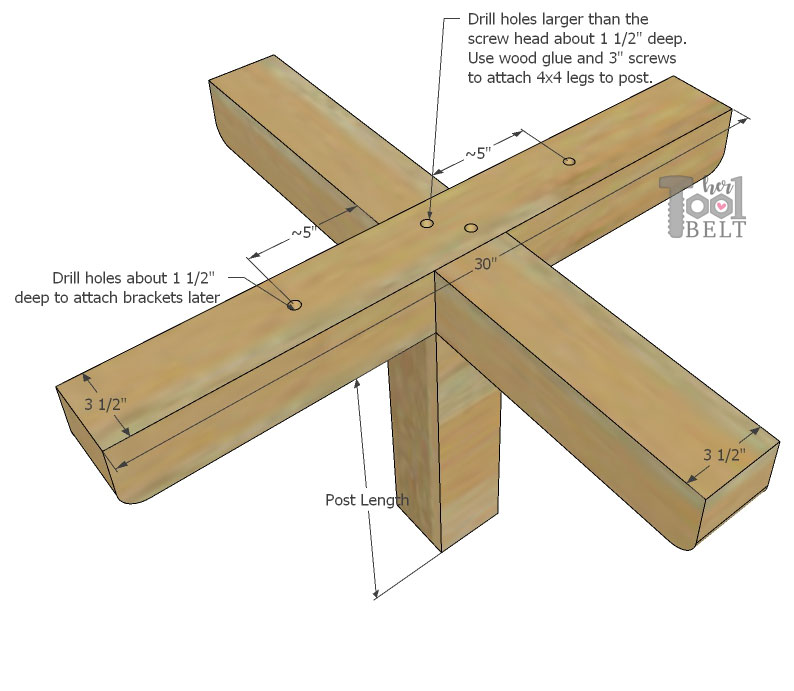
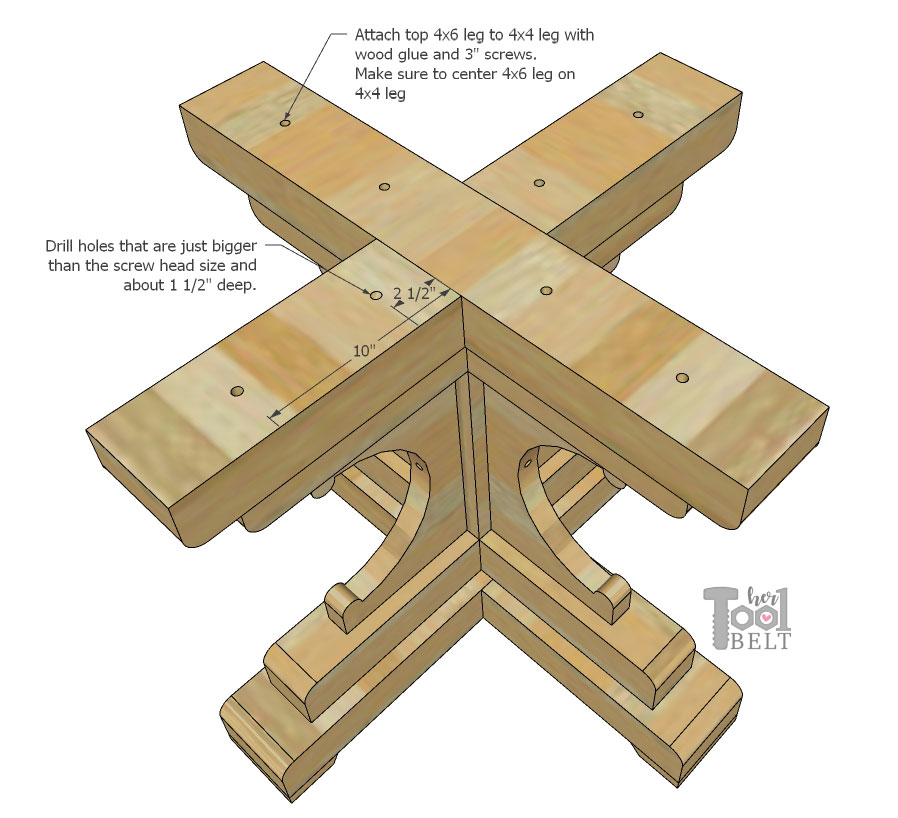
Now it’s time to start stacking the base pieces together. On one of the 4×4 layers, drill a couple holes in the center 3 1/2″ x 3 1/2″ area to attach the base to the post. The holes should be just larger that the heads of the screws you’re using and about 1 1/2″ or so deep. Also drill holes on each leg (4, sorry only 2 holes are pictured) about 5″ out and about 1 1/2″ deep. These are to attach to the brackets later. *To drill the holes in the legs, I used this Daredevil spade bits. They are different from other spade bits, the screw top really grabs into the wood and pulls the bit thru.
Use wood glue and 3″ screws to attach a 4×4 leg layer to the post, centering the post on the leg.
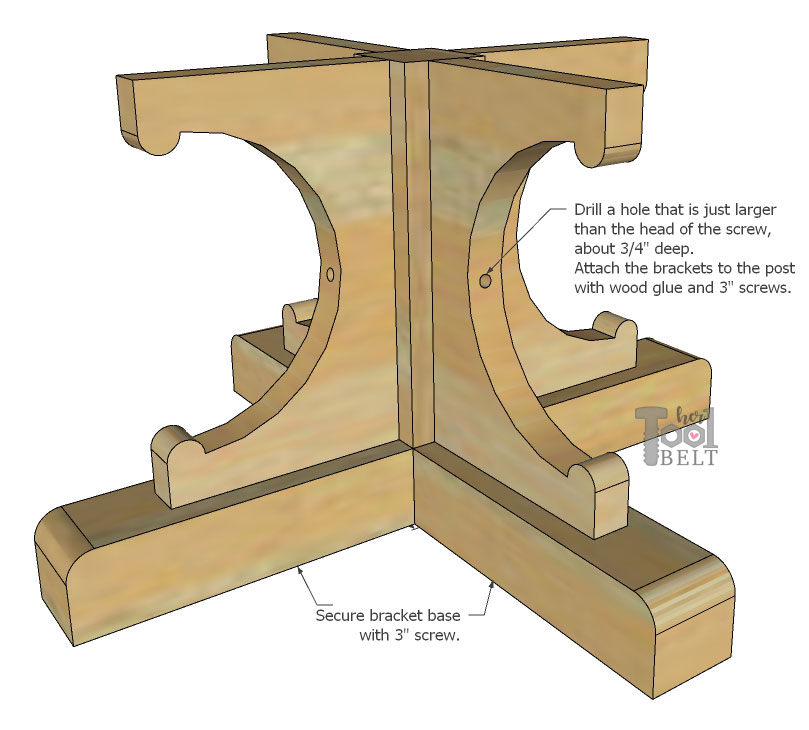
Drill a hole that is just larger than the head of the screw, about 3/4″ in the center of the bracket. Attach the brackets to each side of the post with wood glue and 3″ screws. Also secure the base of the bracket in the hole previously drilled in the leg.
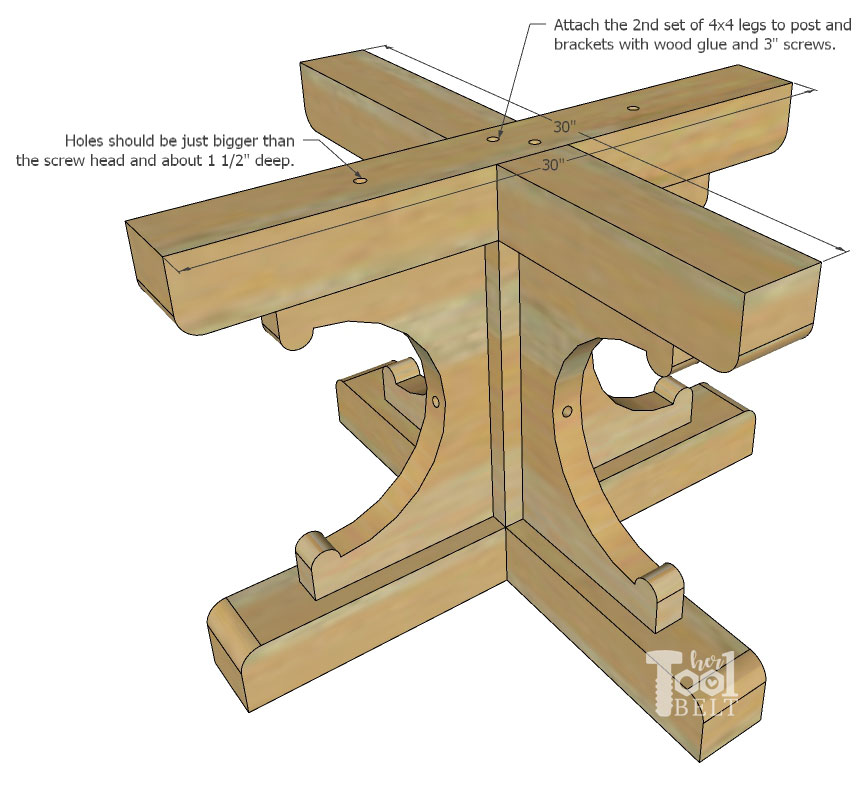
Repeat the same process for the other 4×4 leg layer. Secure to post and brackets with wood glue and 3″ screws. (Note only 2 holes are pictured for the bracket, but there should be 2 more).
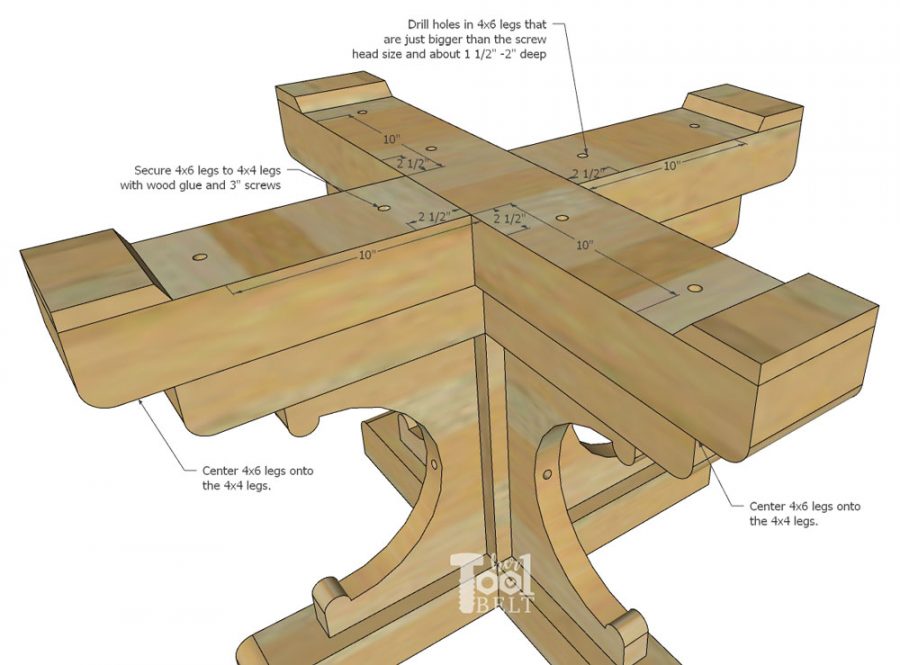
Next grab the 4×6 leg layer with the feet. Drill a couple of holes in each leg, about 2 1/2″ and 10″ out. The holes should be about 1 1/2″ deep. Use wood glue and 3″ screws to attach the 4×6 leg layer to the 4×4 leg layer. Make sure to center the 4×6 layer on the 4×4 layer.
Flip the base over and repeat for the last 4×6 layer.
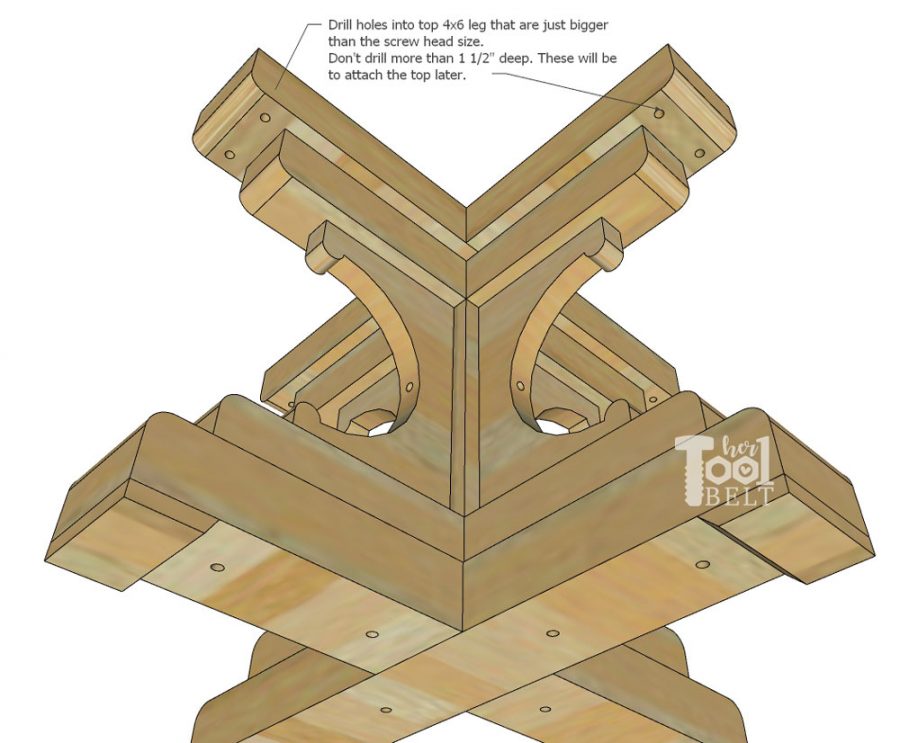
I drilled a couple of holes in each of the legs on the top layer, to attach the base to the table top. These holes should be just bigger than the screw head, but don’t go more than 1 1/2″ deep!
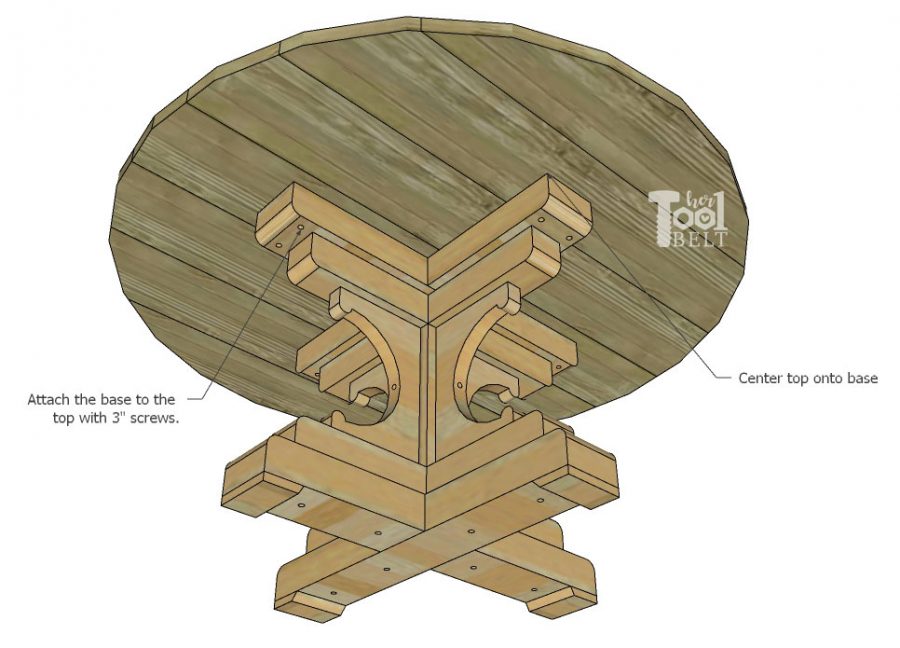
You can either assemble the table now, or wait until you’ve applied the finish. When ready to assemble table and base, make sure the table top is centered on the base. Use 3″ screws to attach the base to the top.
Applying the Finish to the 60″ Round Table
This is how I finished this table.
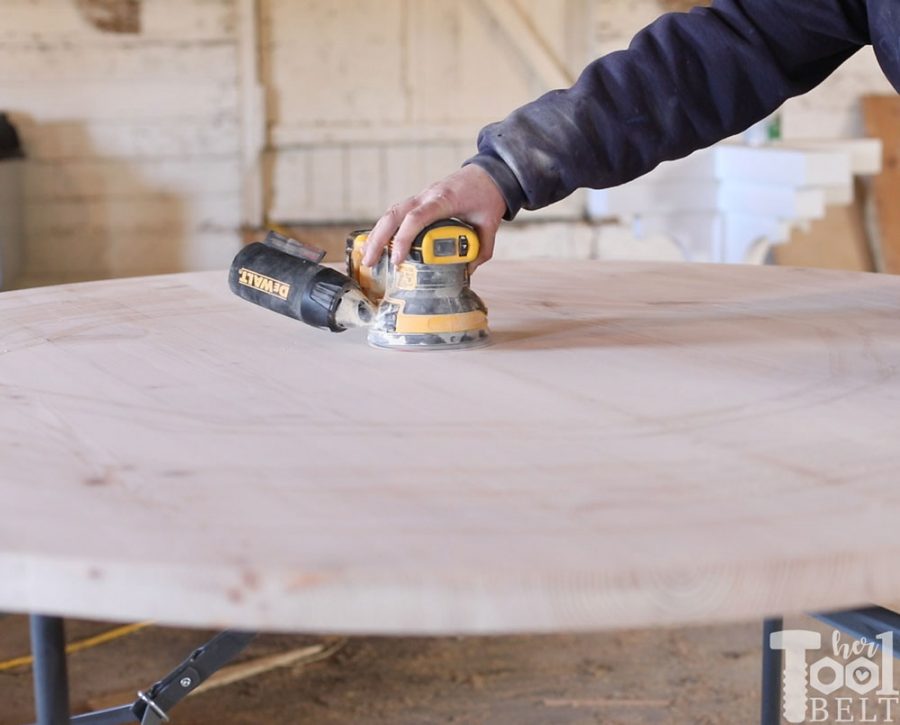
Give the table a good sanding. If you’re painting, I usually stop at 80 or 120 grit. If staining I usually progress to finer grits, starting at 80, then 120/150, the 180/220 or so. Always sand in the direction of the grain if possible.
The table top is stained in Varathane Briarsmoke, currently my very favorite stain color. (Since I was running late on this project, I didn’t have time for the top coat to dry, so I made her do it later 🙂 ) I know really nice aren’t I! Here’s a gift, but you have to finish it, ha ha.
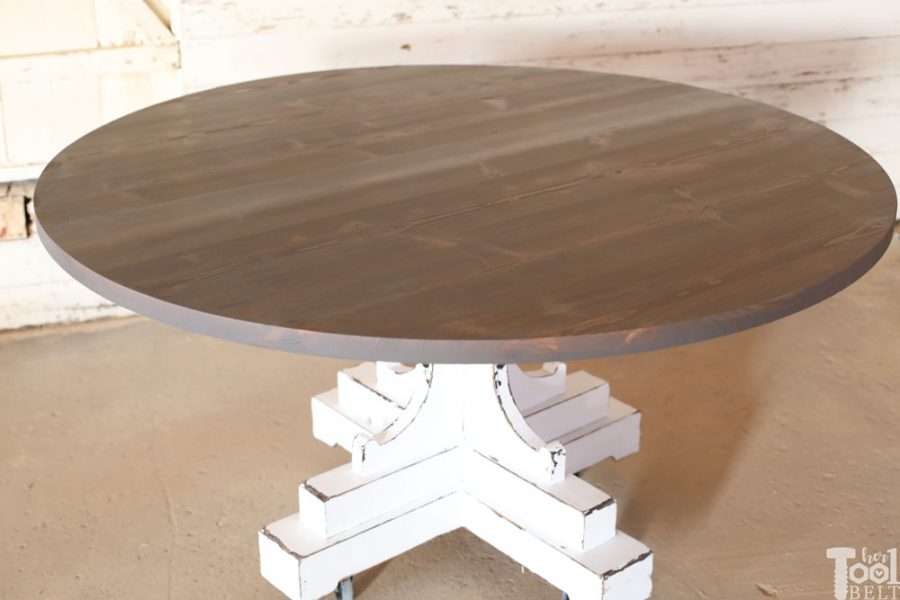 On the base, I stained it in a dark brown color, I believe it was dark walnut and let that dry for a day or so.
Then I applied a little bit of vaseline on the edges where I wanted the chippy paint look.
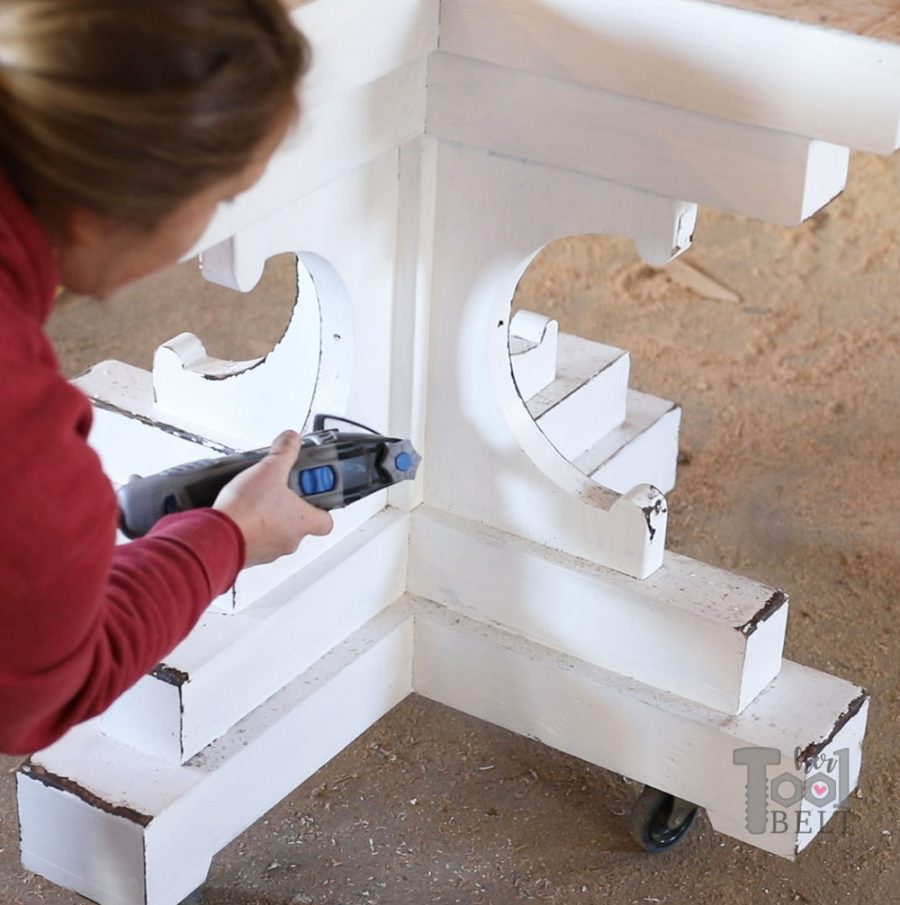
And followed the vaseline with couple thin coats of Behr ultra pure white paint and let the paint fully dry. Once the paint dried, I used the sanding attachment on the oscillating tool to distress the paint. The corners of the oscillating tool sanding pad make distressing really easy.
To finish off the table, I added a 1″ decorative nail head on the center of each bracket to hide the screw.
My sister was thrilled with her new table, and I was thrilled to finish it one hour before the family party on Christmas Eve! 🙂
Thanks for pinning
Download Free —> 60″ Table Plans <—
“I acknowledge that The Home Depot is partnering with me to participate in the Tool Review Program. As a part of the Program, I am receiving compensation in the form of products and services, for the purpose of promoting The Home Depot. All expressed opinions and experiences are my own words. My post complies with the Word Of Mouth Marketing Association (WOMMA) Ethics Code and applicable Federal Trade Commission guidelines.”

Leave a Reply