This post is sponsored by The Home Depot. I have been compensated for my time and provided with product. All ideas and opinions are my own. This post contains some affiliate links for your convenience. Click here to read my full disclosure policy.
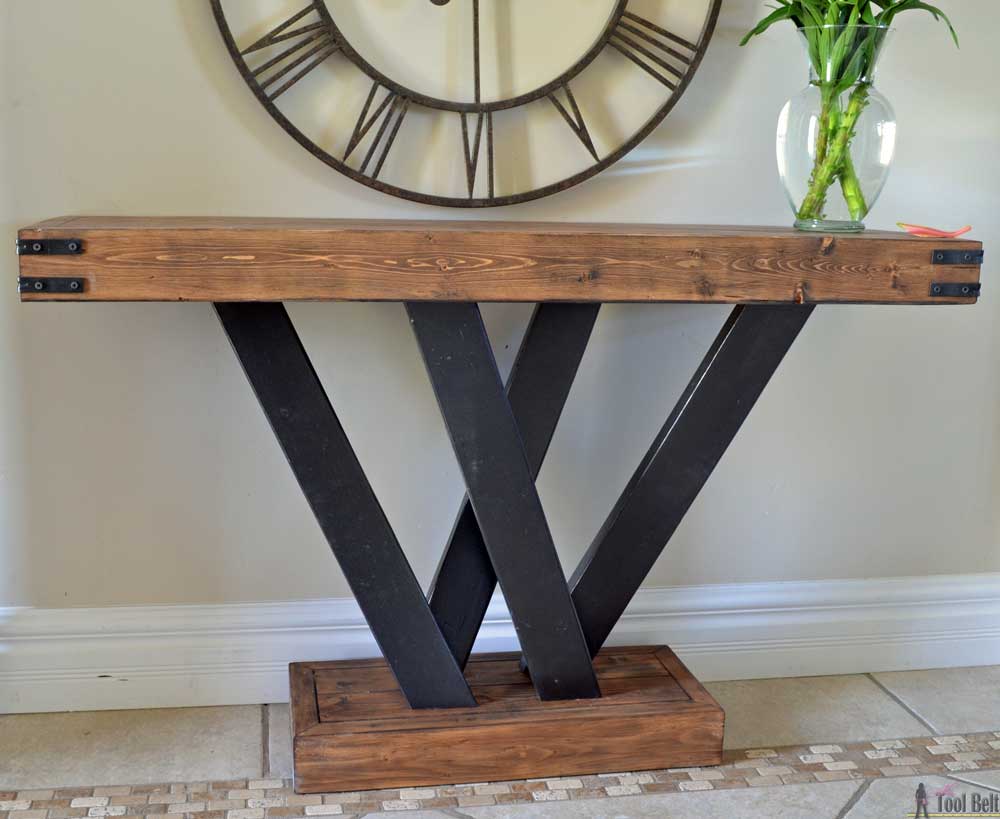
Remodelaholic put out the call and I thought it would be fun to participate in her structural lumber feature week called 2×4 and more. A while back I saw this Modera style console table and wanted to try those funky legs. It was the perfect piece to build out of all 2×4’s and easy too.
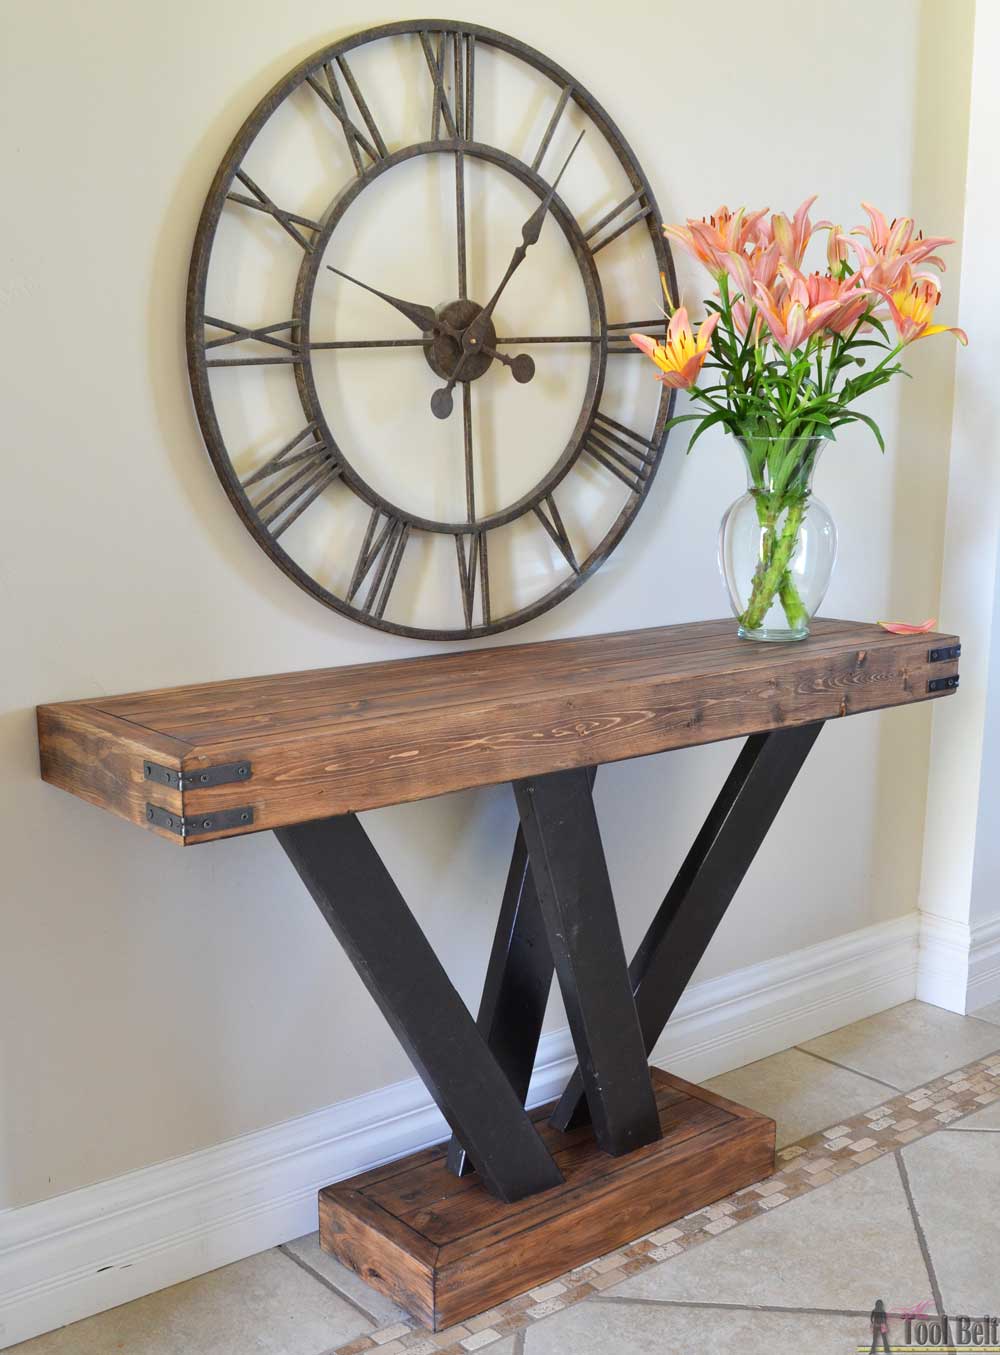
What do you think of that style? I think the console table legs could stand to be a little chunkier, but no matter what angle you look, they look different.
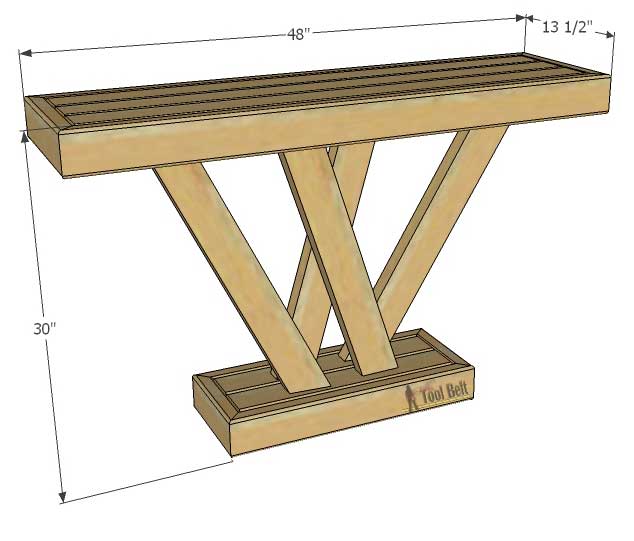
How to Build a 2×4 Console Table
Materials
- 6 – 2″ x 4″ x 8′ studs (actual size 1 1/2″ x 3 1/2″)
- 1 – corner brace (4 pack) – painted with ORB spray paint, optional
- 2 1/2″ pocket hole screws
- wood glue
- Oil Rubbed Bronze Spray Paint
- primer
- stain – golden oak and kona
- Most of the finishing supplies I had left over from other projects, the wood and braces totaled to about $25.
Tools
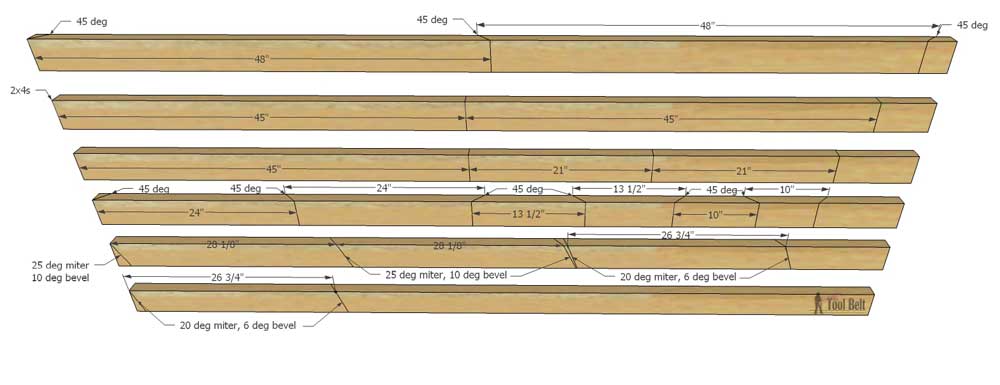
Cut list
- 2 – 1 1/2″ x 3 1/2″ x 48″ with 45 deg bevel cuts on each end facing each other (cut to fit)
- 3 – 1 1/2″ x 3 1/2″ x 45″
- 2 – 1 1/2″ x 3 1/2″ x 21″
- 2 – 1 1/2″ x 3 1/2″ x 24″ with 45 deg bevel cuts on each end facing each other (cut to fit)
- 2 – 1 1/2″ x 3 1/2″ x 13 1/2″ with 45 deg bevel cuts on each end facing each other (cut to fit)
- 2 – 1 1/2″ x 3 1/2″ x 10″ with 45 deg bevel cuts on each end facing each other (cut to fit)
- 2 – 1 1/2″ x 3 1/2″ x 28 1/8″ with a 25 deg miter/10 deg bevel cut on each end facing the same direction (use the 25 deg miter on the right side of 0 deg)
- 2 – 1 1/2″ x 3 1/2″ x 26 3/4″ with a 20 deg miter/6 deg bevel cut on each end facing the same direction (use the 20 deg miter on the left side of 0 deg)
Cut Diagram
Build Video
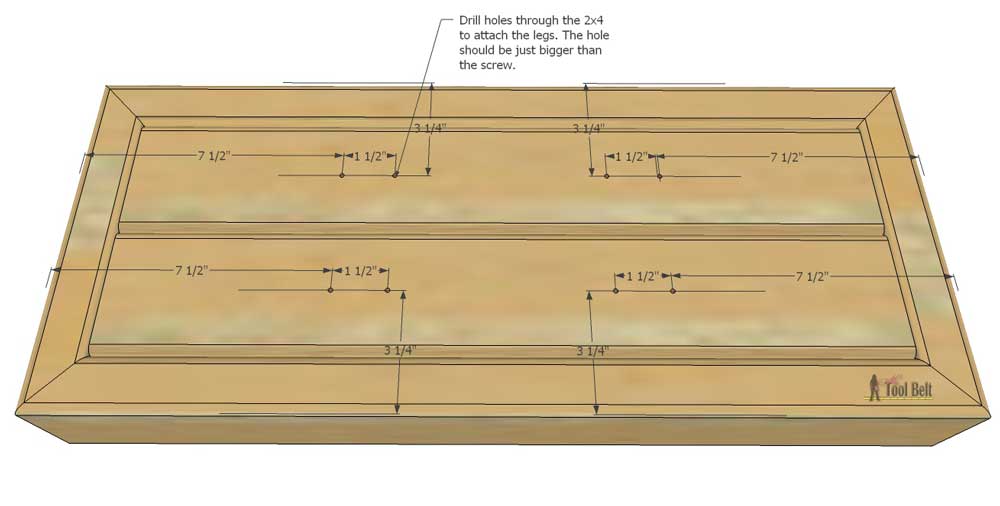
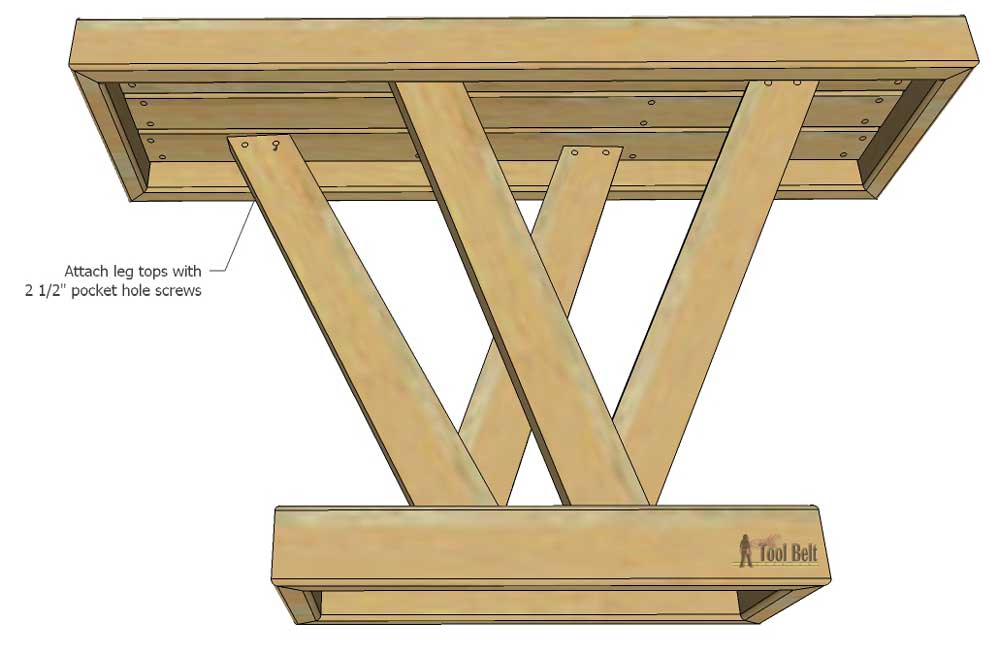
Step 1 – Assemble the Top
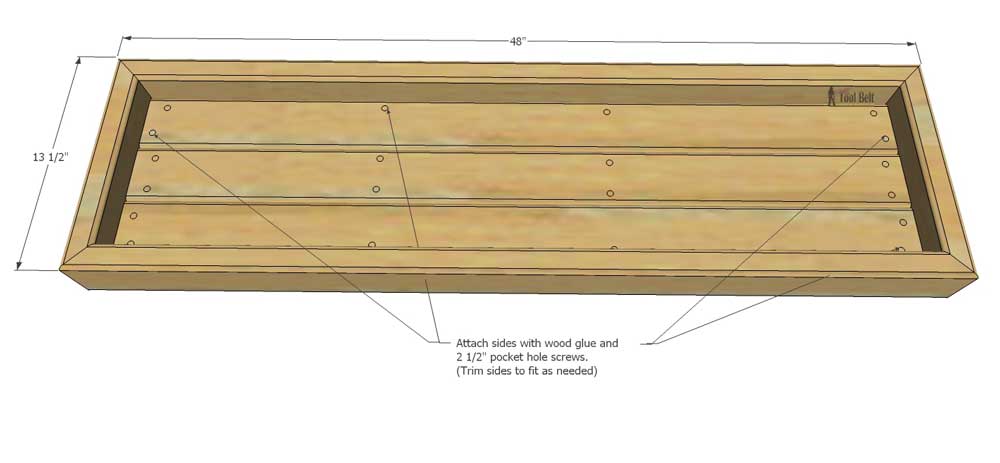
Drill pocket holes for 1 1/2″ material in the 45″ 2×4 pieces. Drill pocket holes to join the 3 boards together and also around the edges to secure the sides on later. Use wood glue and 2 1/2″ pocket hole screws to join the 3 – 45″ together.
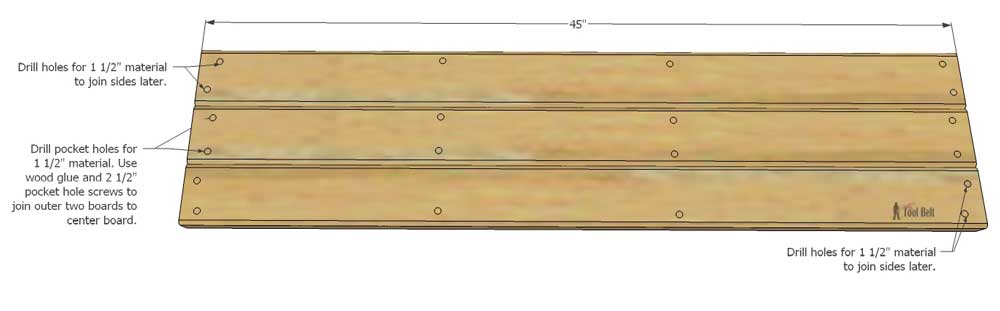
Cut the two 48″ pieces and 13 1/2″ pieces to fit around the 45″ boards. Put the 45″ boards top down and secure the 48″ and 13 1/2″ side boards on with wood glue and 2 1/2″ pocket hole screws. The tops of the side pieces and the 45″ pieces should all be flush.
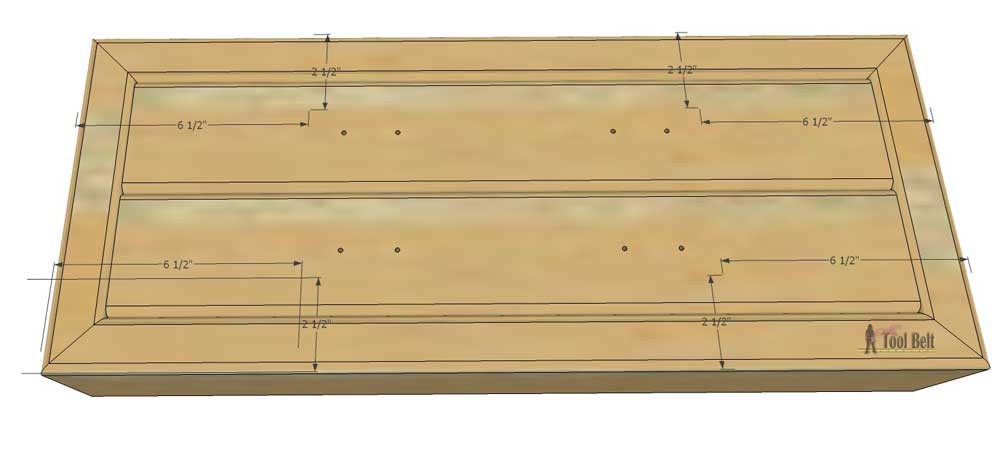
Step 2 – Assemble the Base
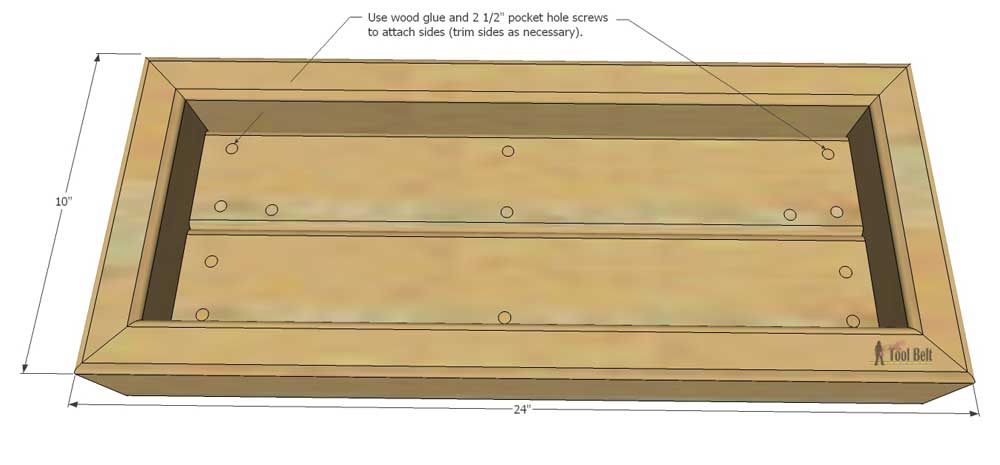
Drill pocket holes for 1 1/2″ material in the 21″ 2×4 pieces. Drill pocket holes to join the 2 boards together and also around the edges to secure the sides on later. Use wood glue and 2 1/2″ pocket hole screws to join the 21″ boards together.
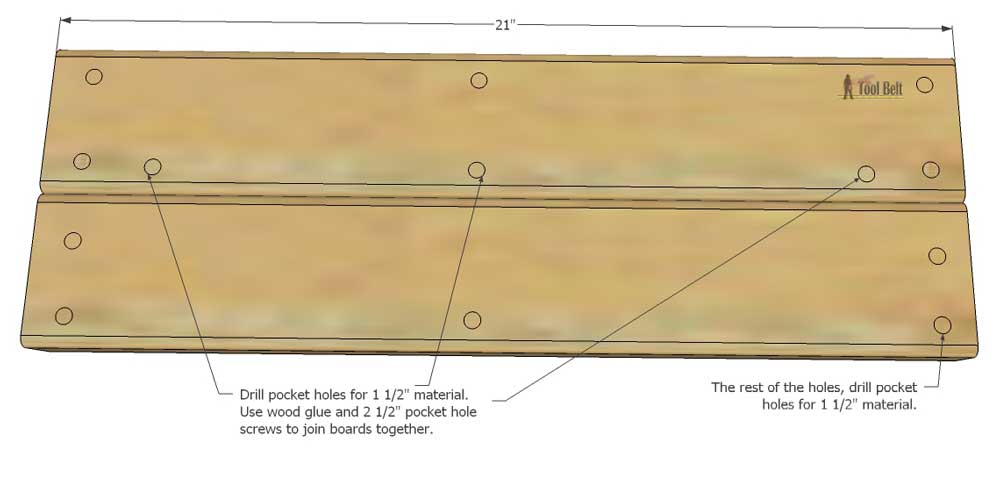
Cut the two 24″ pieces and 10″ pieces to fit around the 21″ boards. Put the 21″ boards top down and secure the 24″ and 10″ side boards on with wood glue and 2 1/2″ pocket hole screws. The tops of the side pieces and the 21″ pieces should all be flush.
Step 3 – Sand/Stain
Sand the top and bottom pieces for convenience before putting the legs on.
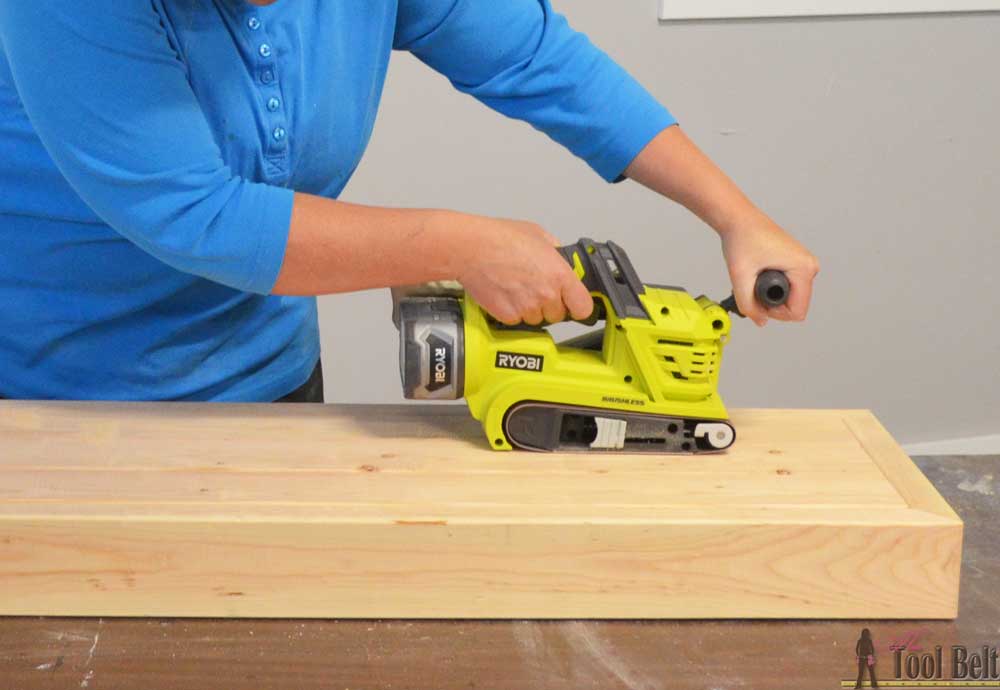

This belt sander is super easy to use, but you’ll need to make sure all of your batteries are charged up, because you’ll go through them. It’s a great tool for small to medium builds and doesn’t make you feel like it’s running away with you. There’s also a trigger lock, so you don’t have to hold the trigger down the whole time!
To tighten up the tension on the sanding belt, rotate the knob in the front. (If your sanding belt starts to wander, tighten it up a bit.)
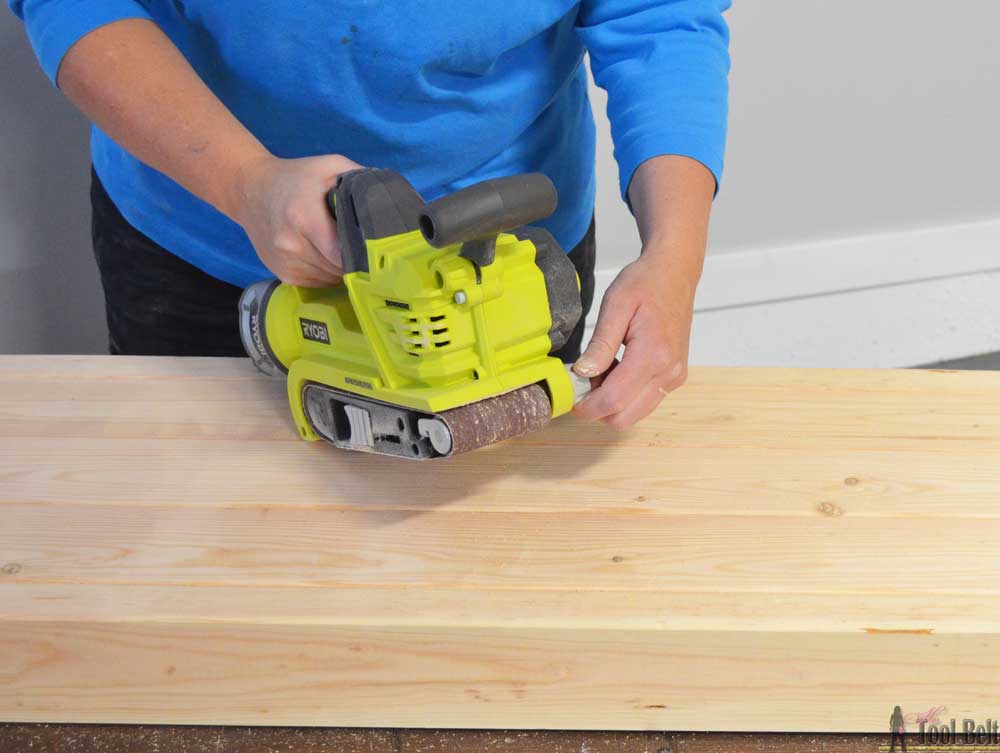
Move the pommel handle by pressing the button and rotating it up or down, so it’s comfortable for you.
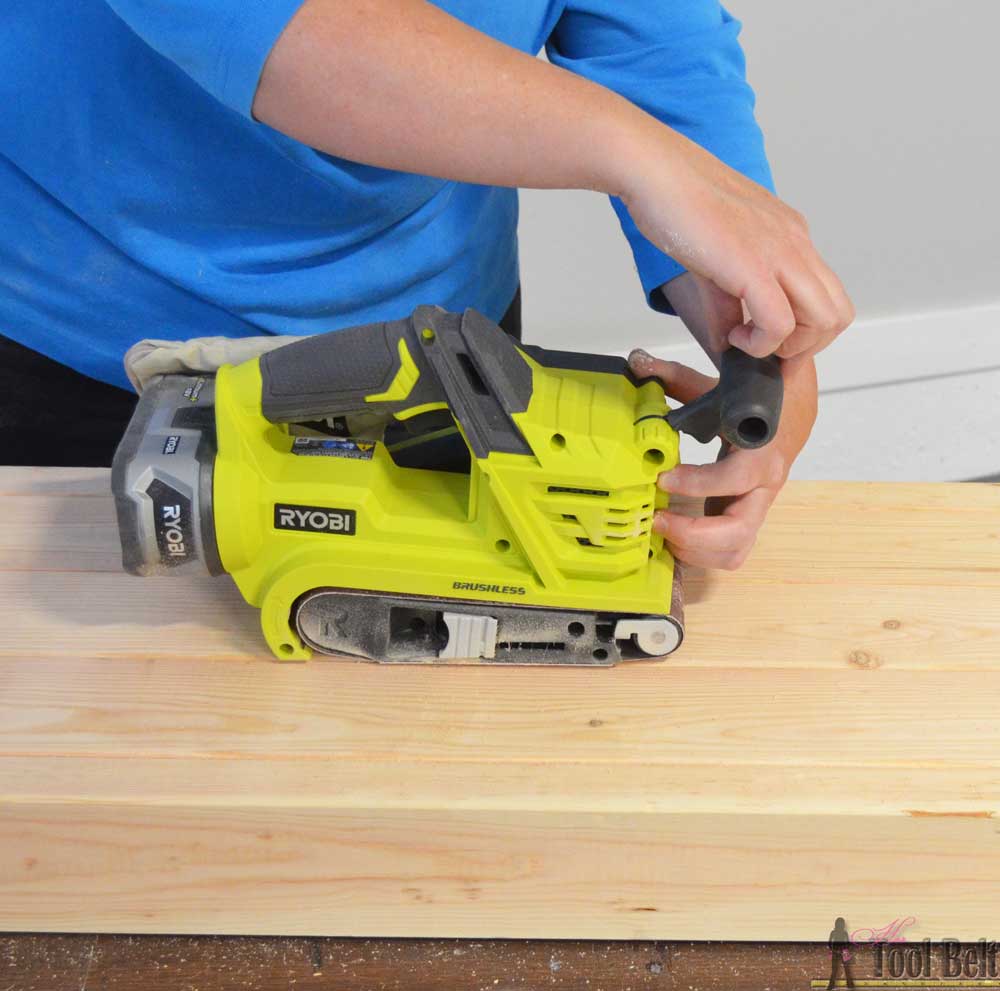
If you need to change the belt, loosen the tension and pull the side lever and that’s it.
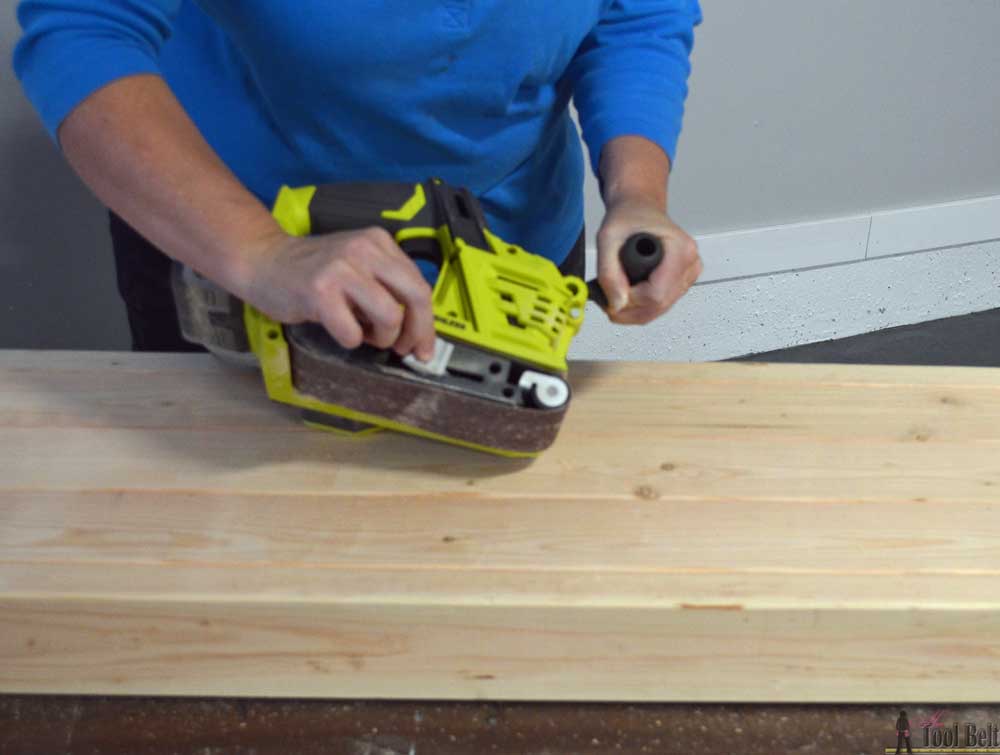
Belt sanders are made to remove a lot of material, so the grit is usually pretty rough and will leave scratches. If you’re going to stain your table, then follow it up with 120 or finer grit paper with your regular sander. Sand in the direction of the wood grain.
For this finish, I rubbed a light coat of golden oak stain onto the top and bottoms. I used a chip brush and dry brushed (put a little amount of stain on the brush and dab off onto a paper towel) the Kona sparingly onto the top and bottom, focusing mostly on the edges.
Step 4 – Prep for Assembly
Drill thru holes in the base for the legs. The hole diameter should be just large enough to fit the screw through. Drill 2 holes per leg about 3 1/4″ from the long side and 7 1/2″ & 9″ from the short side.
Mark the outside corner location for each leg.
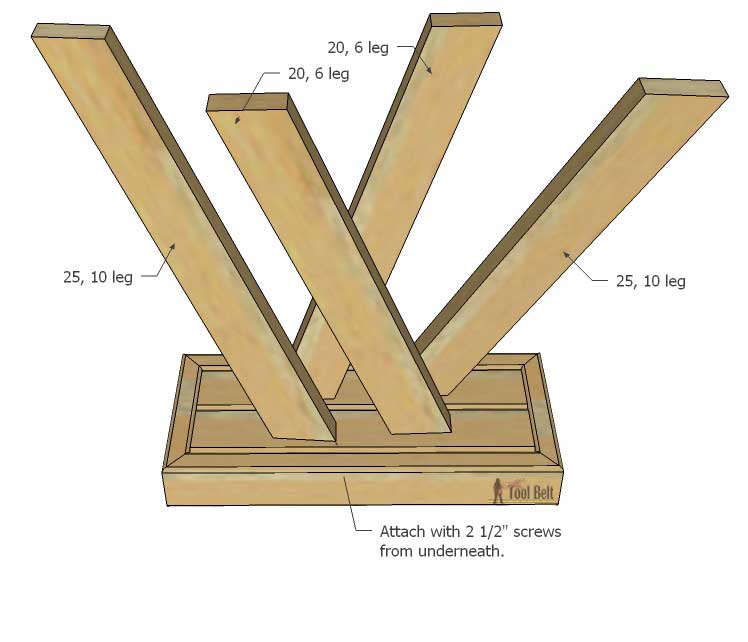
Inspect your legs and decide which one is going where. The 25/10’s will angle outward and go from front/back. The 20/6’s will angle inwards and stay either front or back.
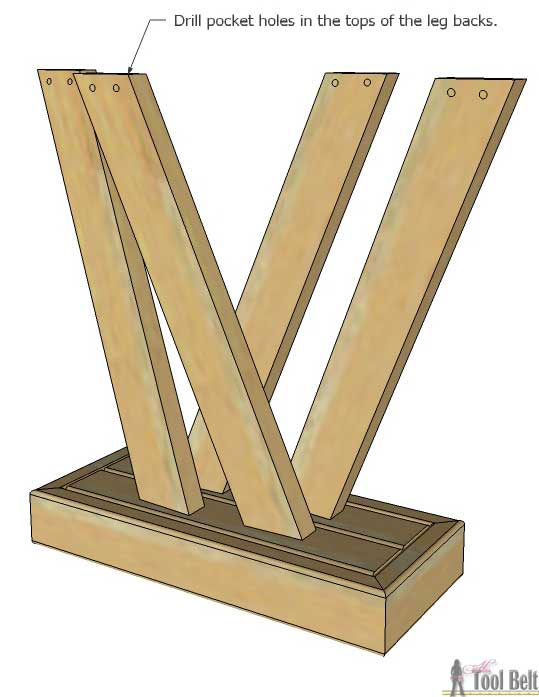
Drill pocket holes in the tops of the legs on the BACKSIDE.
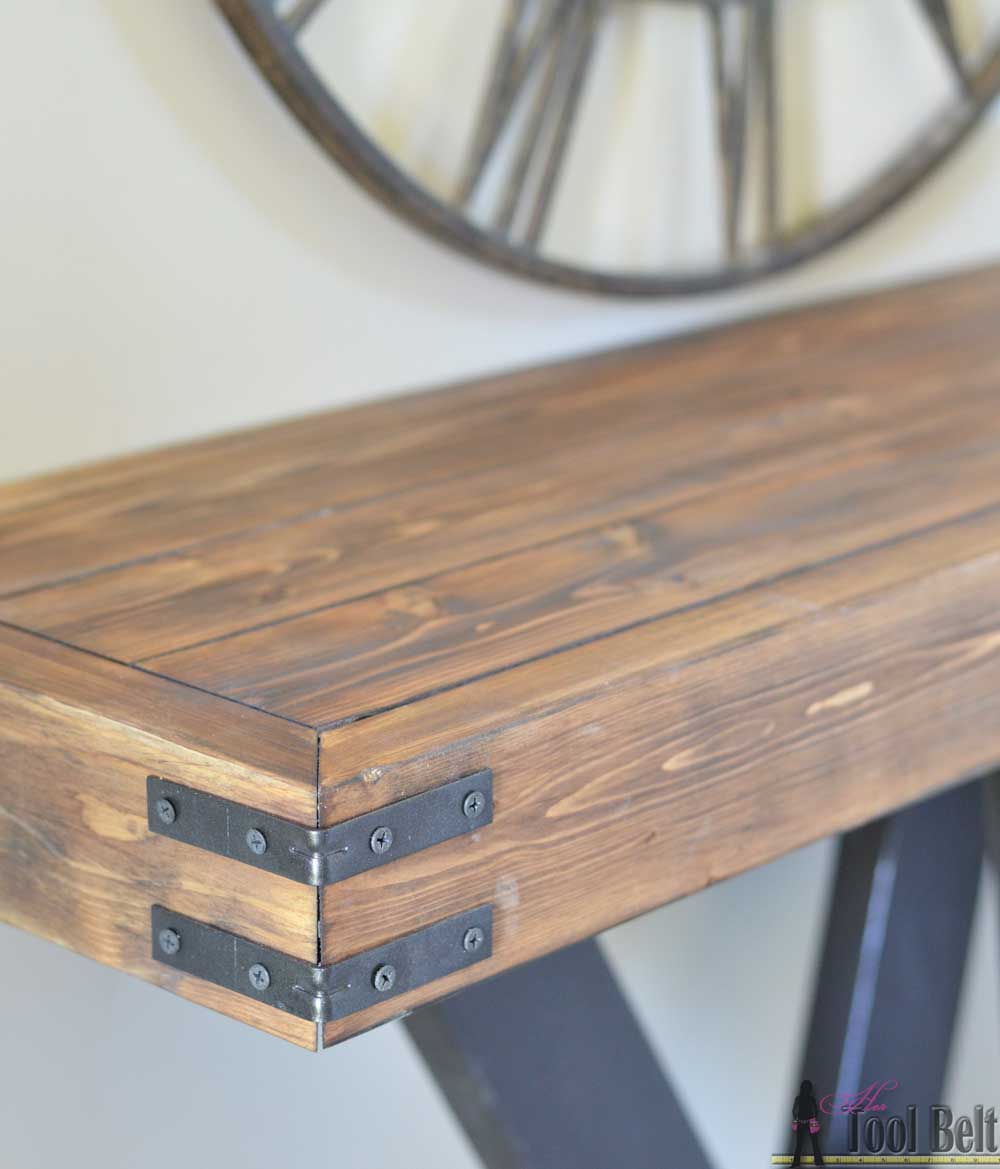
Tip for ORB legs – Sand the legs smooth and apply paint primer, let dry. Lightly sand the dry primer and spray evenly with Oil Rubbed Bronze spray paint and let dry. Spray the corner braces now too.
Step 5
From under the base, attach each leg with a 2 1/2″ screw. Then place the top over the legs and secure the legs with 2 1/2″ pocket hole screws.
Front view of the console table.
Thanks for pinning the 2×4 console table.

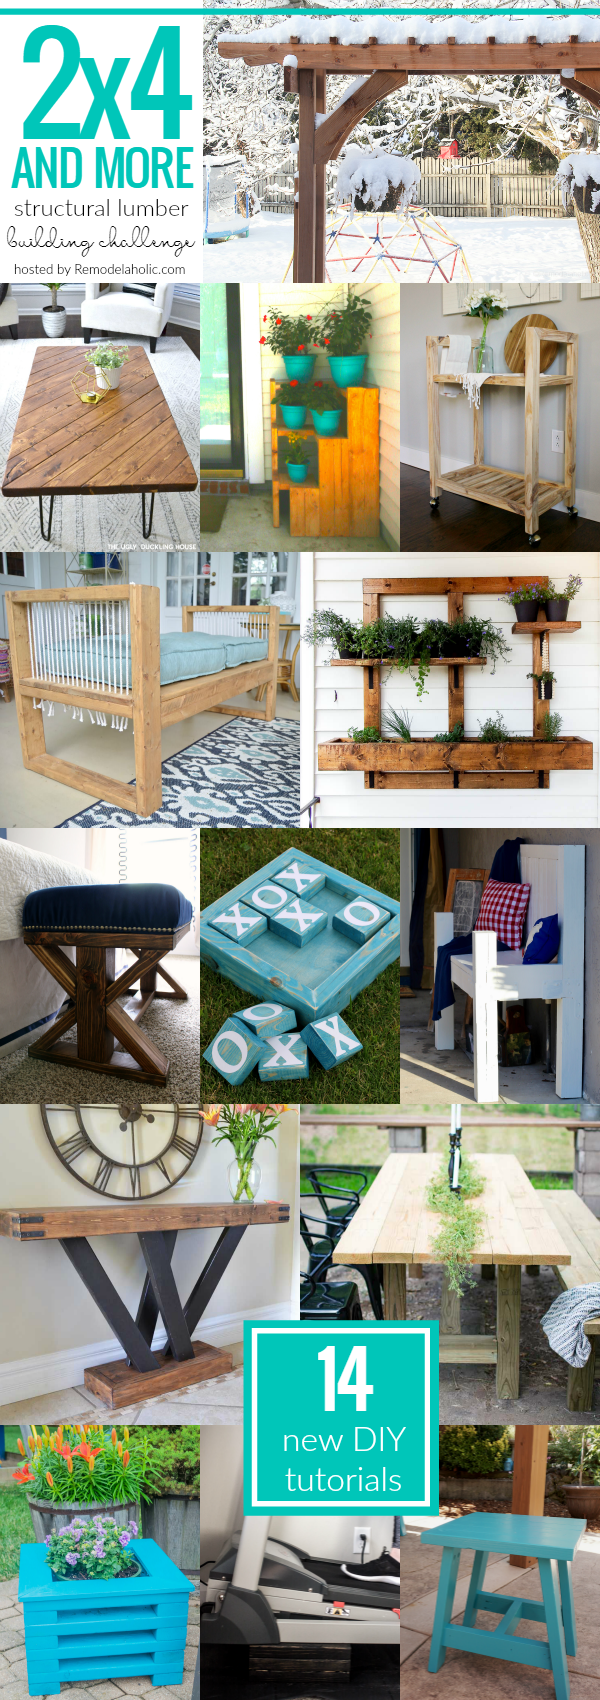
Check out all of these fun 2×4 and more projects:
garden arbor | Remodelaholic
15 minute coffee table | The Ugly Duckling House
tiered corner plant stand | Charleston Crafted
single-board rolling bar cart | Woodshop Diaries
outdoor bench w/rope detail | At Charlotte’s House
wall planter and herb garden | Making Joy and Pretty Things
upholstered x-base bench | Frazzled Joy
jumbo tic tac toe | Ginger Snap Crafts
porch bench | Everyday Party Magazine
console table | Hertoolbelt
farmhouse patio table | North Country Nest
easy flower planters | Our House Now a Home
treadmill incline | Practical and Pretty
patio side table | Small Home Soul
You can check out lots of structural lumber builds at the 2×4 and more feature week hosted by Remodelaholic.
“I acknowledge that The Home Depot is partnering with me to participate in the Tool Review Program. As a part of the Program, I am receiving compensation in the form of products and services, for the purpose of promoting The Home Depot. All expressed opinions and experiences are my own words. My post complies with the Word Of Mouth Marketing Association (WOMMA) Ethics Code and applicable Federal Trade Commission guidelines.”
As always, your design is gorgeous and you don’t leave out a single detail! I love the look of black mixed with stain. This turned out super cool and would be the perfect entry table!
Love this! That sander is pretty amazing, too. I’ll have to check it out. 🙂
Oh my gosh… all those angles are SO intimidating to me! :0 One day, I’ll just have to bite the bullet and try! (I can barely manage a 90 degree one… ) Ha! I love it!
I love your console table, the design is awesome and unexpected but it works beautifully. I love all your building projects, they inspire women and give them the courage to build their own furniture 🙂
Seriously such a cool design! I love the black on the legs – they look metal at first glance :). Great job!
What color did you paint the walls? I love the look!
Hi Sheryl the walls are botany beige.
Hello – I love the clock. Have been looking for a similar one but everything seems so flimsy. This one looks like it has substance. Can you tell me where I can find it? Many thanks.
Hi,
This is the specific clock, I bought it 9 years ago and it’s been great. https://www.amazon.com/gp/product/B00112VBXQ/ref=ppx_yo_dt_b_asin_title_o00_s00?ie=UTF8&psc=1
Amazon does have many similar clocks in stock. https://amzn.to/2VrzPDF
This is such a creative design for a console table! I especially love the brackets around the top – adds an industrial flair! Great Job!
Would using 2×6 for the legs necessarily require an adjustment for the leg screw hole locations on the bottom stand? Also wouldn’t pocket holes be stronger for the legs rather than putting screws through the cut ends of the legs through the bottom stand? I really like the look of the table.
Yes you should be able to use the same holes in the base for 2×6’s. Pocket holes would probably be stronger and easier for assembly, since I was screwing into end grain, which isn’t the strongest method. I didn’t use pocket holes because I was lazy and didn’t want to fill them. 🙂
This is a great looking table. I really want to make, soon. You used 2×4 that are “normal”, so the corners are rounded off. I don’t have a table saw but I was thinking that since Home Depot will do cut for you, I could have them trim the edges so the boards are square.
This would make the table totally flat. Just curious if you think that is a good idea or a bad idea?
Does the way you did it, add to the rustic vibe?
Hi Drew,
I think your idea is great if you want it to be flat. However I know HD can cut boards, but I’m not sure if they can rip them to get rid of the rounded edges. Worth asking though. You can probably rip the edges off with a circular saw and a straight edge if the HD can’t.
Thank you. I appreciate the feedback.
I had made a comment and it was not published
As soon as I saw this table I fell in love with it since my last name is Weaver. My wife and I are redoing our living room and I thought this would make a perfect tv stand I used six 2×4’s across the top and four on the bottom and also made it longer to accommodate a 70″ tv. This is my first woodworking project and I’m so happy with how it turned out.
Thanks so much for sharing the plans and for taking the time to make the video.
I wish I knew how to attach a picture here so you could see what you helped accomplish.
Hi! This looks amazing! I love industrial design. I have a question: is possible to buy this creation? Thanks for inspiration.
Laura from Italy
Love the design and look and will create one. I’ll have to figure out how to increase the bottom and make the top sturdier since I’d like to make an “M” rather than a “W”.